
Search Our Database
How to Set Up Site-to-site IPSec VPN in pfSense
Introduction
A Site-to-Site IPSec VPN (Virtual Private Network) enables organizations to securely connect two separate local networks over the public internet. Network administrators configure this in pfSense when branch offices need to access shared resources at the headquarters securely. By establishing encrypted tunnels using IPSec, data transmission is protected against unauthorized access. This guide will walk you through setting up a reliable and secure Site-to-Site IPSec VPN between two pfSense firewalls, ensuring seamless communication between your isolated networks.
Prerequisite
- Access to two pfSense firewalls with Administrator privileges.
- Static Public IP addresses assigned to both pfSense WAN interfaces.
- Non-overlapping Local Area Network (LAN) subnets for both sites (e.g., Site A: 192.168.1.0/24, Site B: 192.168.2.0/24).
- A Pre-Shared Key (PSK) generated for secure authentication.
Step-by-step Guide
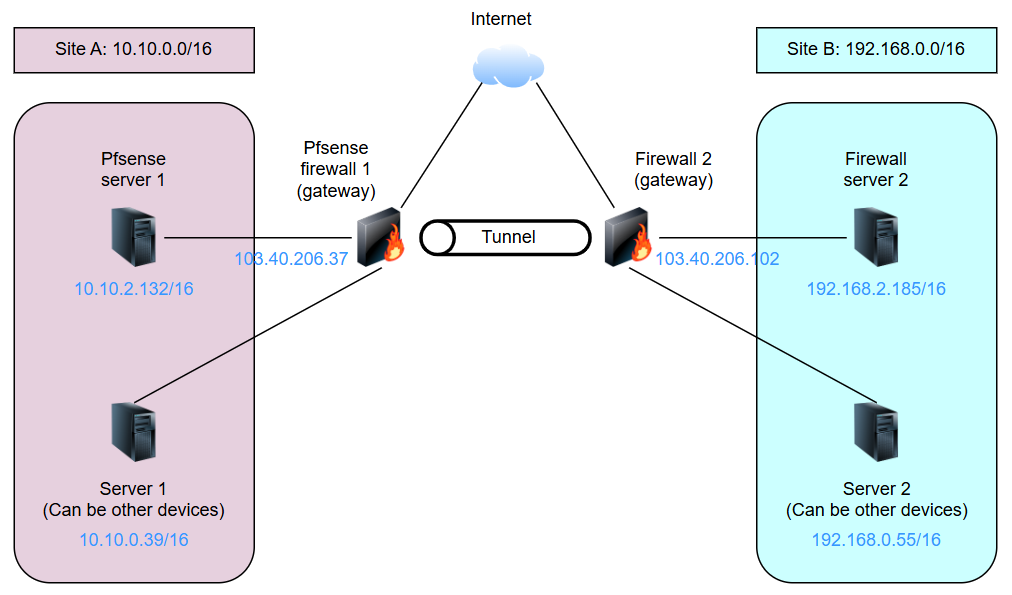
Example diagram for this guidance:
Step 1: Configure IPSec Phase 1 on Site A
- Navigate to VPN > IPsec and click on + Add P1.
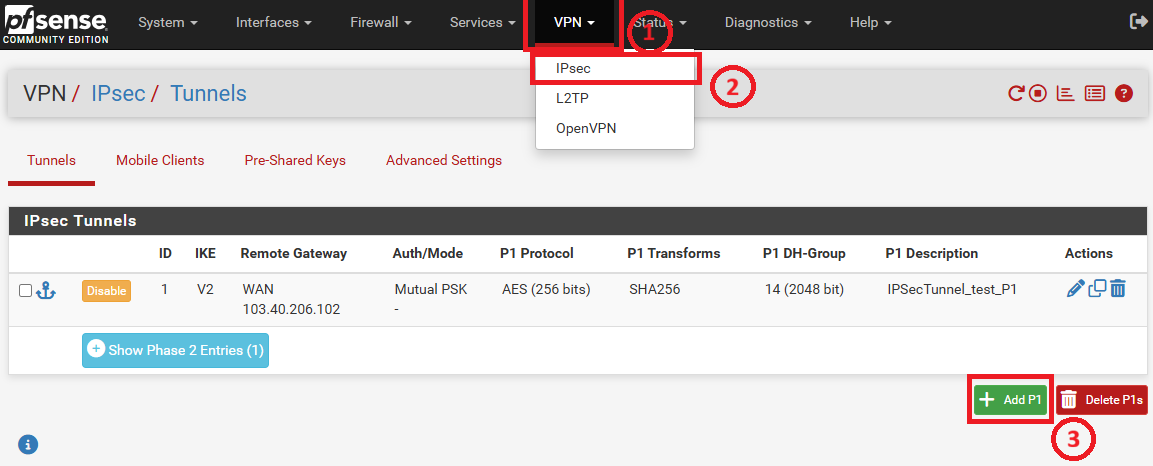
- Configure the following parameters:
- Description: Enter a descriptive name for Phase 1. In this example, IPSecTunnel_test_P1 is used.
- Remote Gateway: Enter the public IP address of your Site B. For example, 103.40.206.102 is used here.
- Pre-Shared Key: Enter your secure key in this field. You may click on the Generate new Pre-Shared Key.
- Encryption Algorithm – Key length: Choose at least 256 bits.
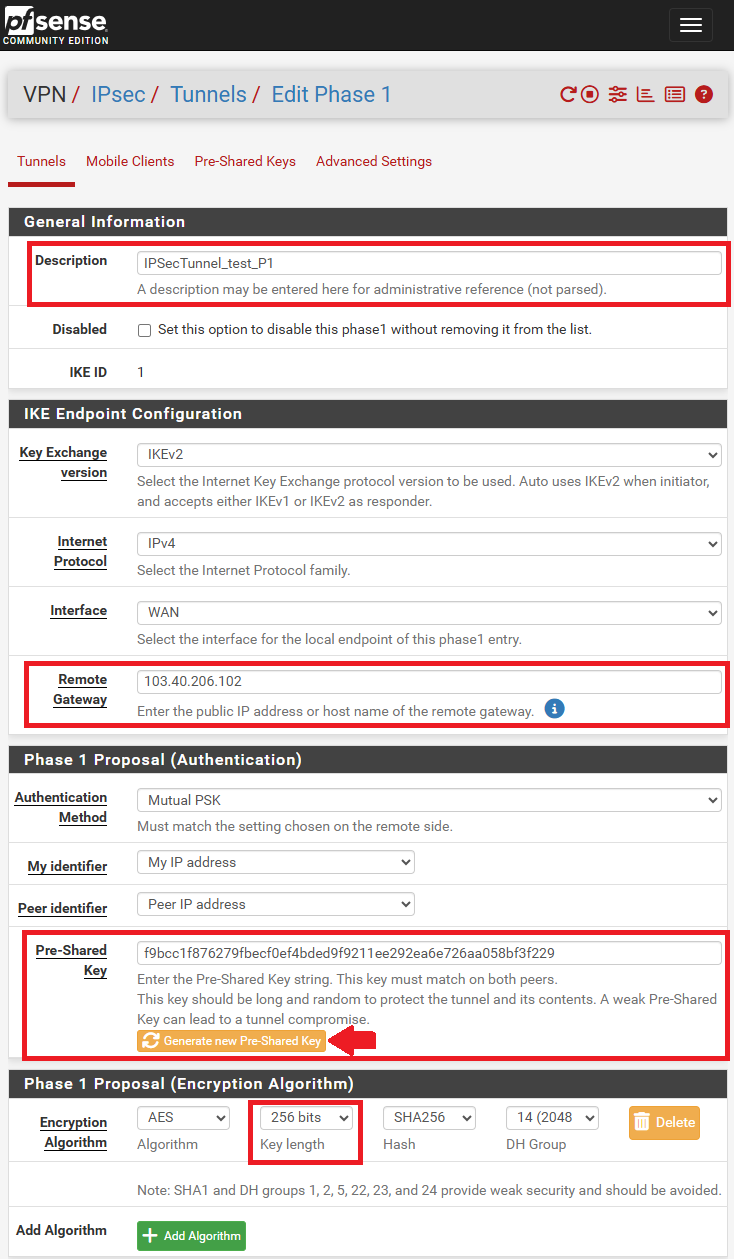
- Lastly, don’t forget to click Save at the very bottom, then click on Apply Changes.
Step 2: Configure IPSec Phase 2 on Site A
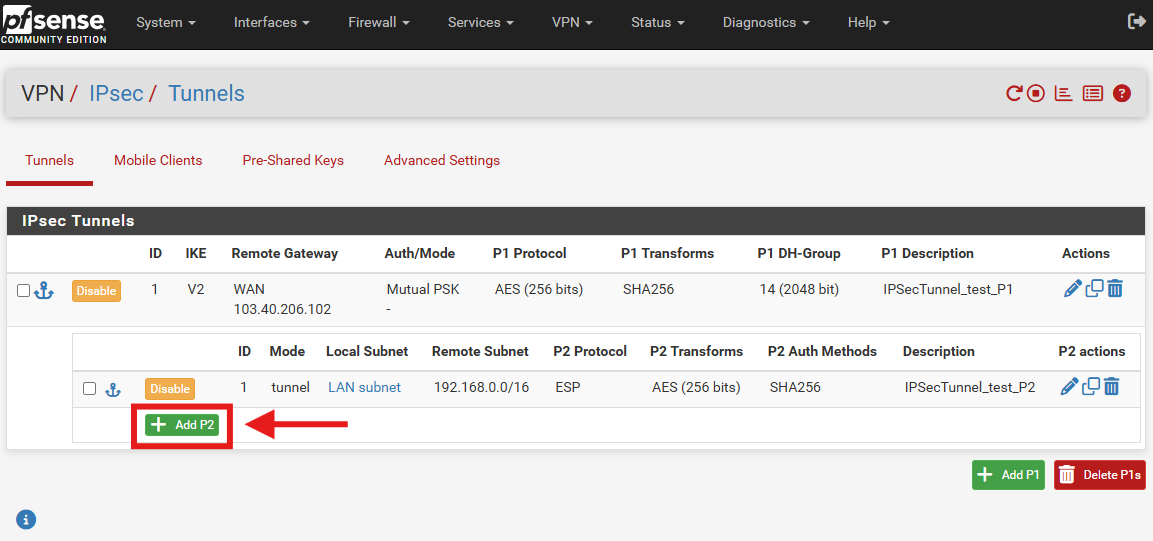
- Expand the Phase 1 configuration you just created by clicking the Show Phase 2 Entries button.
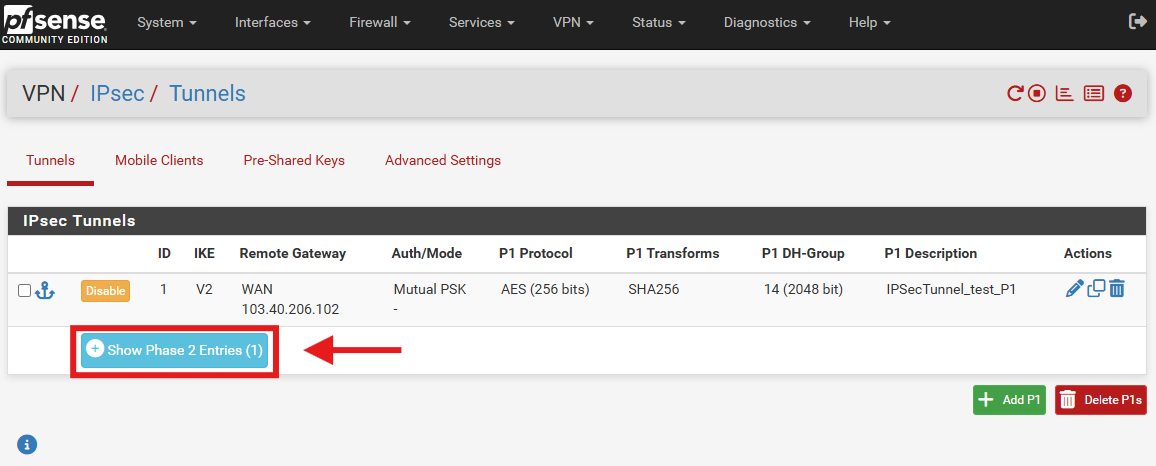
- Then, click on + Add P2.
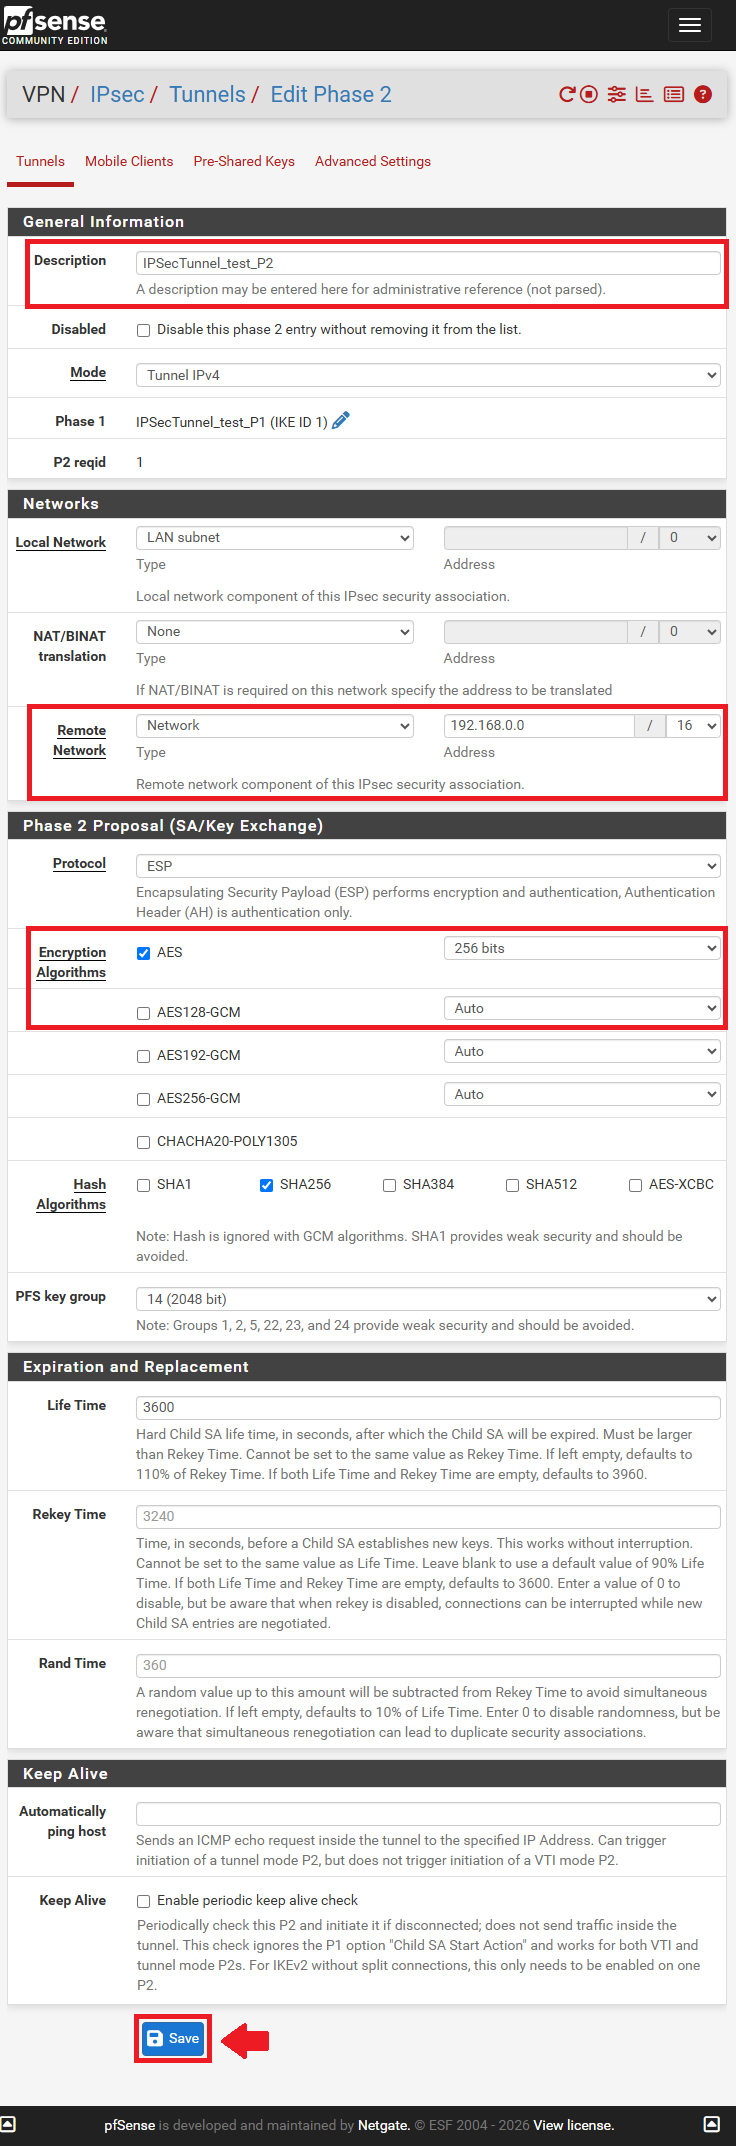
- Configure the following parameters:
- Description: Enter a descriptive name for Phase 2. In this example, IPSecTunnel_test_P2 is used.
- Remote Network: Choose Network in Type field and enter your Site B LAN subnet in Address field.
- Encryption Algorithms:
- Choose 256 bits at the dropdown next to AES.
- Untick AES128-GCM.
- Click Save and then Apply Changes.
Step 3: Configure IPSec on Site B
- If you are using pfSense firewall for Site B:
- Repeat Step 1 and Step 2 on your Site B’s firewall.
- Ensure that the Remote Gateway points to Site A’s public IP address, and make sure to swap the Local Network and Remote Network subnets appropriately so they mirror Site A.
- Make sure to use the same Pre-Shared Key.
- If you are using other firewall for Site B:
- Make sure to use the same Pre-Shared Key and ensure that all configurations are mirrored for Site B.
Step 4: Create Firewall Rules for IPSec on Both Sites
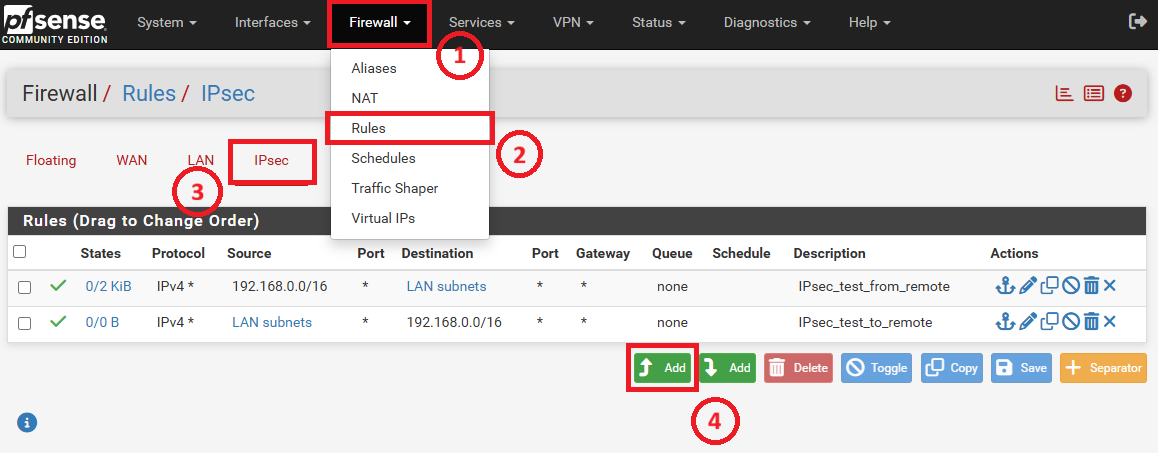
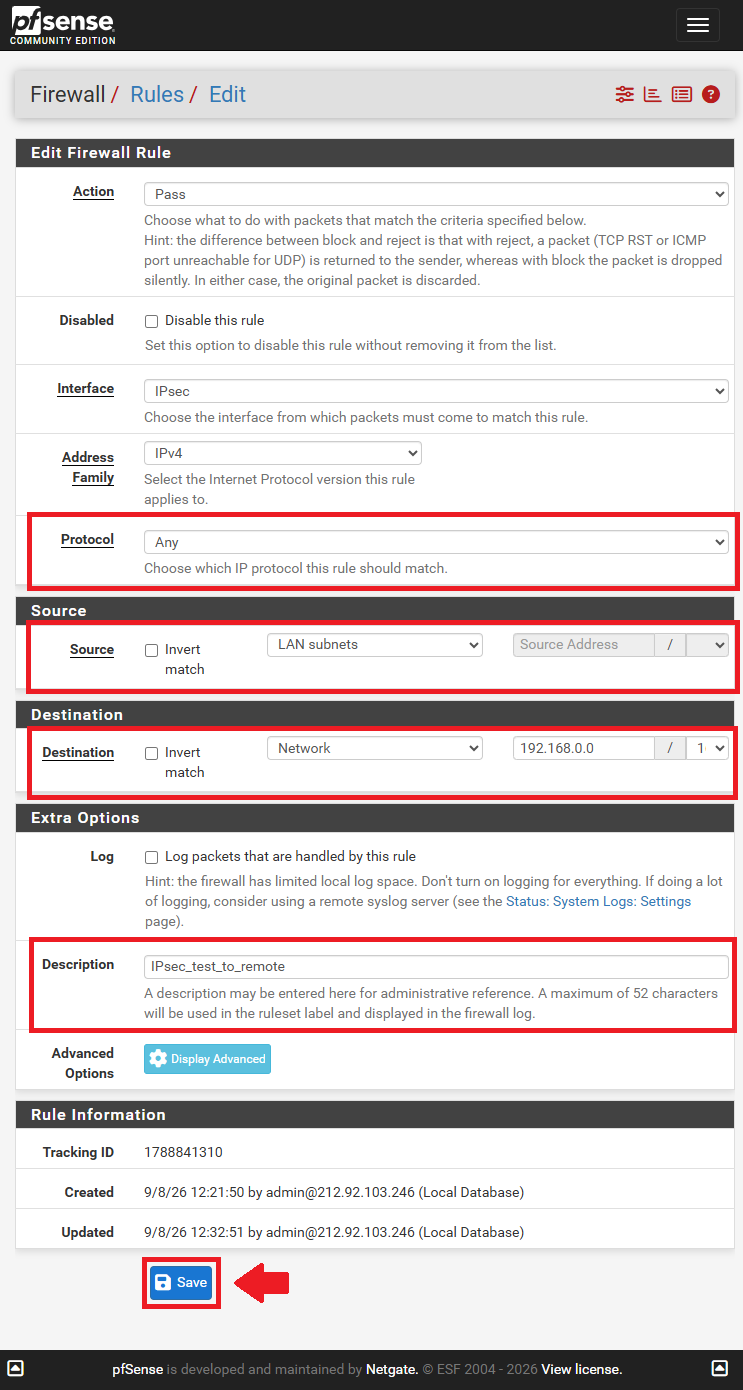
- Navigate to Firewall > Rules and select the IPsec tab. Click Add to create a new rule.
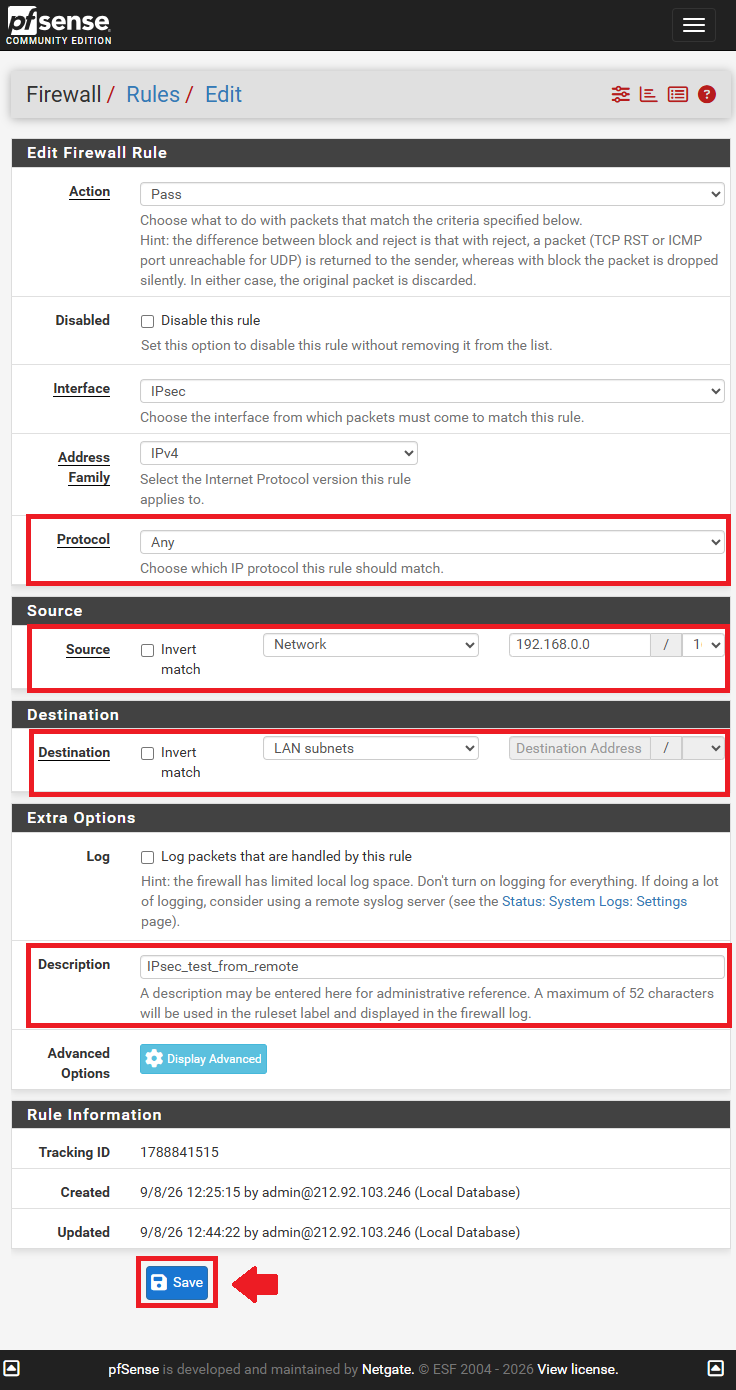
- Configure the following parameters:
- Protocol: Set it to Any to allow all traffic between the two connected networks.
- Source: Choose Network from the dropdown and fill in the remote network address.
- Destination: Choose LAN subnets from the dropdown.
- Description: Enter a descriptive name for this rule. In this example, IPsec_test_from_remote is used.
- Click Save and Apply Changes.
- Click Add to create the second new rule.
- Configure the following parameters:
- Protocol: Set it to Any to allow all traffic between the two connected networks.
- Source: Choose LAN subnets from the dropdown.
- Destination: Choose Network from the dropdown and fill in the remote network address.
- Description: Enter a descriptive name for this rule. In this example, IPsec_test_to_remote is used.
- Click Save and Apply Changes.
- Repeat Step 4 in Site B.
Step 5: Verify the VPN Status and Connectivity
-
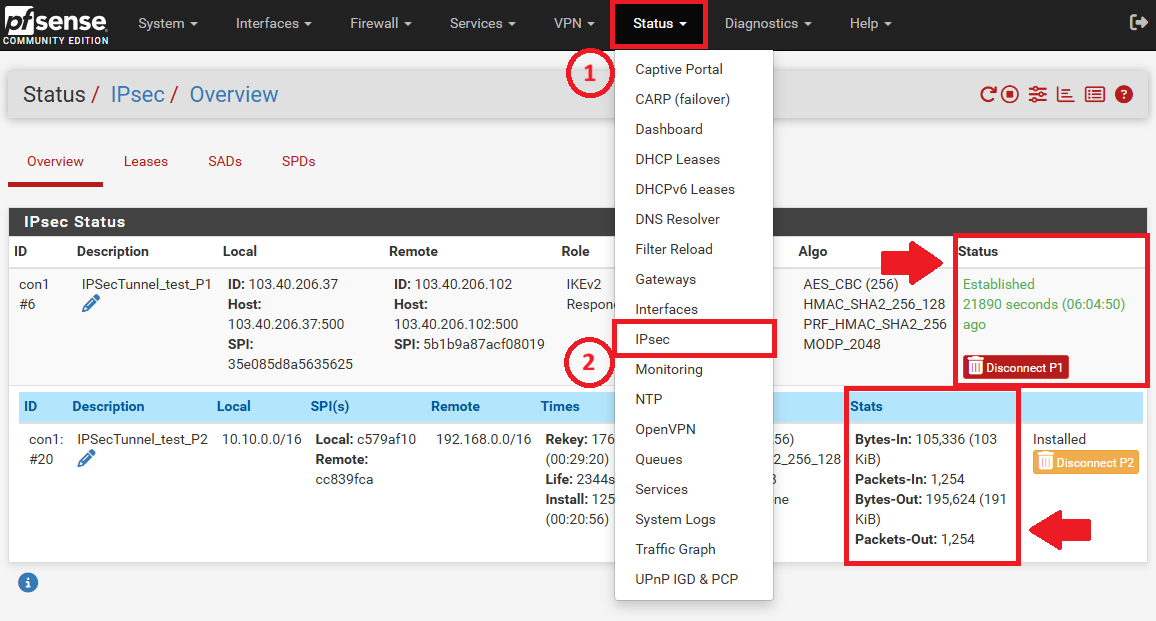
- To check if the connection is successful, navigate to Status > IPsec. Once properly connected, the Status will display as ESTABLISHED and the Stats will show values instead of 0.
- You can then run a ping test between devices on each local network to confirm routing.
PING 192.168.2.185 (192.168.2.185) from 10.10.2.132: 56 data bytes
64 bytes from 192.168.2.185: icmp_seq=0 ttl=64 time=1.044 ms
64 bytes from 192.168.2.185: icmp_seq=1 ttl=64 time=0.878 ms
64 bytes from 192.168.2.185: icmp_seq=2 ttl=64 time=1.131 ms

--- 192.168.2.185 ping statistics ---
3 packets transmitted, 3 packets received, 0.0% packet loss
round-trip min/avg/max/stddev = 0.878/1.018/1.131/0.105 ms
- To check if the connection is successful, navigate to Status > IPsec. Once properly connected, the Status will display as ESTABLISHED and the Stats will show values instead of 0.
Conclusion
By following this guidance, you can successfully establish a secure Site-to-Site IPSec VPN between two pfSense firewalls, or between a pfSense firewall and another compatible VPN device, ensuring safe and continuous communication between your remote networks. For additional assistance or if you encounter any issues, please contact our support team at support@ipserverone.com.