
Search Our Database
How to Set Up 1:1 NAT and Port Forwarding in pfSense
Introduction
pfSense is a robust open-source firewall and routing software. Setting up 1:1 NAT (Network Address Translation) and Port Forwarding in pfSense allows you to securely route incoming internet traffic directly to specific internal servers. 1:1 NAT maps a single public IP address to a single private IP, which is ideal for dedicated servers. Meanwhile, port forwarding directs traffic from a specific port on your public IP to a designated internal machine. This configuration is essential for administrators who need to expose internal services to the public internet anytime while maintaining a highly secure local network environment.
Prerequisite
- Access to the pfSense webGUI with Admin privileges.
- Basic knowledge of your network’s internal private IP addresses and available public IP addresses.
- The specific port numbers required for your application to function properly.
Step-by-step Guide
Method 1: Configure 1:1 NAT
- Use this method if you need to map an entire dedicated public IP address to a single internal private IP address.
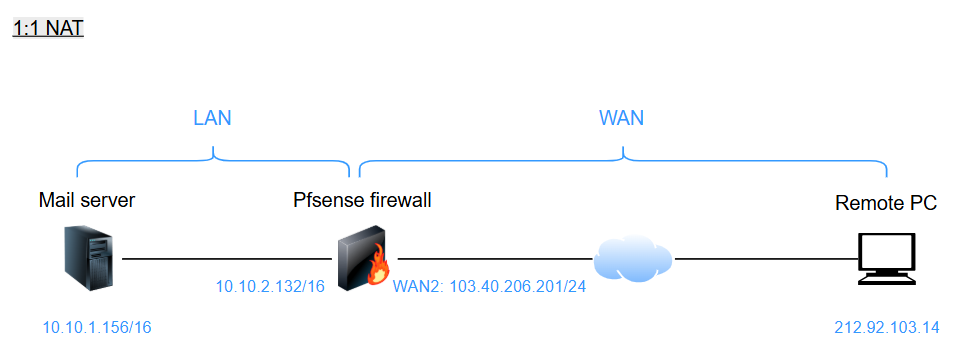
Note: The above diagram is only applicable throughout Method 1.
- From your pfSense webGUI dashboard, click on the Firewall tab at the top and select NAT. Navigate to the 1:1 tab and click the Add button to create a new rule.
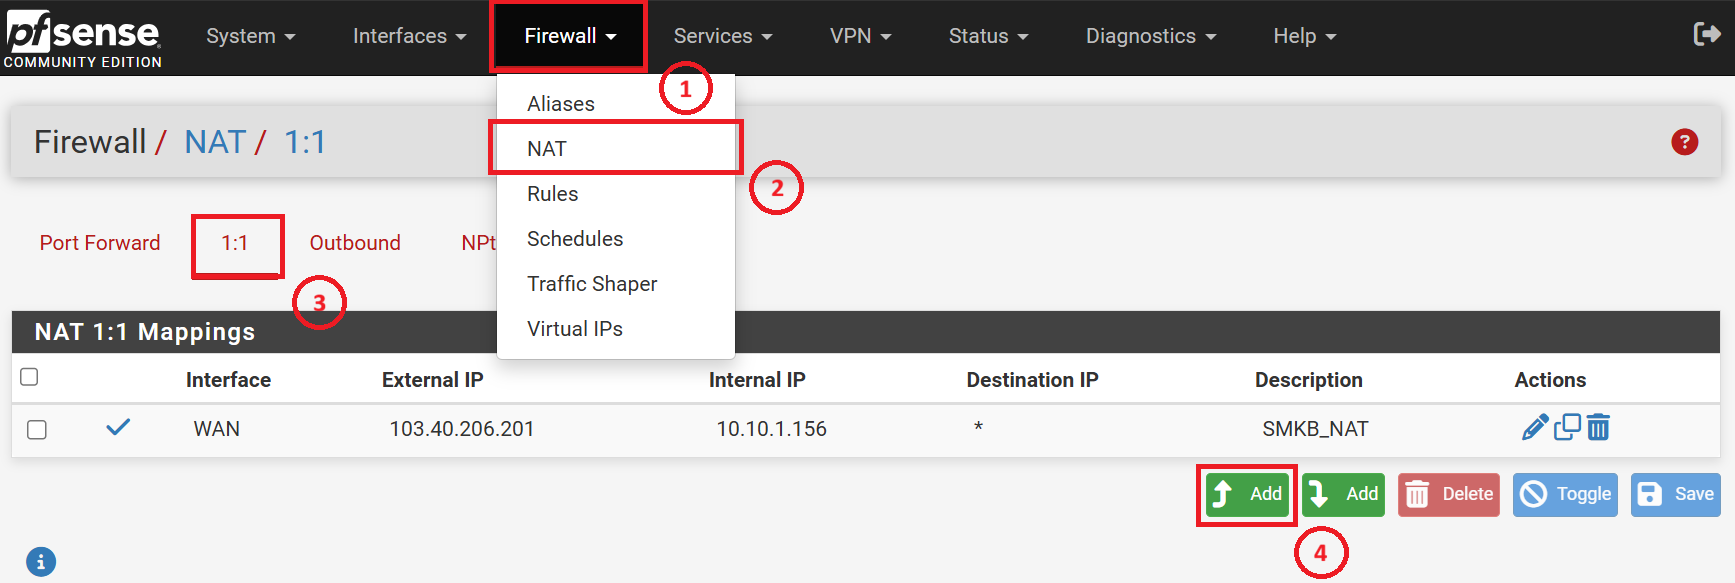
- Configure the following parameters:
- Interface: Set it to WAN.
- External subnet IP: Choose Address from the Type dropdown and type your dedicated public IP address.
Important Note ⚠️: Best Practice for 1:1 NAT Configuration
Always configure 1:1 NAT using a Virtual IP (VIP) rather than the firewall’s primary physical IP. Using a VIP prevents routing and port conflicts with essential firewall services (such as IPSec VPNs and remote management portals), allows you to map multiple public IP addresses to different internal servers, and ensures seamless routing failover in High Availability (HA) hardware deployments. In order to configure VIP, refer the following KB: [How to Add Multiple IPs to a Single Interface Using Virtual IPs in pfSense]- Internal IP: Choose Address from the Type dropdown and enter the private IP address of your internal server.
- Description: Enter a descriptive name for this entry.
- Click Save at the bottom of the page, then click on Apply Changes at the top of the screen to successfully activate the rule.
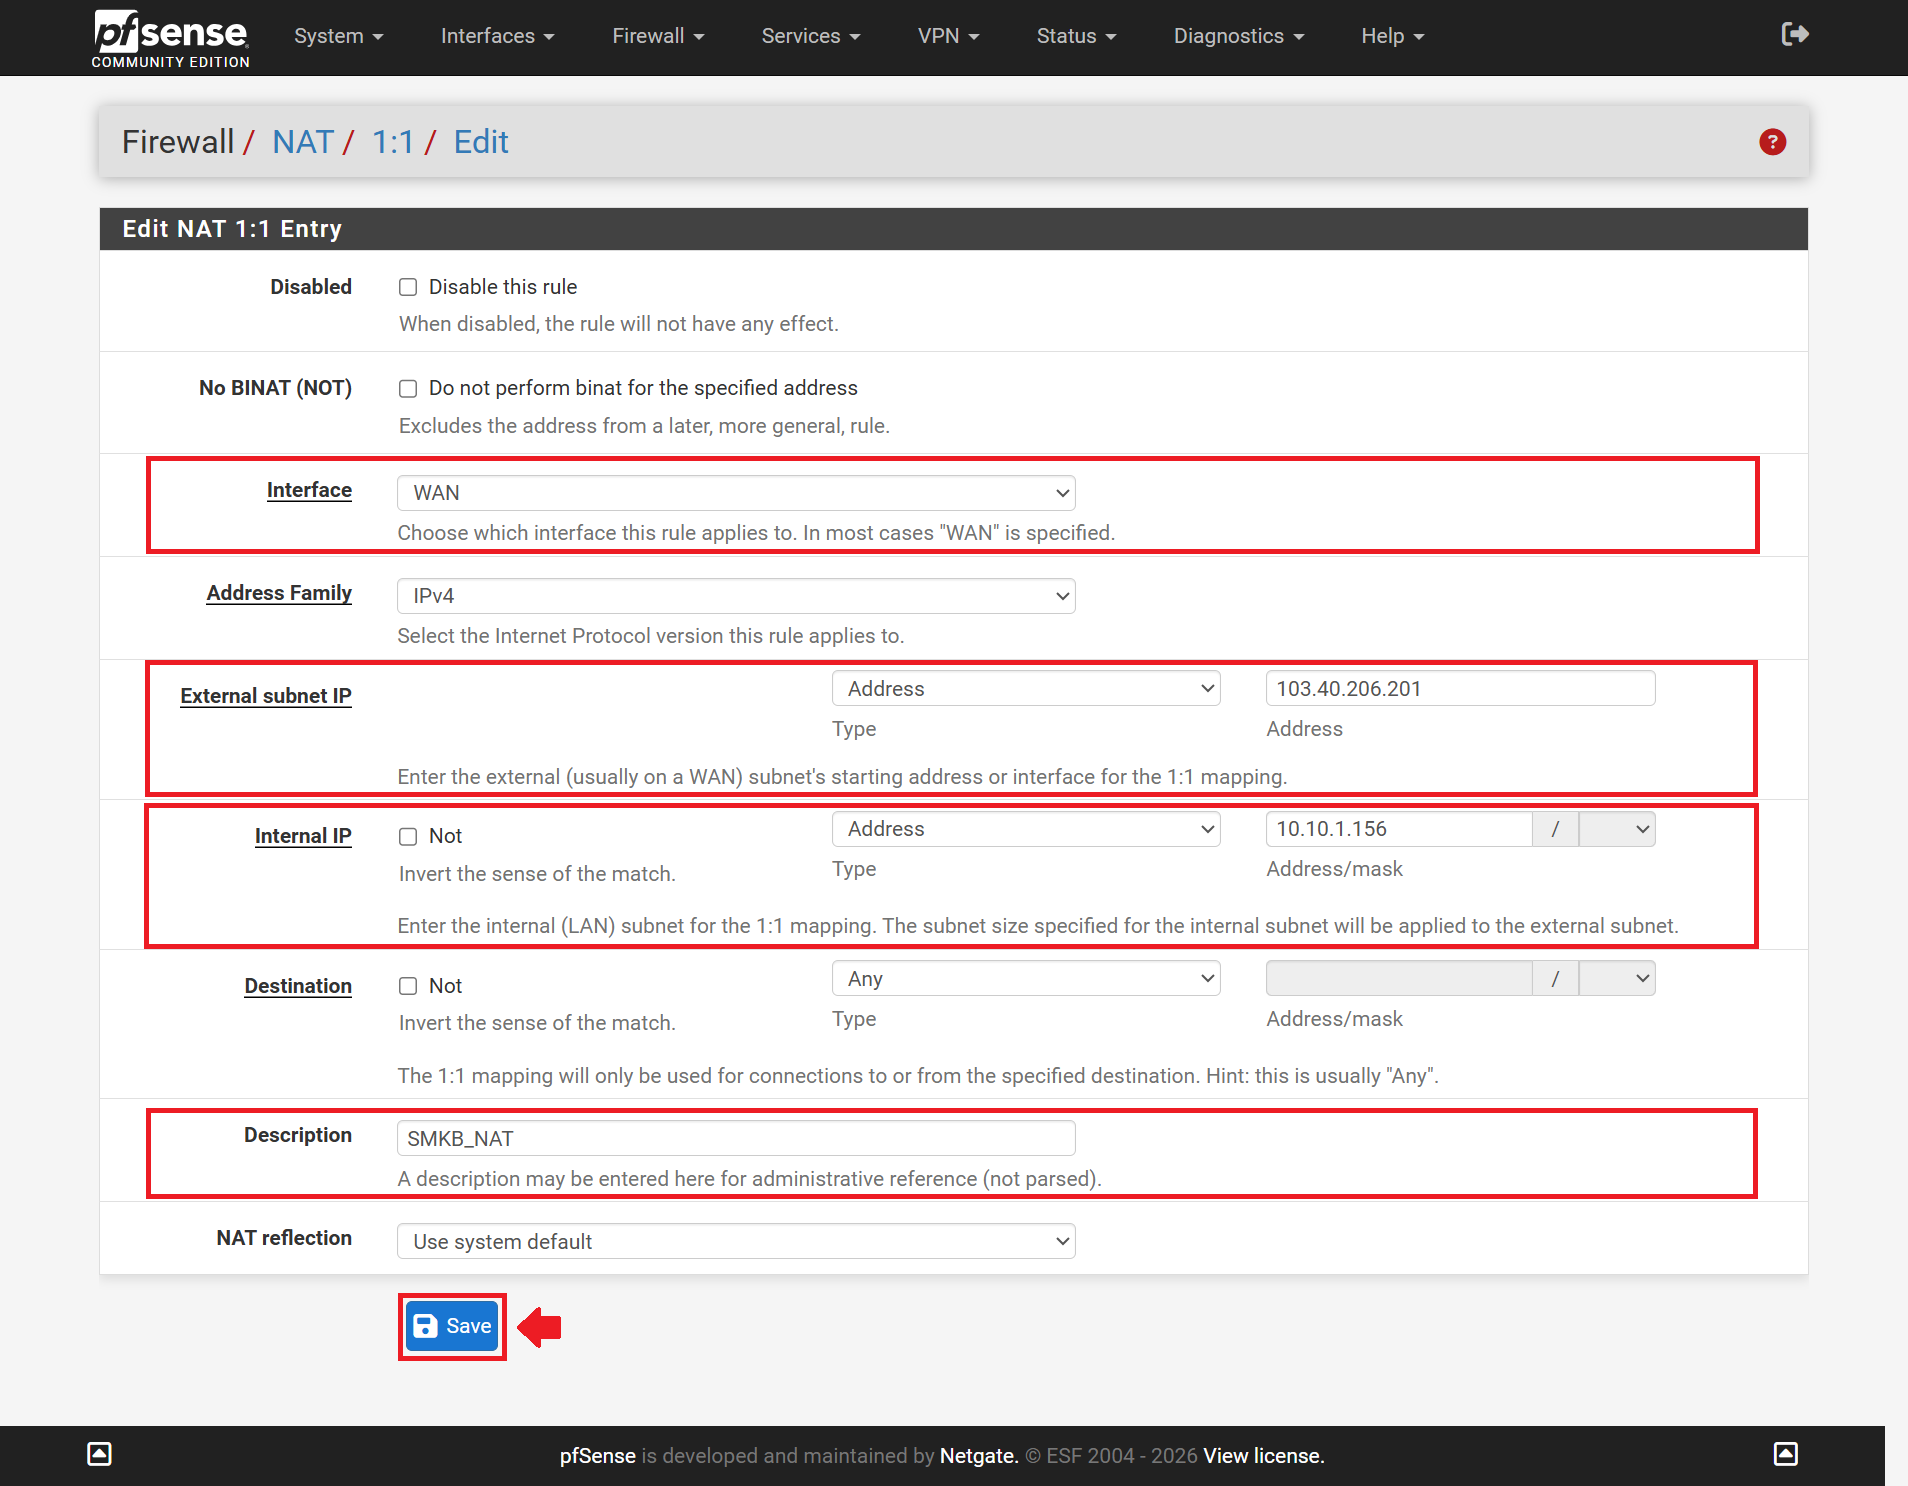
- Verify Inbound Traffic: From a remote device, attempt to access an active service hosted on your internal server (e.g., a web server on port 80/443, or SSH on port 22) using the newly configured External subnet IP.
- Example: Type https://103.40.206.201 in your web browser.
- Expected Output: The website is successfully loaded.
- Verify Outbound Traffic: Log into the internal server and check its external IP address to ensure outbound traffic is using the correct NAT mapping.
- Example: curl ifconfig.me
- Expected output: The returned IP must exactly match your External subnet IP.
root@sm-kb:~# curl ifconfig.me
103.40.206.201
Method 2: Configure Port Forwarding
- Use this method to forward traffic from a specific port on your public IP to a specific port on an internal device, as shown in the network diagram below.
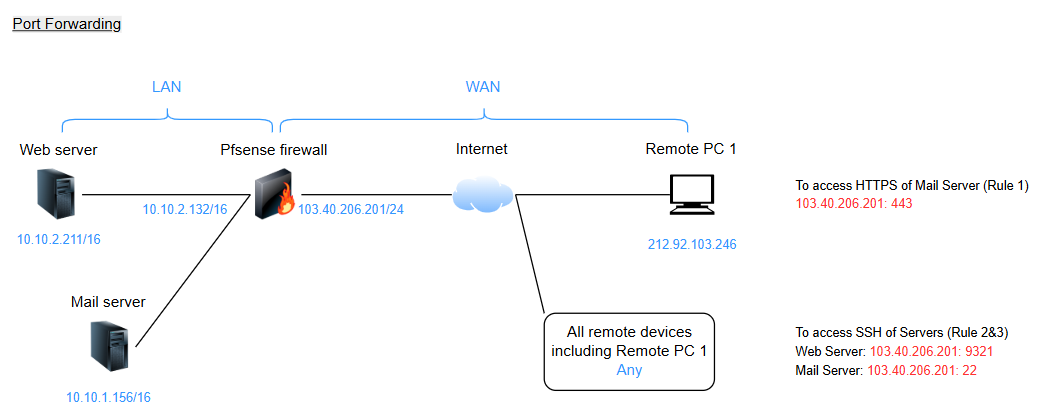
Note: The above diagram is only applicable throughout Method 2.
- Review your network diagram to identify the correct IPs and ports (e.g., WAN IP 103.40.206.201 to Internal Mail Server 10.10.1.156).
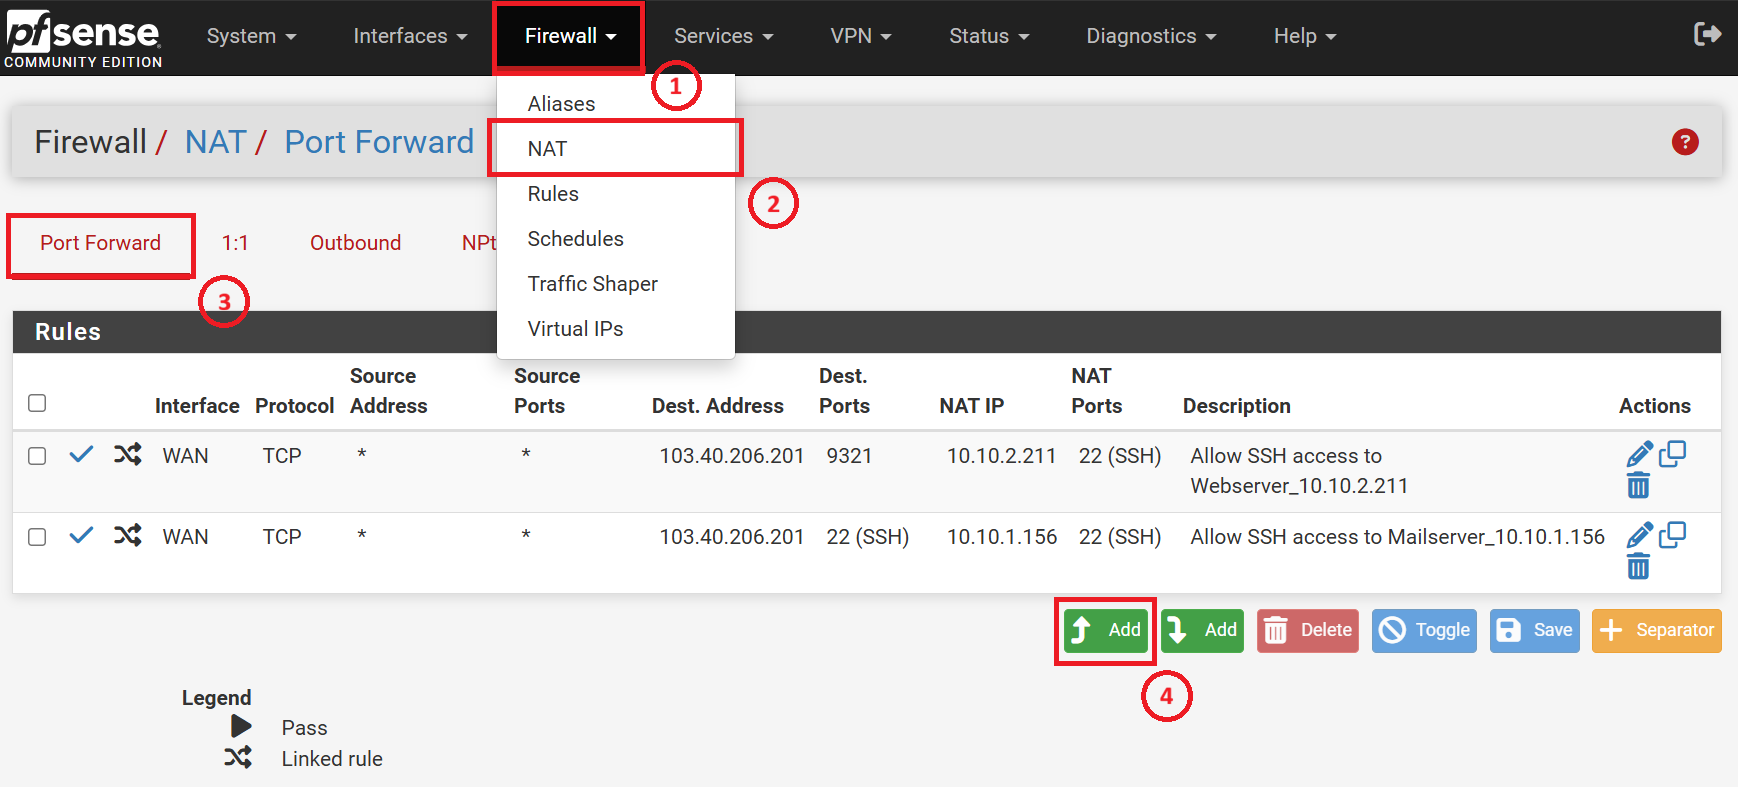
- From the pfSense dashboard, click on Firewall and choose NAT. Select the Port Forward tab. Click the Add button to create a new port forwarding rule.
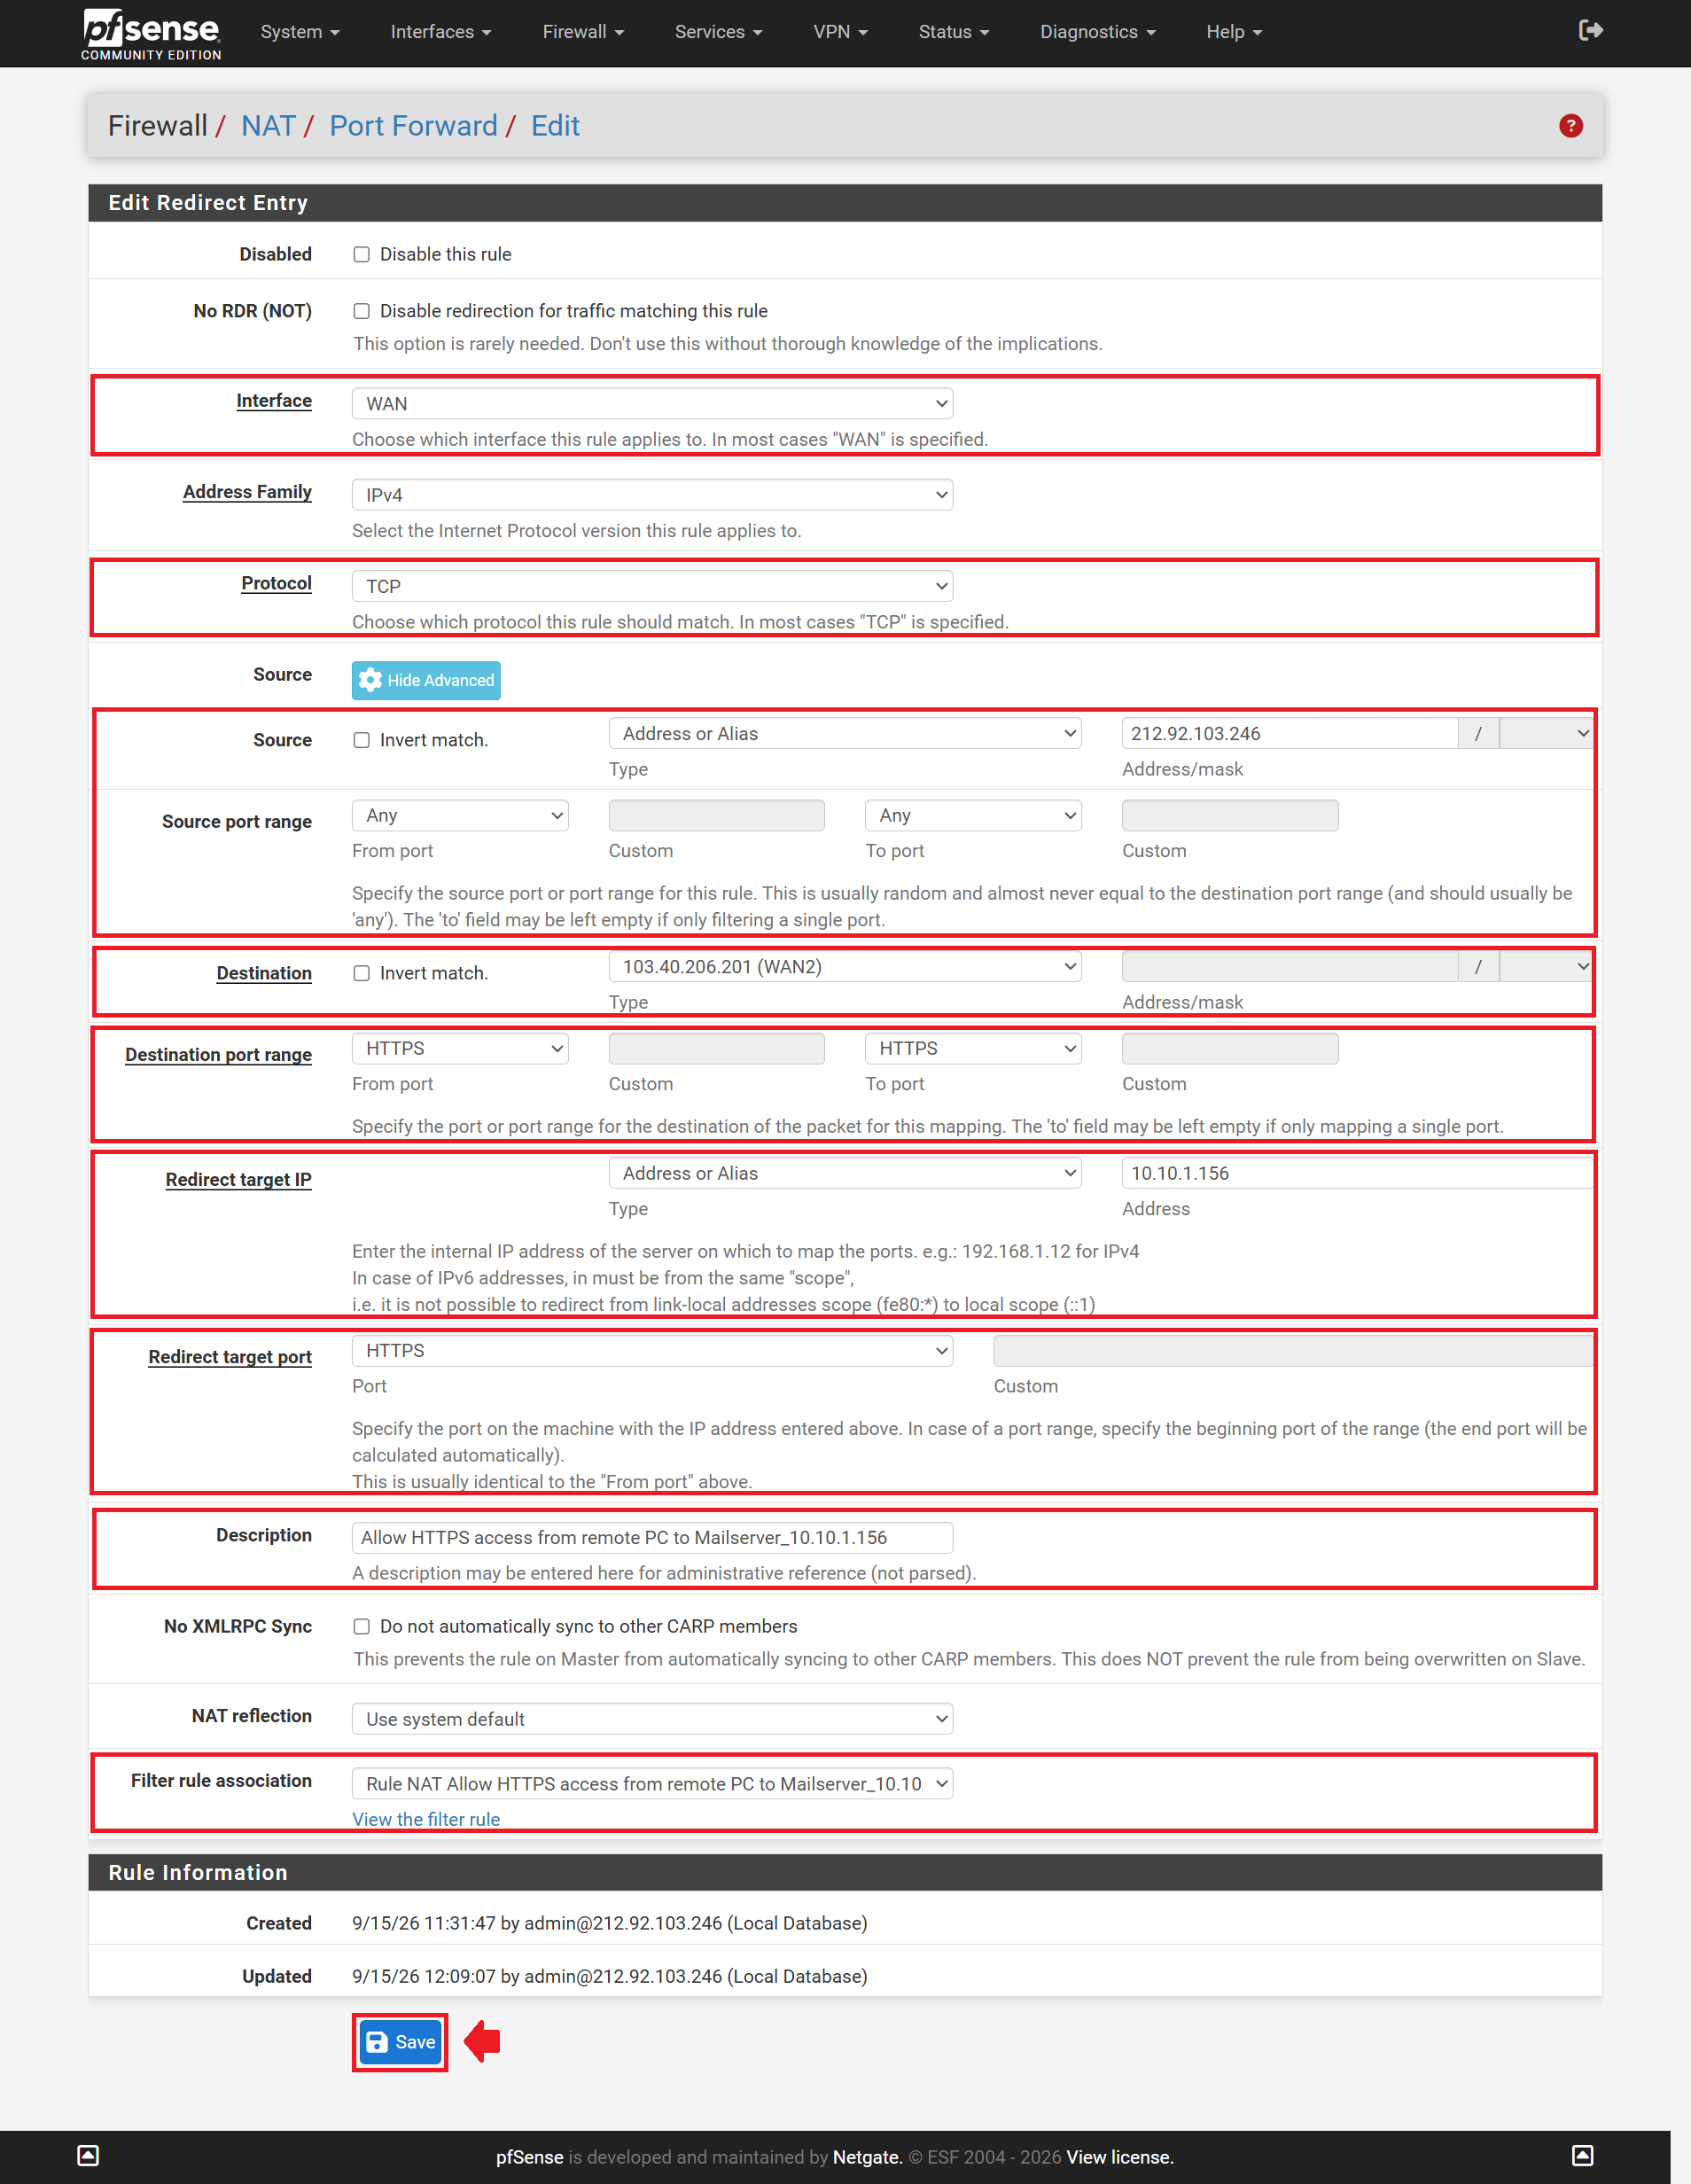
- Configure the following parameters:
- Interface: Ensure the interface is set to WAN.
- Protocol: Select TCP. You may use other protocol according to your cases.
- Source (Optional. If not specified, then it’s Any. Click on Display Advanced to expand):
- Source: Defines who is allowed to connect. In this example, we specify only remote PC 1 which has an IP address of 212.92.103.246 to access the HTTPS of the mail server.
- Source port range: Defines which port the traffic originates from on the client side. Leave this as Any so connections aren’t blocked by arbitrary port restrictions.
- Destination: Select Address or Alias from the dropdown and enter your public IP in the Address field. If you have multiple public IPs in your pfSense firewall interface, you may select the preferred configured IP from the dropdown. For example, 103.40.206.201 (WAN2) is selected.
- Destination port range: Select the external port you want to open. If you prefer to use the custom one, select Other from the dropdown and enter the port number in the Custom field.
- Redirect target IP: Select Address or Alias in the Type field and type the internal private IP of your device in the Address field. In this case, the mail server’s IP, 10.10.1.156 is used.
- Redirect target port: Select the corresponding internal port. HTTPS is chosen for this case.
- Description: Enter a descriptive name for this rule. In this example, Allow HTTPS access from remote PC 1 to Mailserver_10.10.1.156 is entered.
- Filter rule association: Select the Add associated filter rule.
- Click Save, then click Apply Changes to apply the configuration.
-
Tips 🖊️️: You may navigate to Firewall > Rules > WAN to check for the rules automatically generated as we choose Add associated filter rule during Filter rule association, as shown in diagram below.
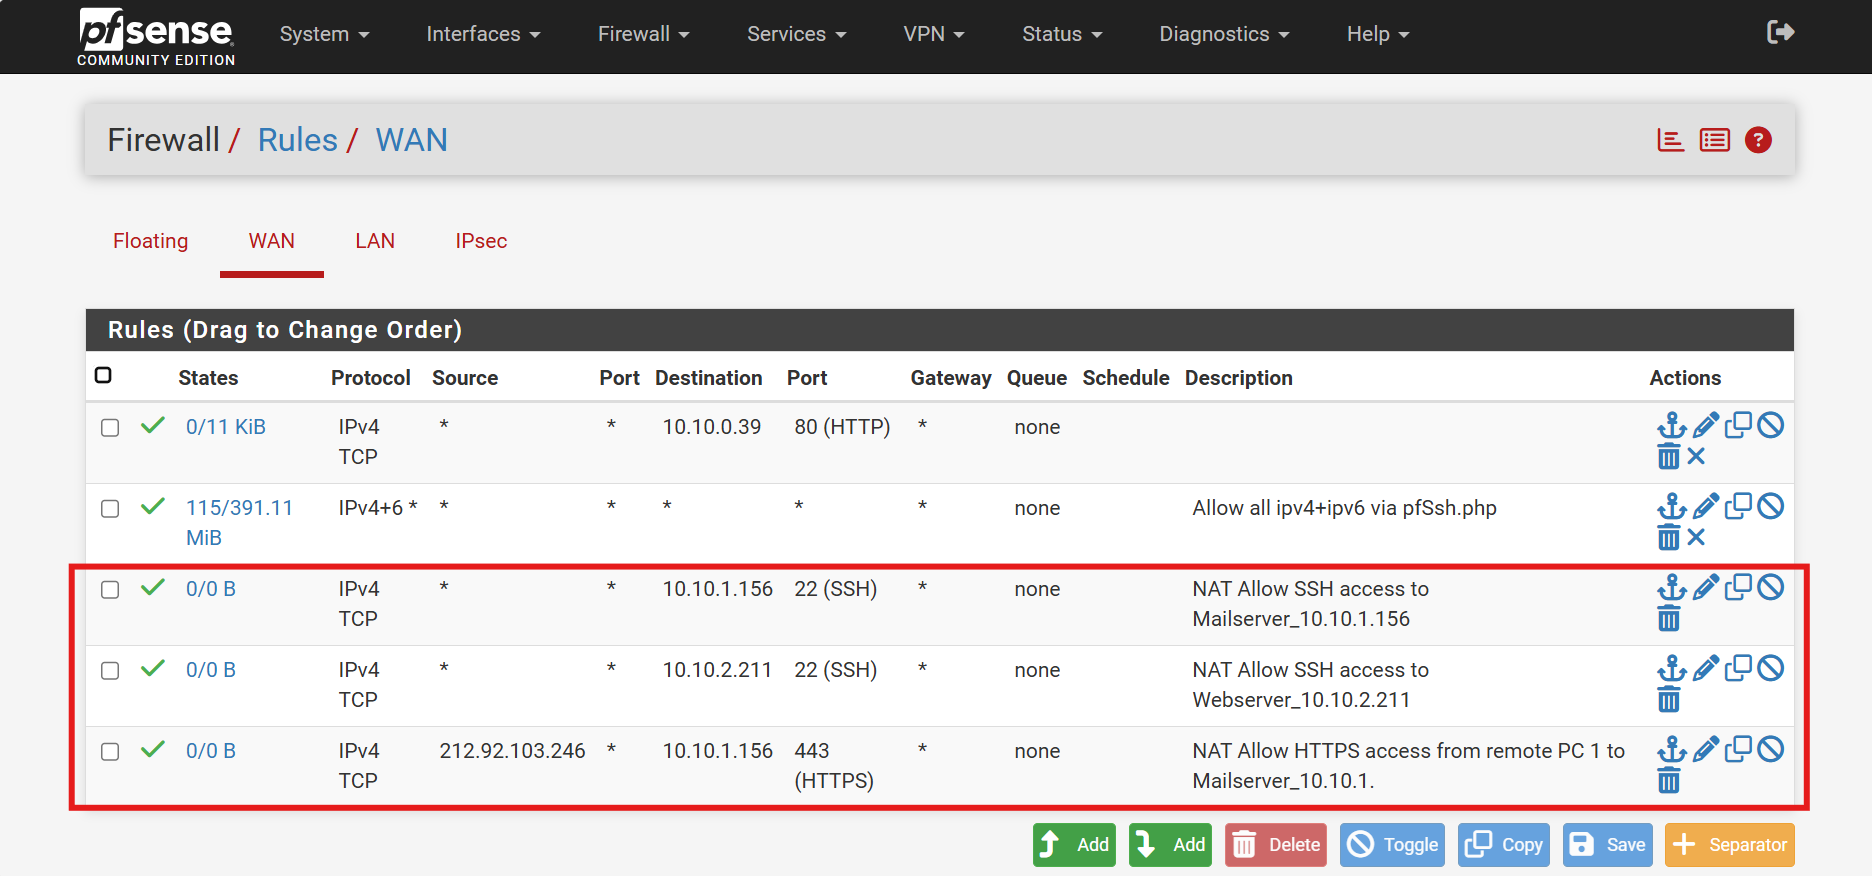
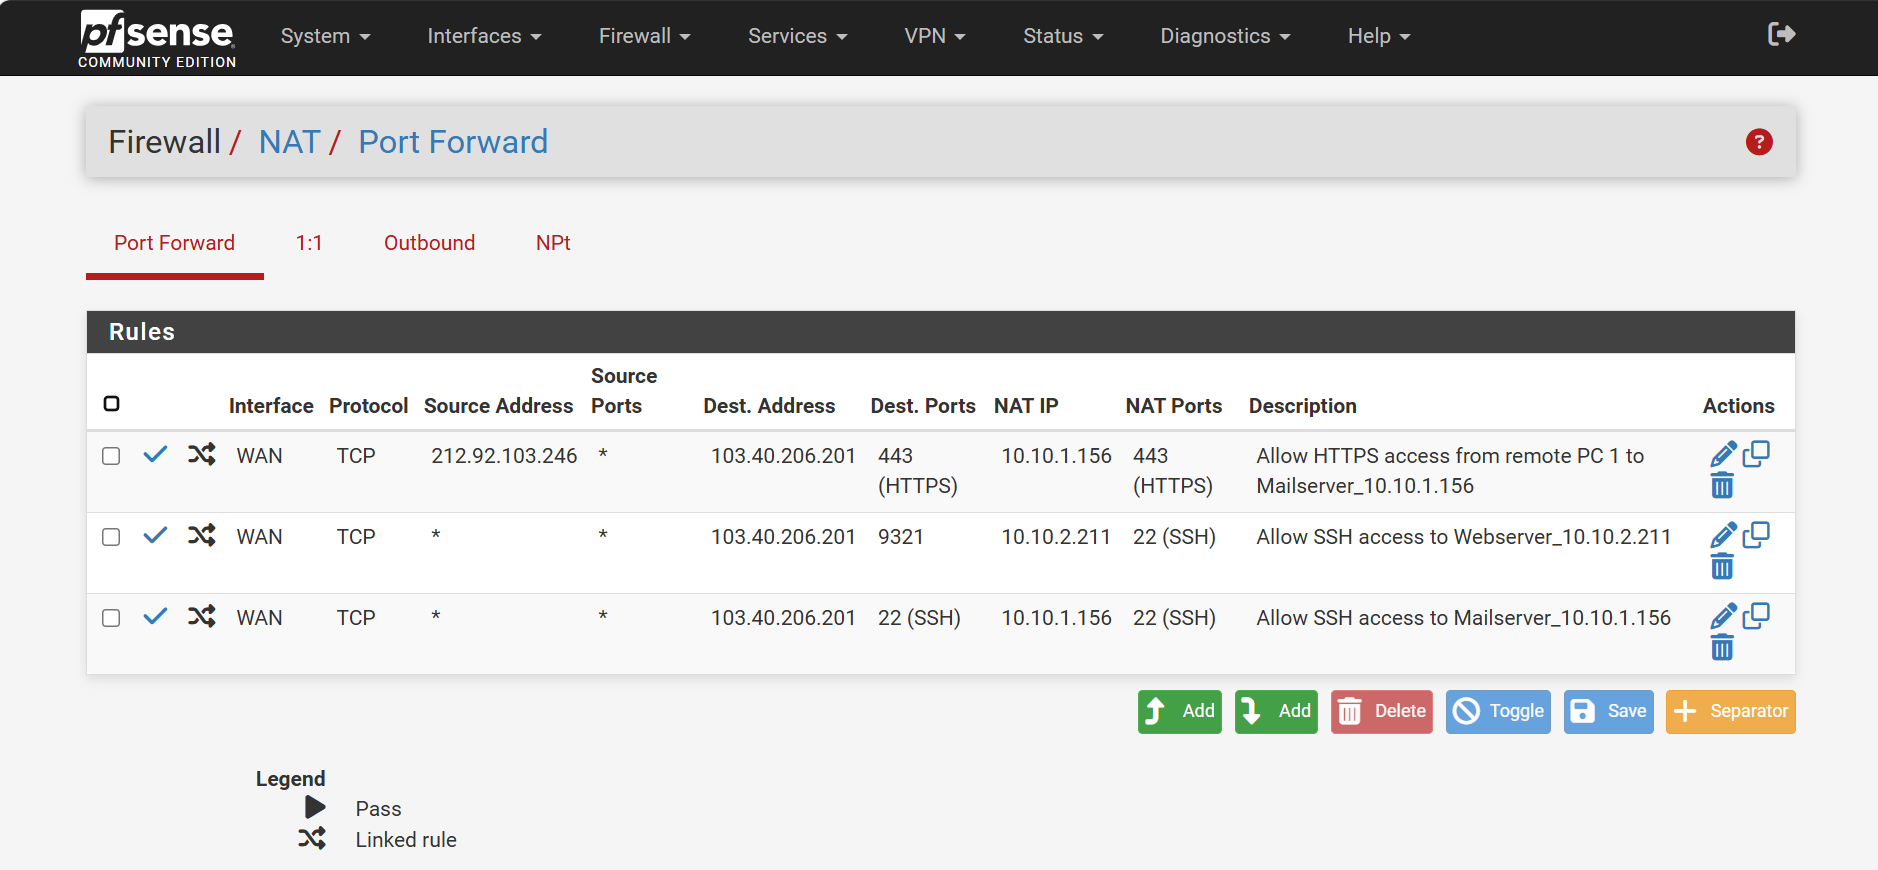
- All the rules shown in the above diagram are based on the network topology diagram. You can enhance security and manage services flexibly by filtering traffic based on the source address and mapping custom external ports to internal services as shown in Rule 1 and 2.
- Restricting Access by Source Address: As seen in the first rule, you can restrict incoming traffic to a specific trusted public IP (e.g., source 212.92.103.246) rather than leaving it open to everyone (*). This ensures only authorized remote users or locations can connect.
- Using Custom External Ports: As shown in the second rule, you can map a non-standard external port (e.g., destination port 9321) to a standard internal service port (e.g., internal port 22 for SSH). This is a common practice to obscure standard services and reduces automated brute-force attacks on your public-facing firewall.
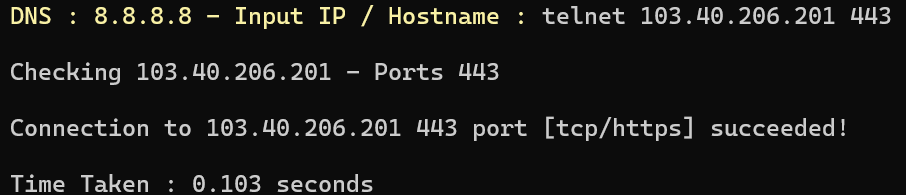
- To verify the port is open and reachable from the outside, you can use the following connection test command:
- From a remote PC:
telnet 103.40.206.201 443
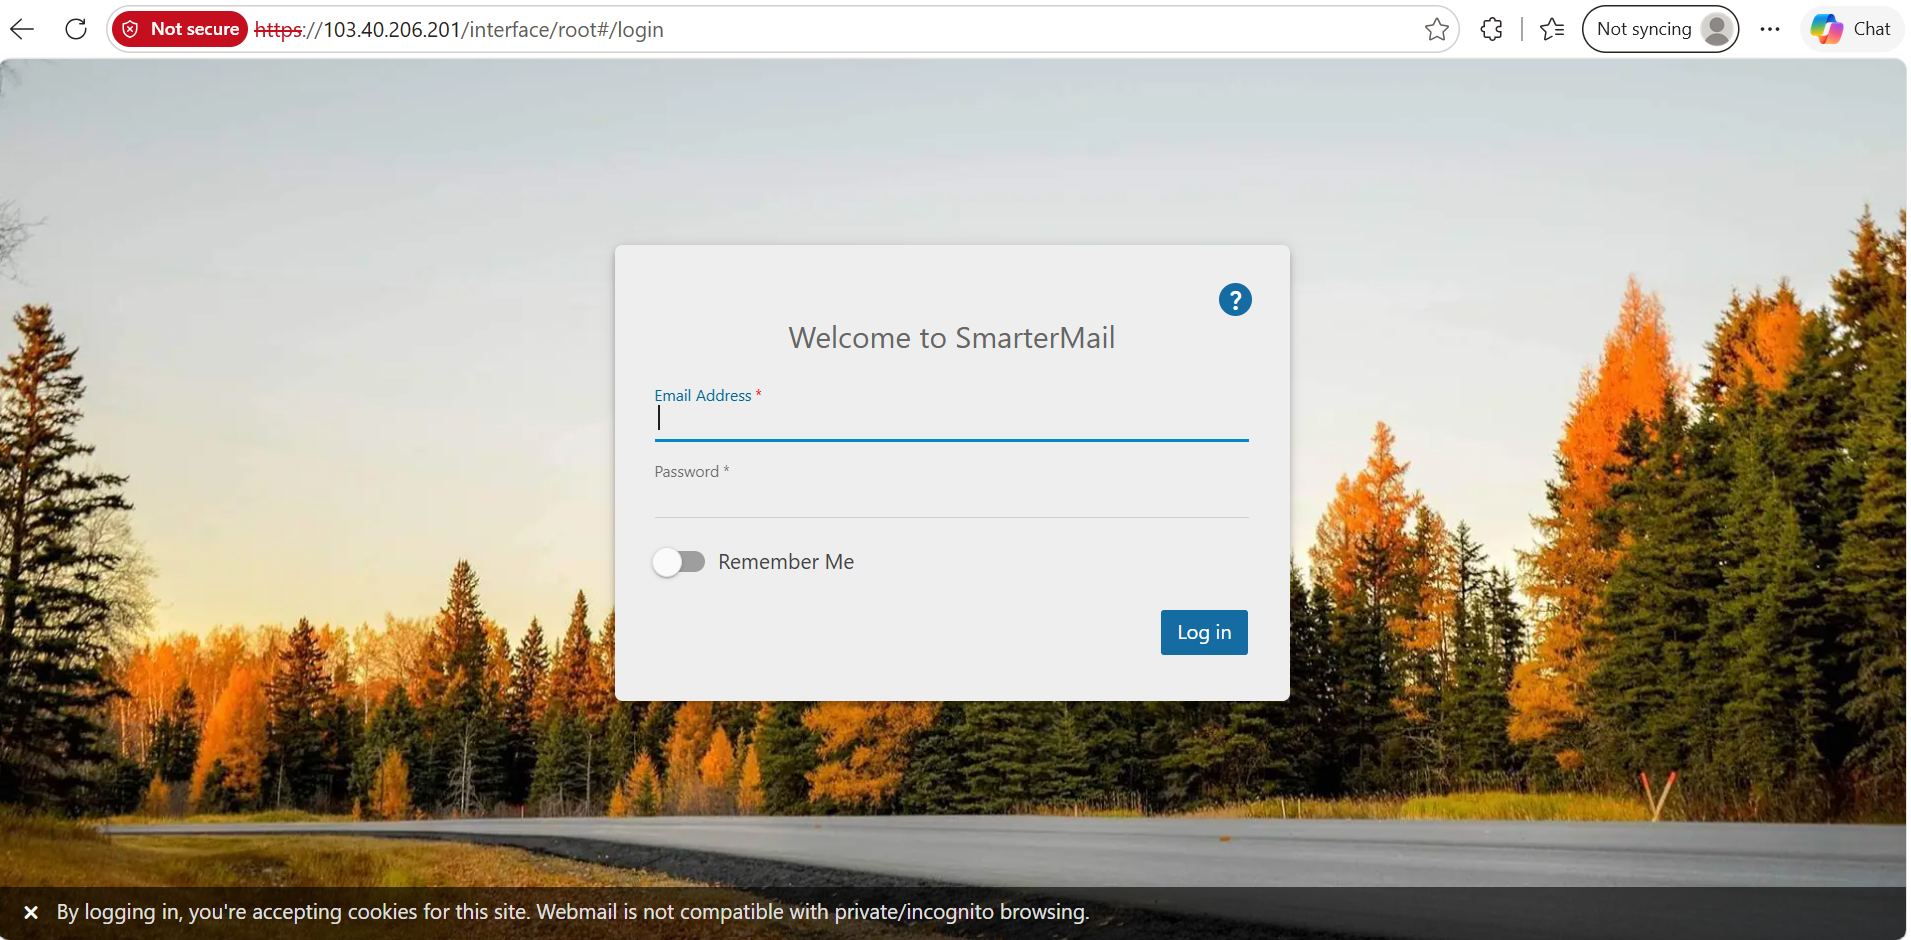
OR type https://103.40.206.201 in your web browser
- Expected Outputs:
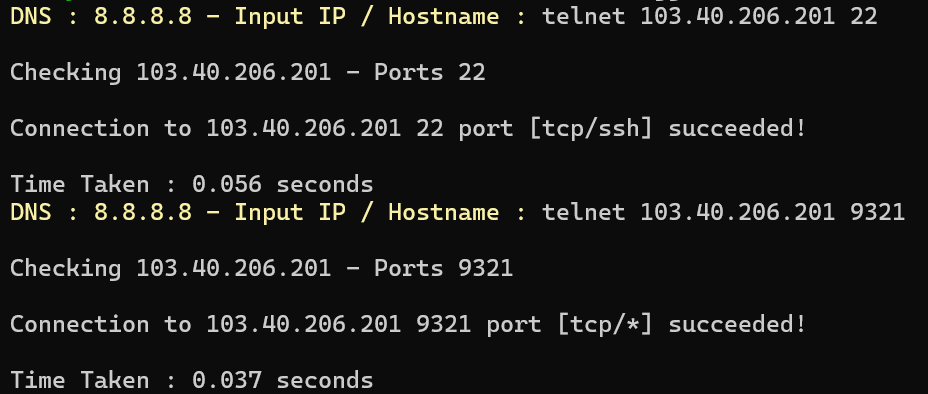
- From any remote devices:
telnet 103.40.206.201 22
telnet 103.40.206.201 9321
- Expected Outputs:
- From a remote PC:
Conclusion
By following this guidance, you can successfully configure 1:1 NAT and Port Forwarding in pfSense to ensure your internal servers are securely accessible from the internet. Proper configuration ensures seamless external access while keeping your local network protected.
For additional assistance or if you encounter any issues, please contact our support team at support@ipserverone.com.