
Search Our Database
How to Add Multiple IPs to a Single Interface Using Virtual IPs in pfSense
Introduction
A Virtual IP (VIP) in pfSense allows network administrators to assign multiple IP addresses to a single physical or logical network interface. This is crucial when you need to configure services requiring additional public IPs, manage 1:1 Network Address Translation (NAT) rules, or establish high-availability failover across multiple firewalls. By configuring Virtual IPs through the pfSense WebGUI, you can easily expand your network’s capabilities without deploying extra physical hardware. This guide outlines how to successfully add and manage these additional addresses.
Prerequisite
- Access to the pfSense WebGUI with administrator privileges.
- An available IP address (public or private) provided by your ISP or network allocation.
- Basic knowledge of your network’s subnet mask.
Step-by-step Guide
Method 1: Add an IP Alias
An IP Alias is the most common Virtual IP type, typically used for assigning additional IPs to an interface for port forwarding or outbound NAT.
- Log in to your pfSense WebGUI.
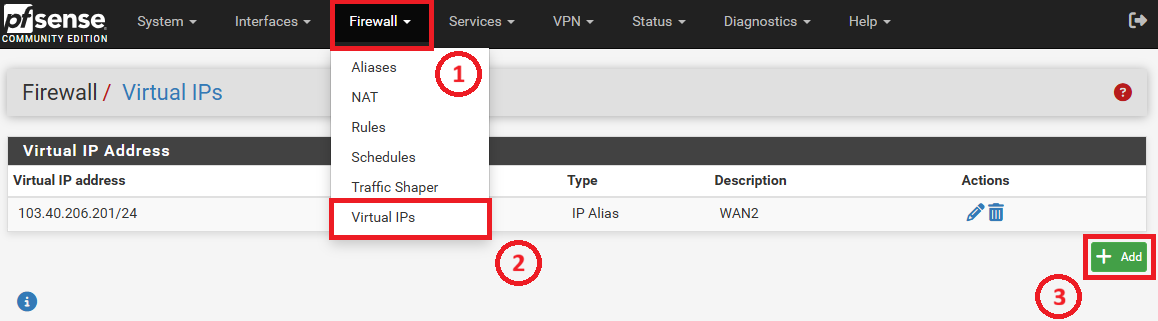
- Navigate to Firewall on the top menu and select Virtual IPs. Then, click the Add button with the green plus icon.
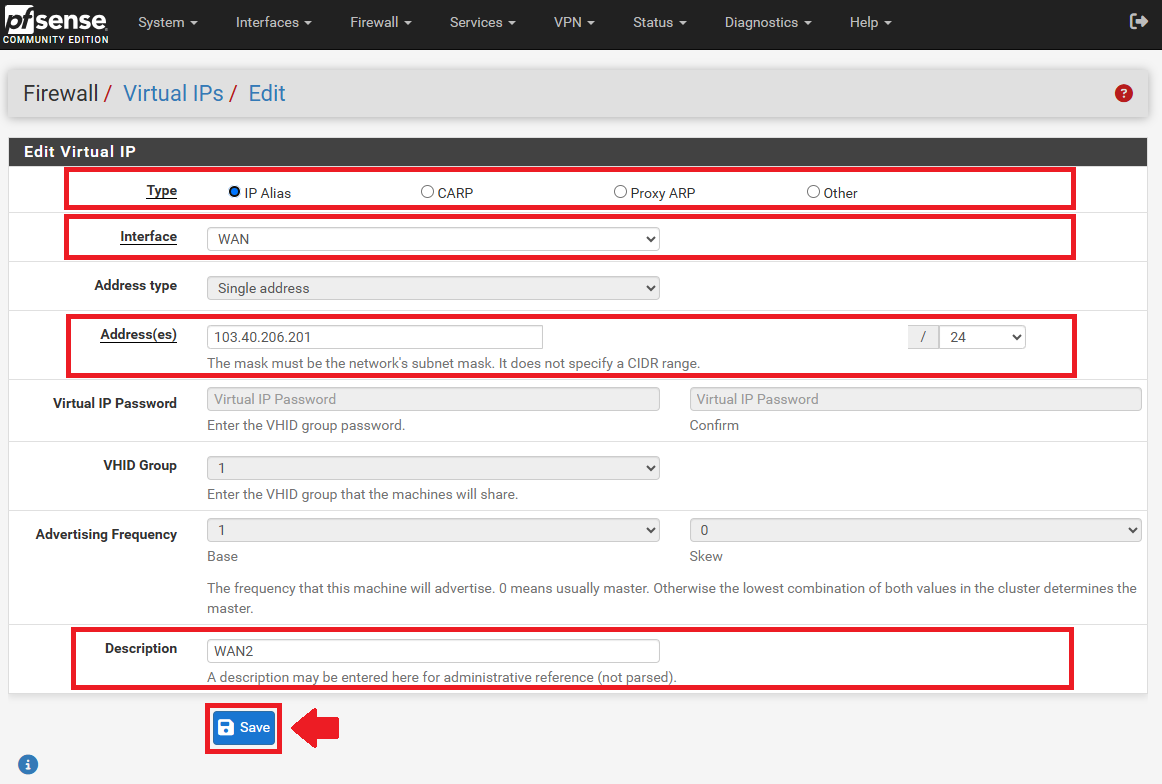
- Configure the following parameters:
- Type: Select IP Alias.
- Interface: Choose the appropriate interface (e.g., WAN) from the drop-down menu.
- Address(es): Enter your new IP address into the empty field and select the correct subnet mask. For example, 103.40.206.201/24 is used.
- Description: Provide a clear description so you can identify this IP later. In this case, WAN2 is used.
- Click Save at the bottom of the page.
- Click Apply Changes at the top of the screen to activate the new Virtual IP.
Method 2: Add a CARP Virtual IP
A CARP (Common Address Redundancy Protocol) Virtual IP is used when configuring high availability between two or more pfSense nodes for seamless failover.
- Log in to your pfSense WebGUI.
- Navigate to Firewall and select Virtual IPs. Then, click the Add button.
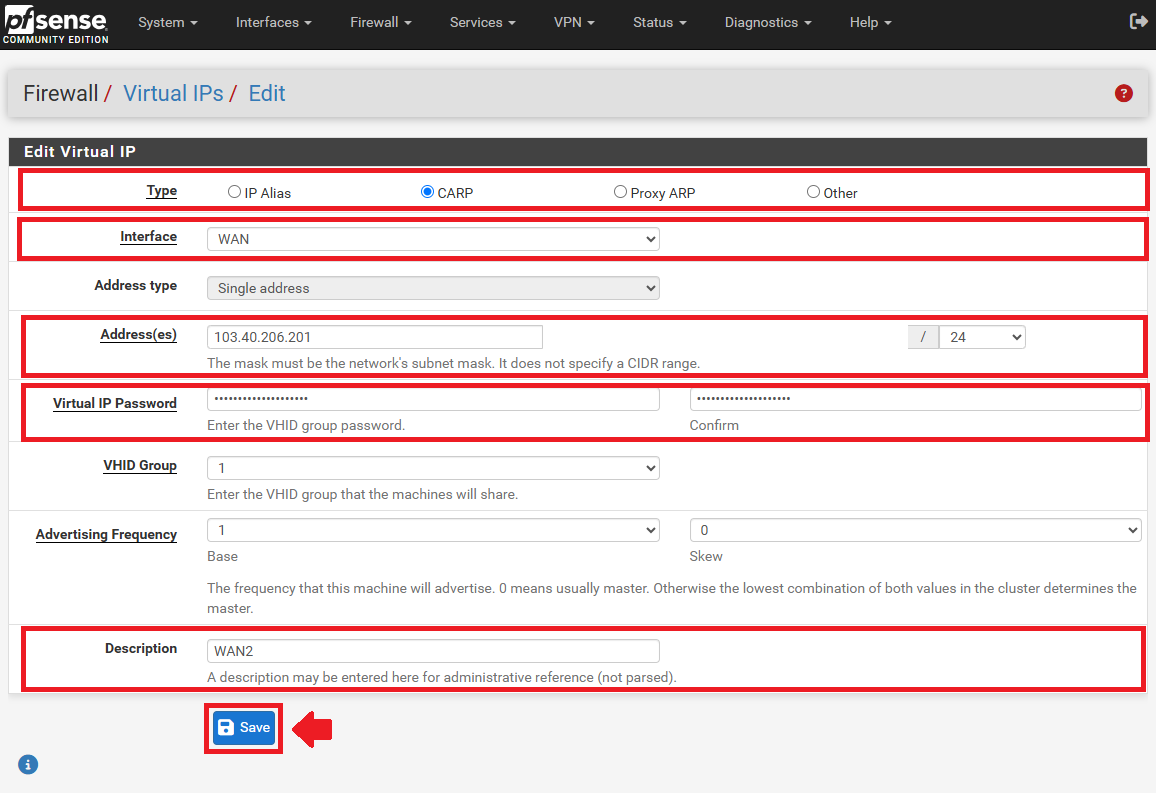
- Configure the following parameters:
- Type: Select CARP.
- Interface: Choose the designated interface where the shared IP will reside.
- Address(es): Enter the shared IP address in the empty field and assign the appropriate subnet mask.
- Virtual IP Password: Enter a secure Virtual IP Password re-enter again at the Confirm field.
Important Note ⚠:The password must be absolutely identical on both the Master and Backup firewalls and cannot be blank.
- VHID Group: Assign a unique VHID Group number.
Tips 🖊️:The VHID Group links your primary and backup firewalls together. It must be a unique number for each CARP IP on the interface to prevent network conflicts, and it must match exactly on both firewalls.
- Advertising Frequency:
-
Base: Leave this at 1 for standard setups.
-
Skew: Set to 0 if this firewall is the primary (Master) node. If this is the secondary (Backup) node, set it higher (e.g., 100).
-
- Description: Enter a descriptive name for this IP.
- Click Save at the bottom of the page.
- Click Apply Changes to push the configuration to the firewall.
Method 3: Add a Proxy ARP Virtual IP
A Proxy ARP Virtual IP is ideal when you need to route an entire subnet of public IPs for 1:1 NAT, though the firewall itself cannot bind local services to these addresses.
Tips 🖊️: Proxy ARP has two major limitations compared to IP Alias:
- No local service binding: pfSense cannot bind its own local services (like the WebGUI, OpenVPN, or DNS) to a Proxy ARP IP.
- No ICMP response: The firewall itself will not respond to ping requests sent to a Proxy ARP IP, which often makes beginners incorrectly assume the configuration is broken.
- Log in to your pfSense WebGUI.
- Navigate to Firewall and select Virtual IPs. Then, click the Add button.
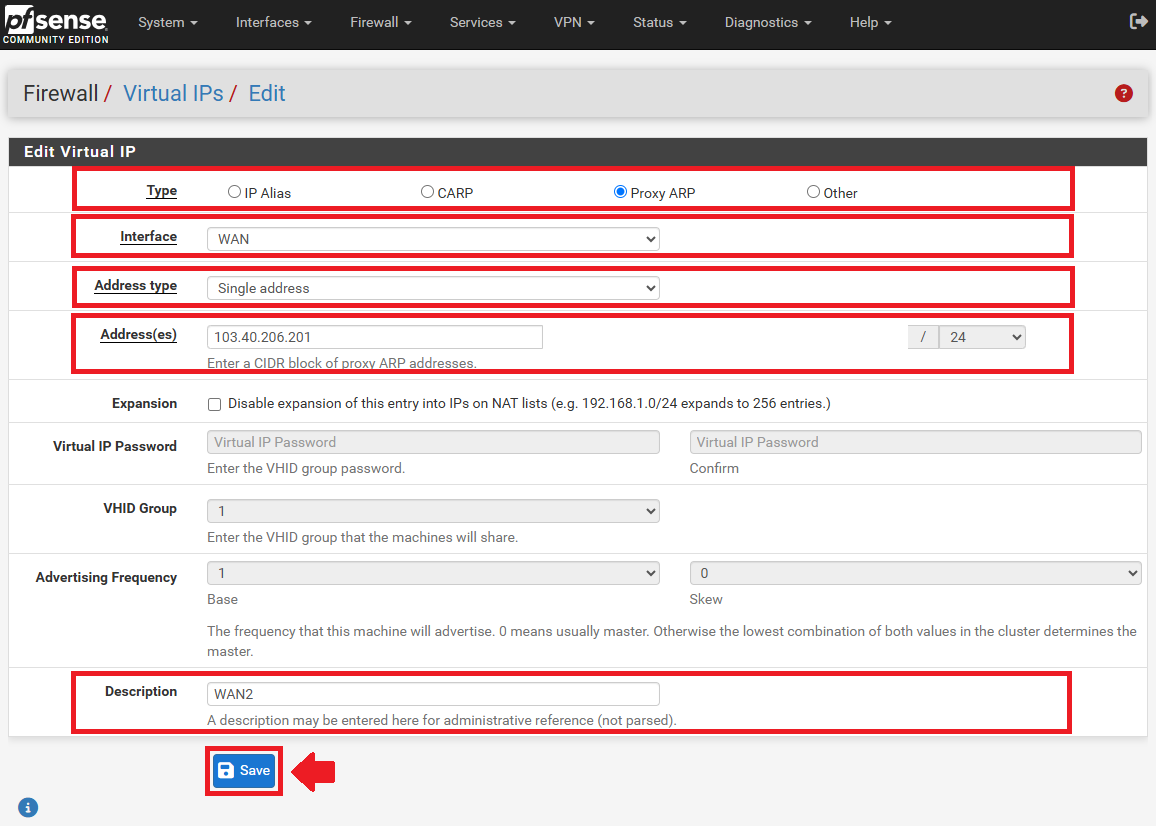
- Configure the following parameters:
- Type: Select Proxy ARP.
- Interface: Choose the appropriate interface.(e.g., WAN).
- Enter the IP Address (this can be a single IP or an entire subnet)
- If single IP: Choose Single Address from the dropdown at Address type. Then, enter the IP in Address(es).
- If entire subnet: Choose Network from the dropdown at Address type. Then, enter the subnet address in Address(es) and select the correct Subnet mask.
- Description: Add a description for easy identification.
- Click Save and then click Apply Changes at the top of the screen.
Conclusion
By following this guidance, you can securely add and configure Virtual IPs in pfSense, giving you the flexibility to manage multiple IP addresses on a single interface for NAT rules, failover deployments, and expanded service hosting.
For additional assistance or if you encounter any issues, please contact our support team at support@ipserverone.com.