
Search Our Database
How to Manage VM Backups in Proxmox
Introduction
Proxmox Virtual Environment (VE) is an open-source virtualization platform used by system administrators and businesses to run and manage virtual machines (VMs) and containers. This guide explains how to create manual backups, schedule automatic backup jobs, perform backups from the command line, and restore a VM from an existing backup through the Proxmox web interface and shell. Regular backups should be performed daily or before any maintenance activity to protect business data and configurations, ensuring fast recovery when hardware failure, corruption or accidental deletion occurs.
Prerequisite
- Access to the Proxmox VE web interface with Datacenter-level administrator privilege.
- Sufficient free storage space on the backup destination (local disk, NFS or SMB share).
- At least one virtual machine (VM) created on the Proxmox node.
Step-by-step Guide
Perform a Backup for VM
You can back up your virtual machines using the web interface, automated schedules, or the command line depending on your workflow.
Method 1: Perform a Manual Backup via the Web Interface
This method allows you to back up a single VM immediately from the Proxmox web interface without waiting for a scheduled job.
- Log in to the Proxmox VE web interface.
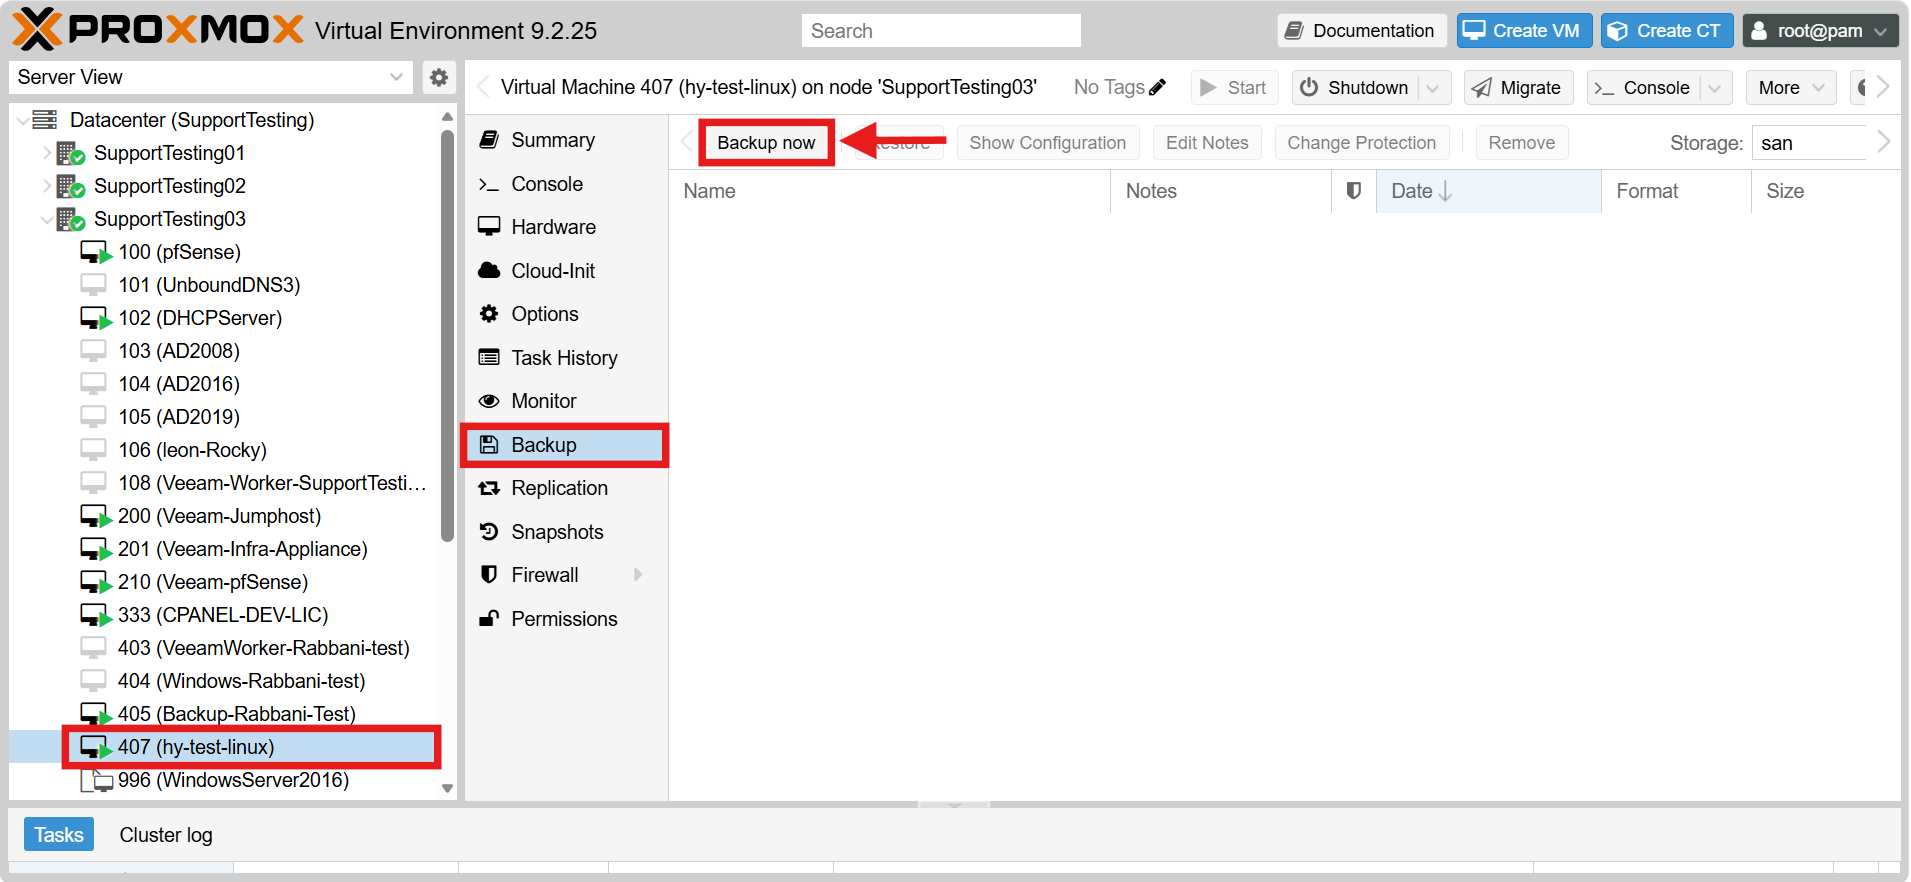
- Select the target VM from the left navigation tree.
- Go to the Backup sub-tab under the selected VM.
- Click Backup now.
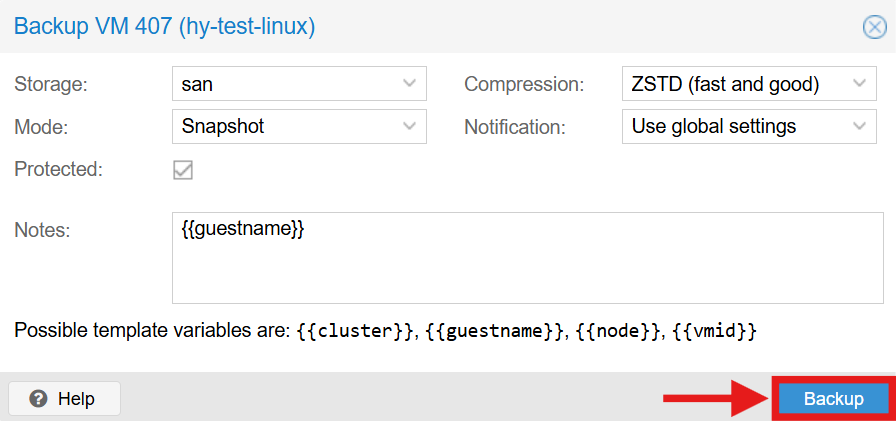
- Select the Storage destination for the backup file.
- Choose the backup Mode: Snapshot (no downtime, recommended), Suspend (VM is paused during backup) or Stop (VM is shut down during backup).
- Select the Compression option (e.g. ZSTD for a balance of speed and file size).
- Click Backup to start the process and wait for the task to complete.
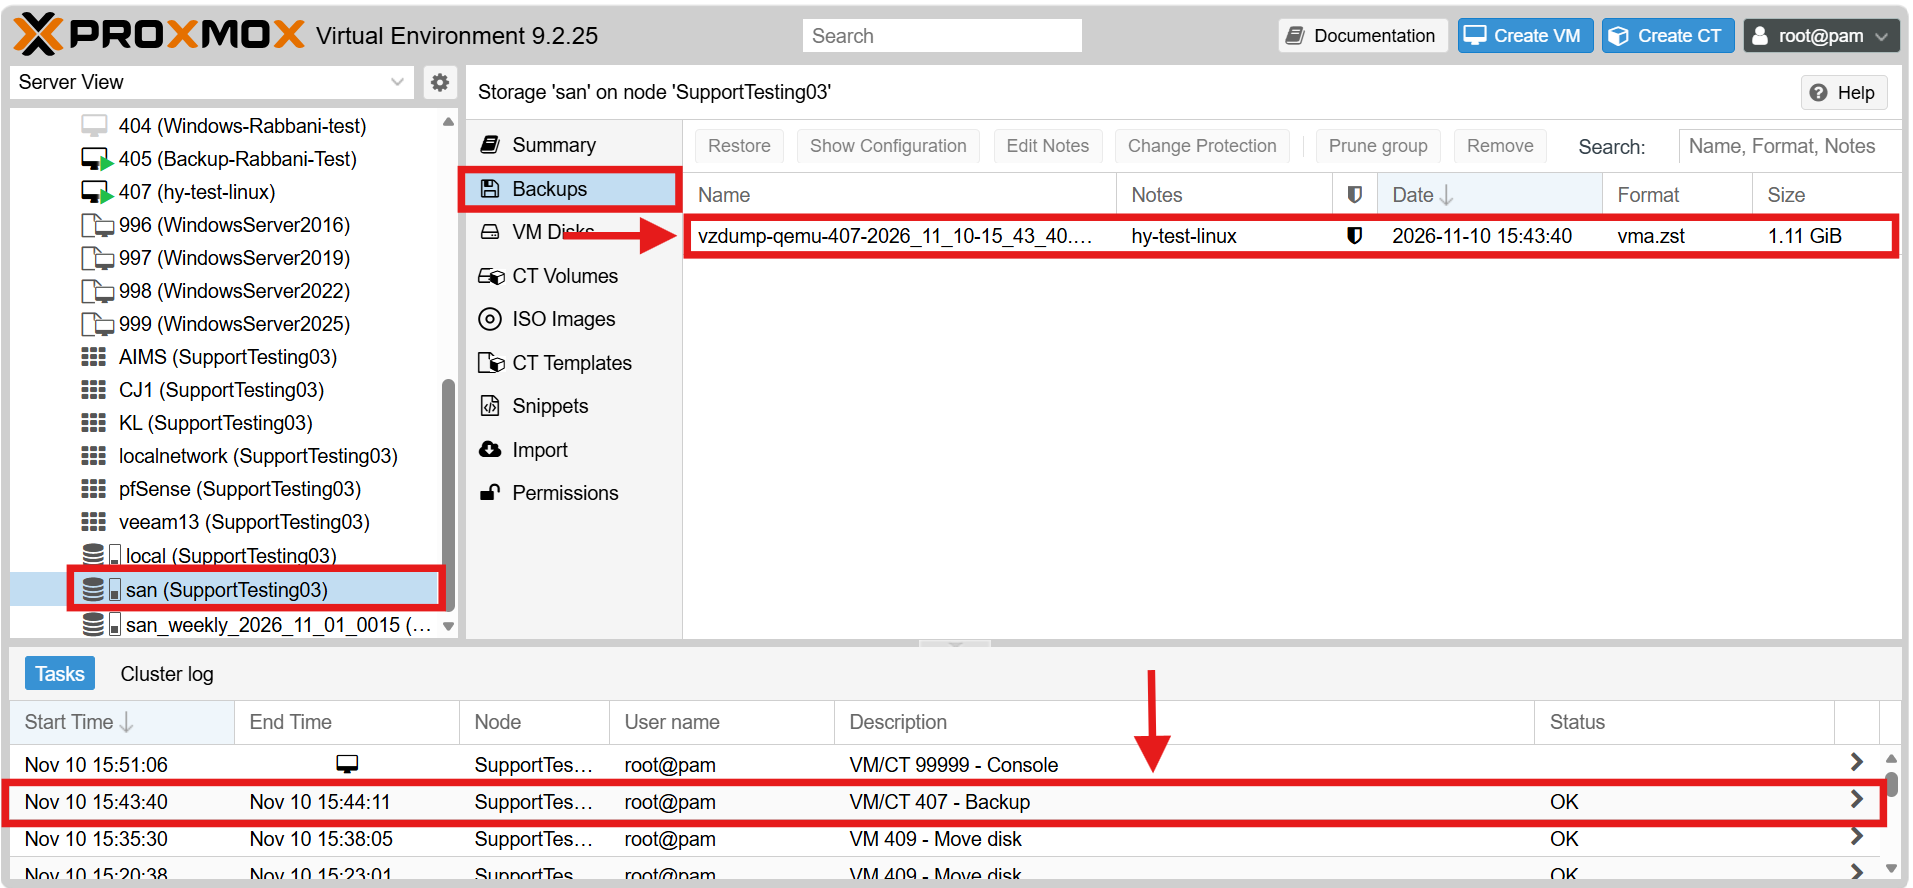
- Verify the result in the Tasks Log and confirm that the backup file appears in the selected storage.
Method 2: Schedule Automatic Backup Jobs
This method configures Proxmox to back up your VMs automatically at a scheduled time, so no manual action is required.
- Log in to the Proxmox VE web interface.
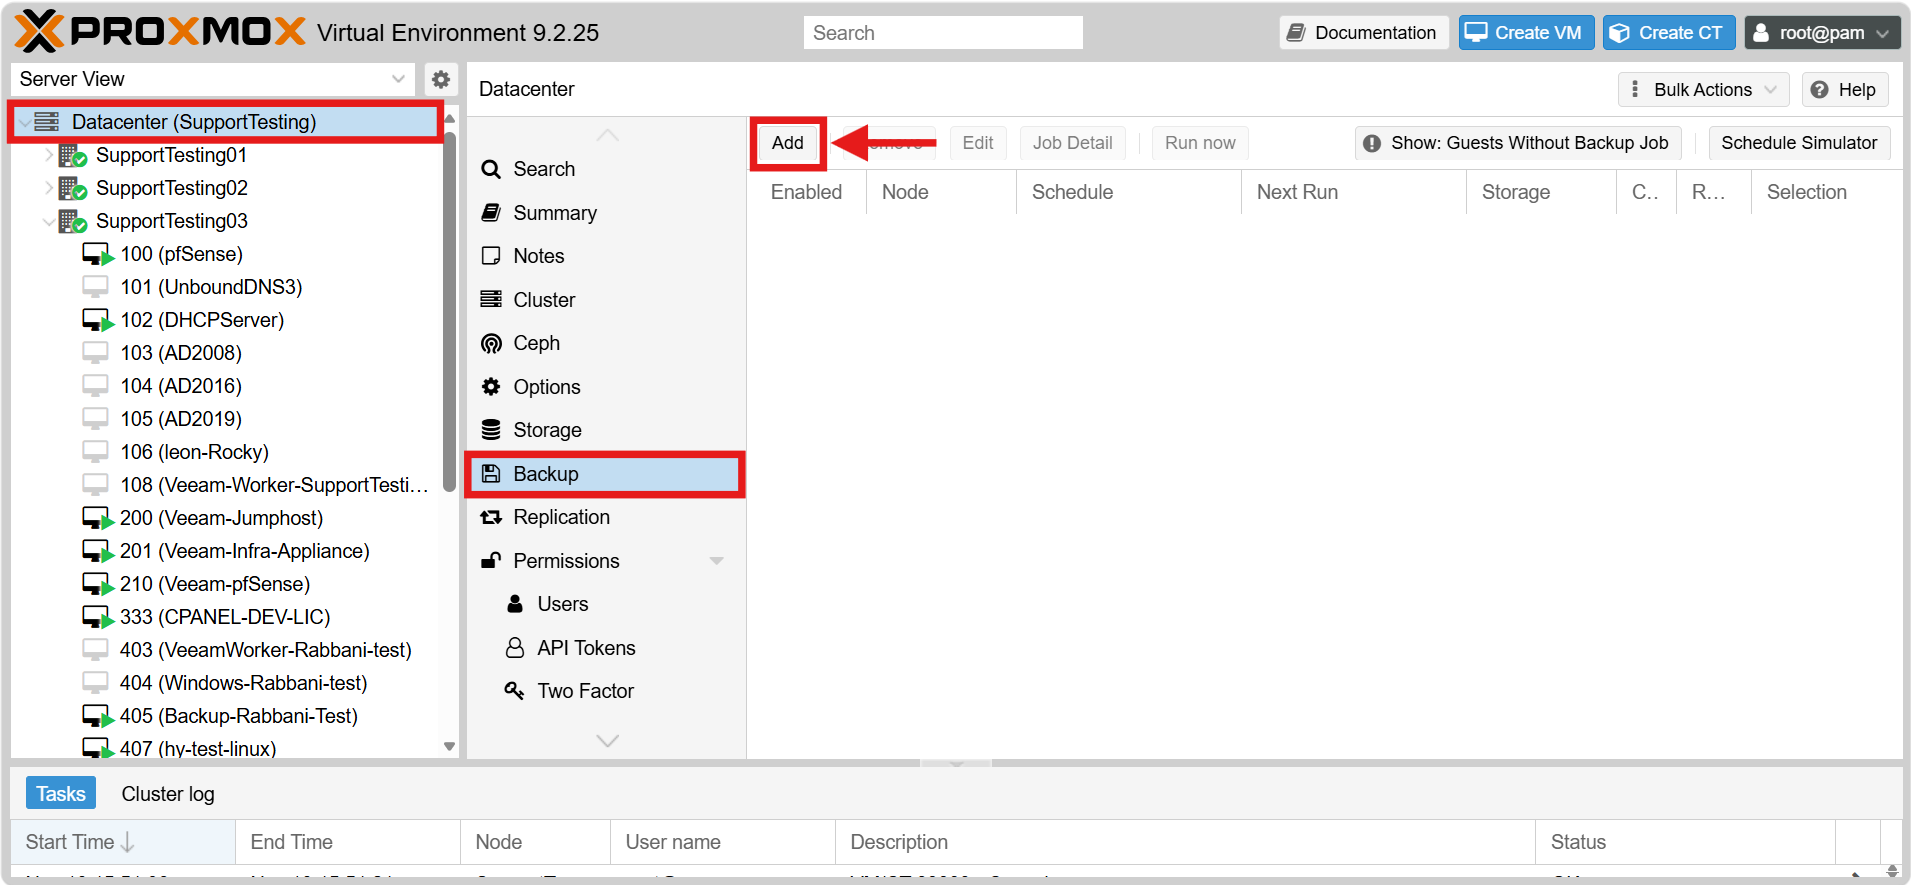
- Select the Datacenter level from the left navigation tree.
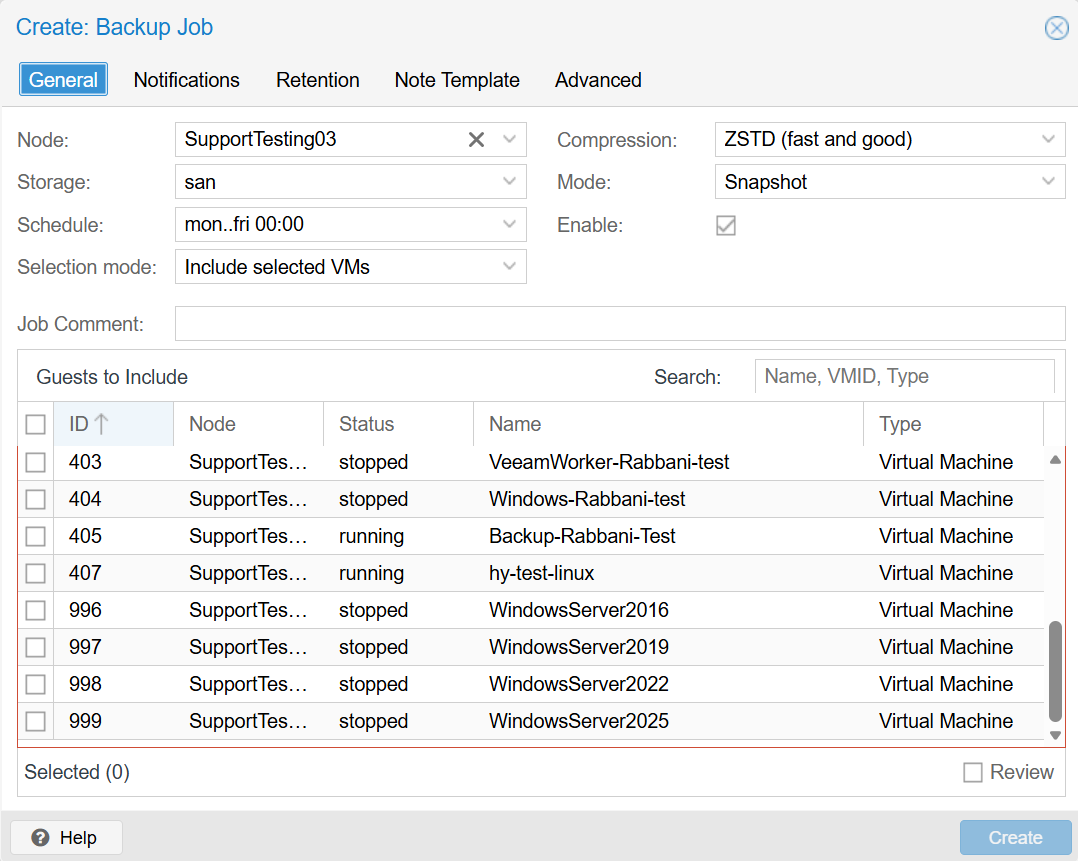
- Go to Backup and click Add to open the “Create: Backup Job” window.
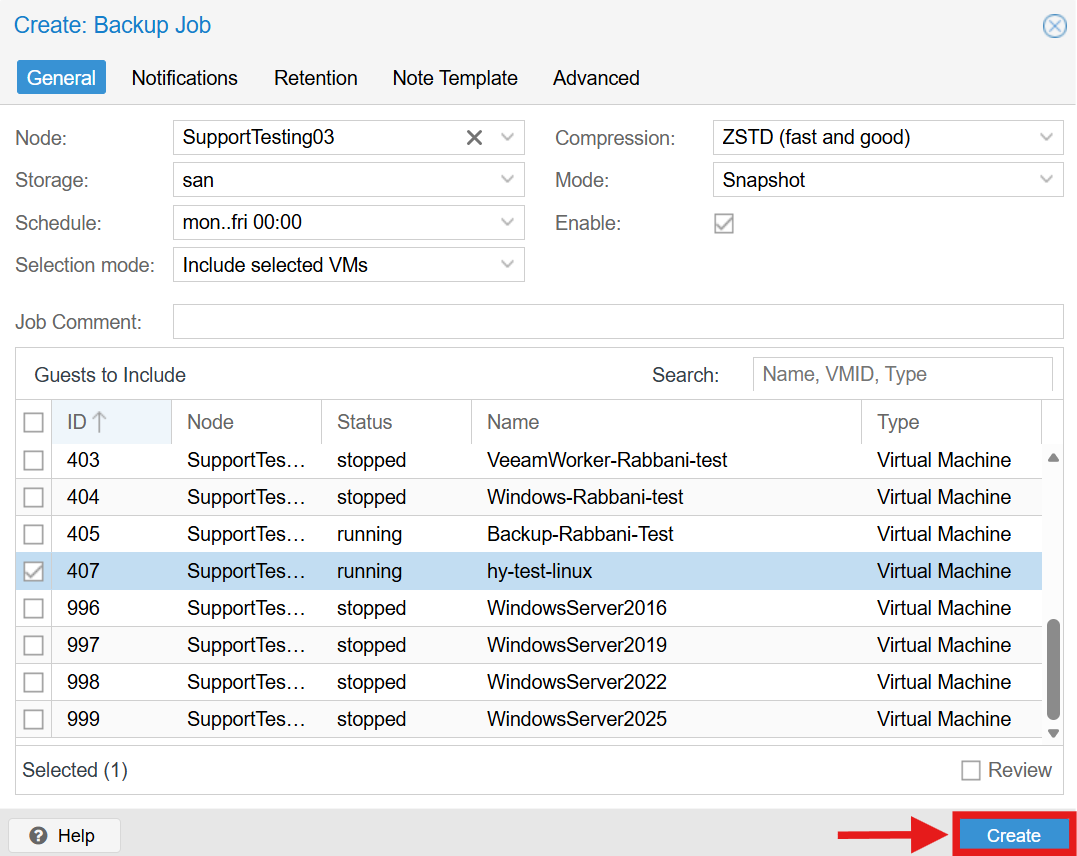
- In the General tab, configure the core backup settings:
- Node: Selects the specific Proxmox node where the backup job will execute.
- Storage: Defines the target destination where the backup files will be saved.
- Schedule: Sets the frequency and exact time the backup job runs automatically.
- Selection mode: Determines the logic for selecting VMs, such as “Include selected VMs”.
- Compression: Selects the data compression algorithm to use.
- Mode: Determines how the VM is backed up (Snapshot mode for minimal downtime).
- Guests to Include: Select the specific VMs to be backed up from the list.
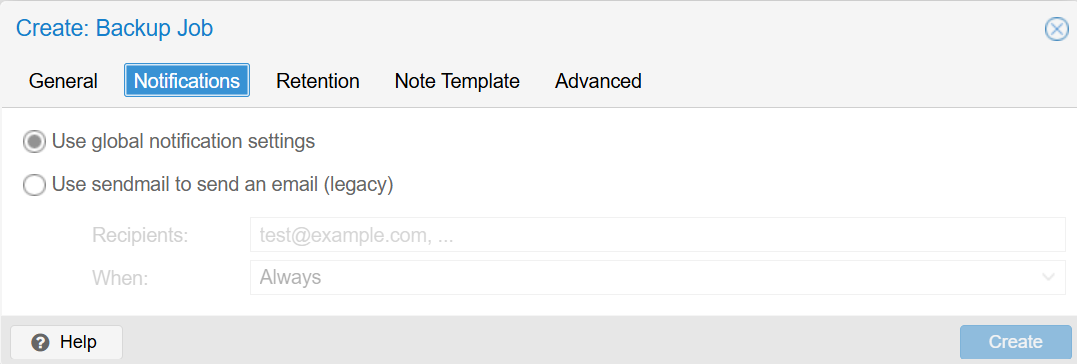
- Navigate to the Notifications tab to configure alerts:
- Use global notification settings: Applies the system-wide notification rules.
- Use sendmail to send an email (legacy): Manually configure email alerts for this job, specifying the Recipients and When to send the alert.
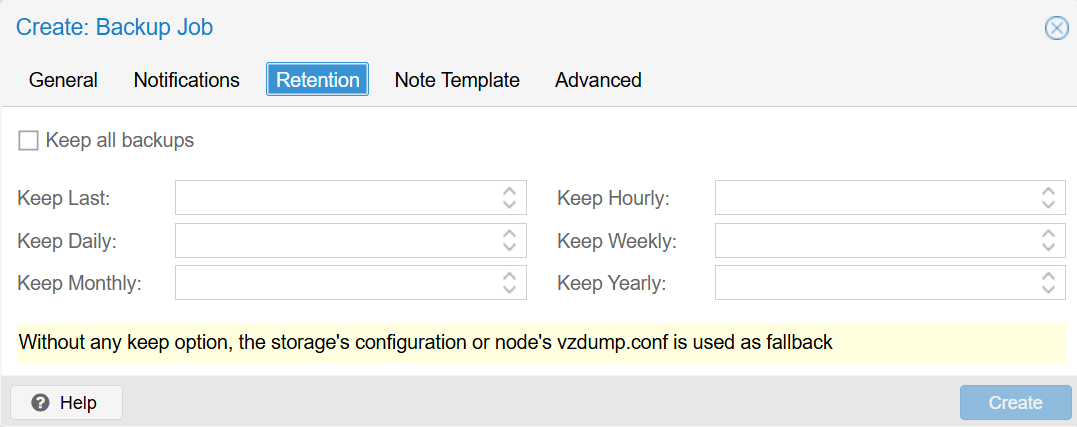
- Navigate to the Retention tab to manage historical backups:
- Keep all backups: Check this to prevent Proxmox from automatically deleting old backups.
- Keep fields (Last/Hourly/Daily/Weekly/Monthly/Yearly): Define exactly how many historical backups to retain for each time period. If left blank, the system falls back to the default configuration.
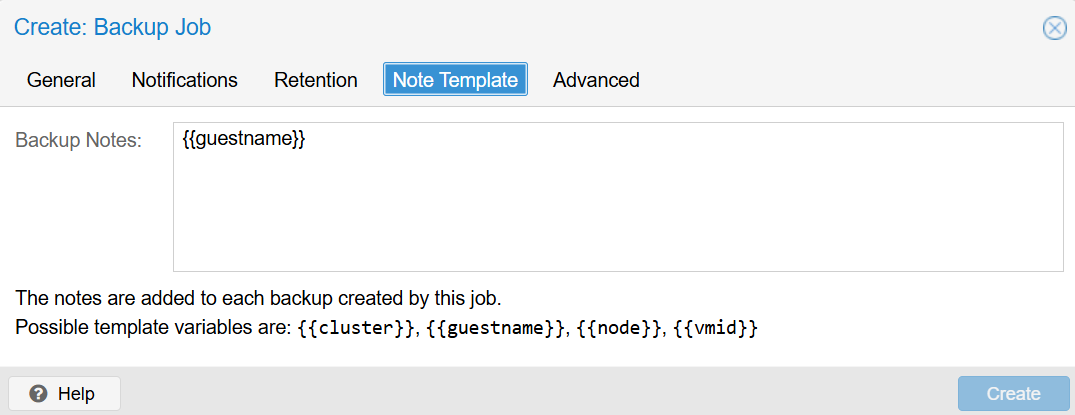
- Navigate to the Note Template tab to define a template (e.g., {{guestname}}) to automatically annotate each backup.
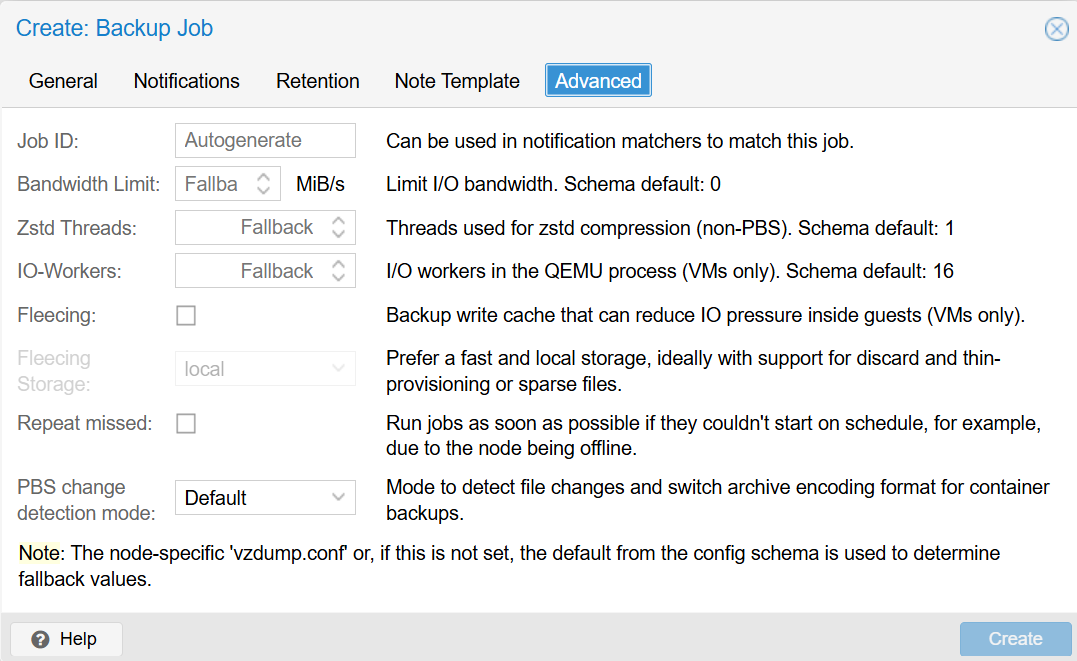
- Navigate to the Advanced tab to configure extra options such as the Bandwidth Limit, Zstd Threads, Fleecing (to reduce IO pressure), or Repeat missed to ensure jobs run if they miss their schedule.
- Click Create to save the scheduled backup job.
Method 3: Perform a Backup via the Command Line
This method is useful for advanced users who prefer to run or automate backups from the Proxmox shell using the vzdump command.
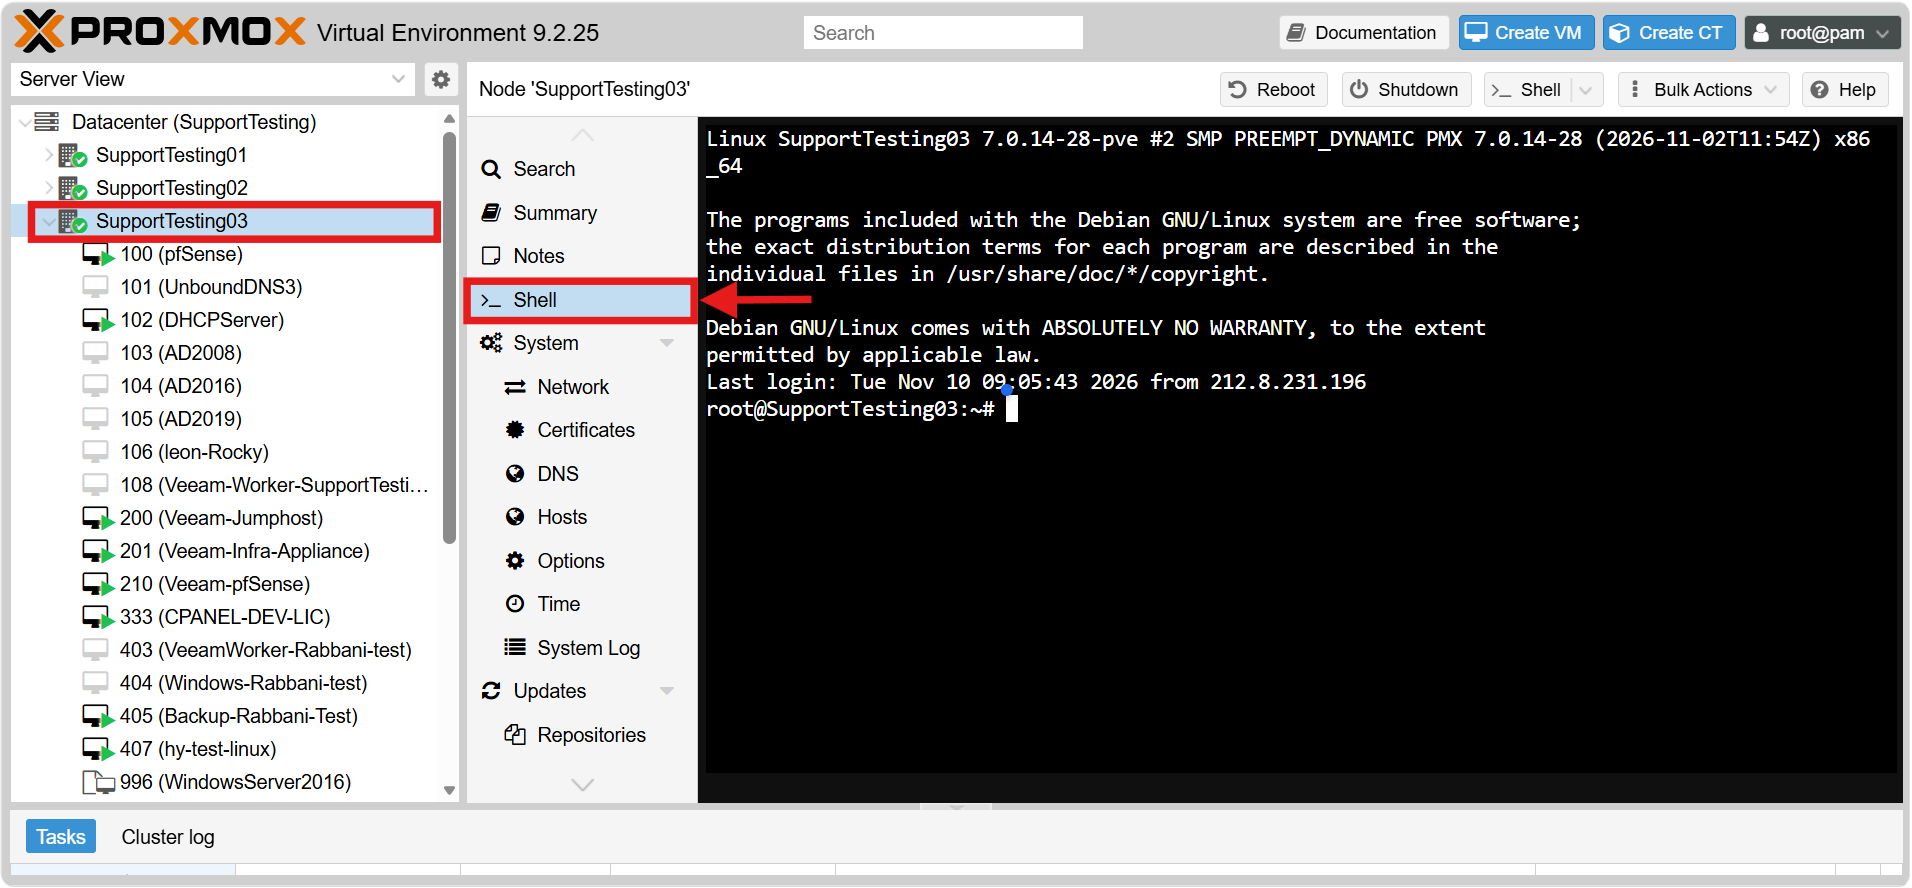
- Connect to the Proxmox node via SSH or open the Shell from the web interface. Ensure you have root privileges by running the su – command.
- To view all available command options and arguments for vzdump, open the manual page by running:
man vzdump
(Note: Press “q” on your keyboard to exit the manual page when finished).
- Review the most common vzdump options:
- –mode: Specifies the backup method (snapshot for no downtime, suspend to pause, stop to shut down).
- –compress: Sets the compression type (zstd is fast and efficient, lzo, gzip, or 0 for none).
- –storage: The ID of the target storage (e.g., san). The storage must have “VZDump backup file” enabled in its content types to avoid a “wrong content type” error.
- –mailto: Email address to send backup notifications to.
- –all 1: Backs up all VMs on the node instead of specifying a single VM ID.
- –exclude: Excludes specific VM IDs when backing up all VMs.
- –notes-template: Adds a custom text note to the backup archive.
- Run the following command to back up a specific VM (replace <vmid> with your VM ID and <storage-name> with your target storage name):
vzdump <vmid> --mode snapshot --compress zstd --storage <storage-name>
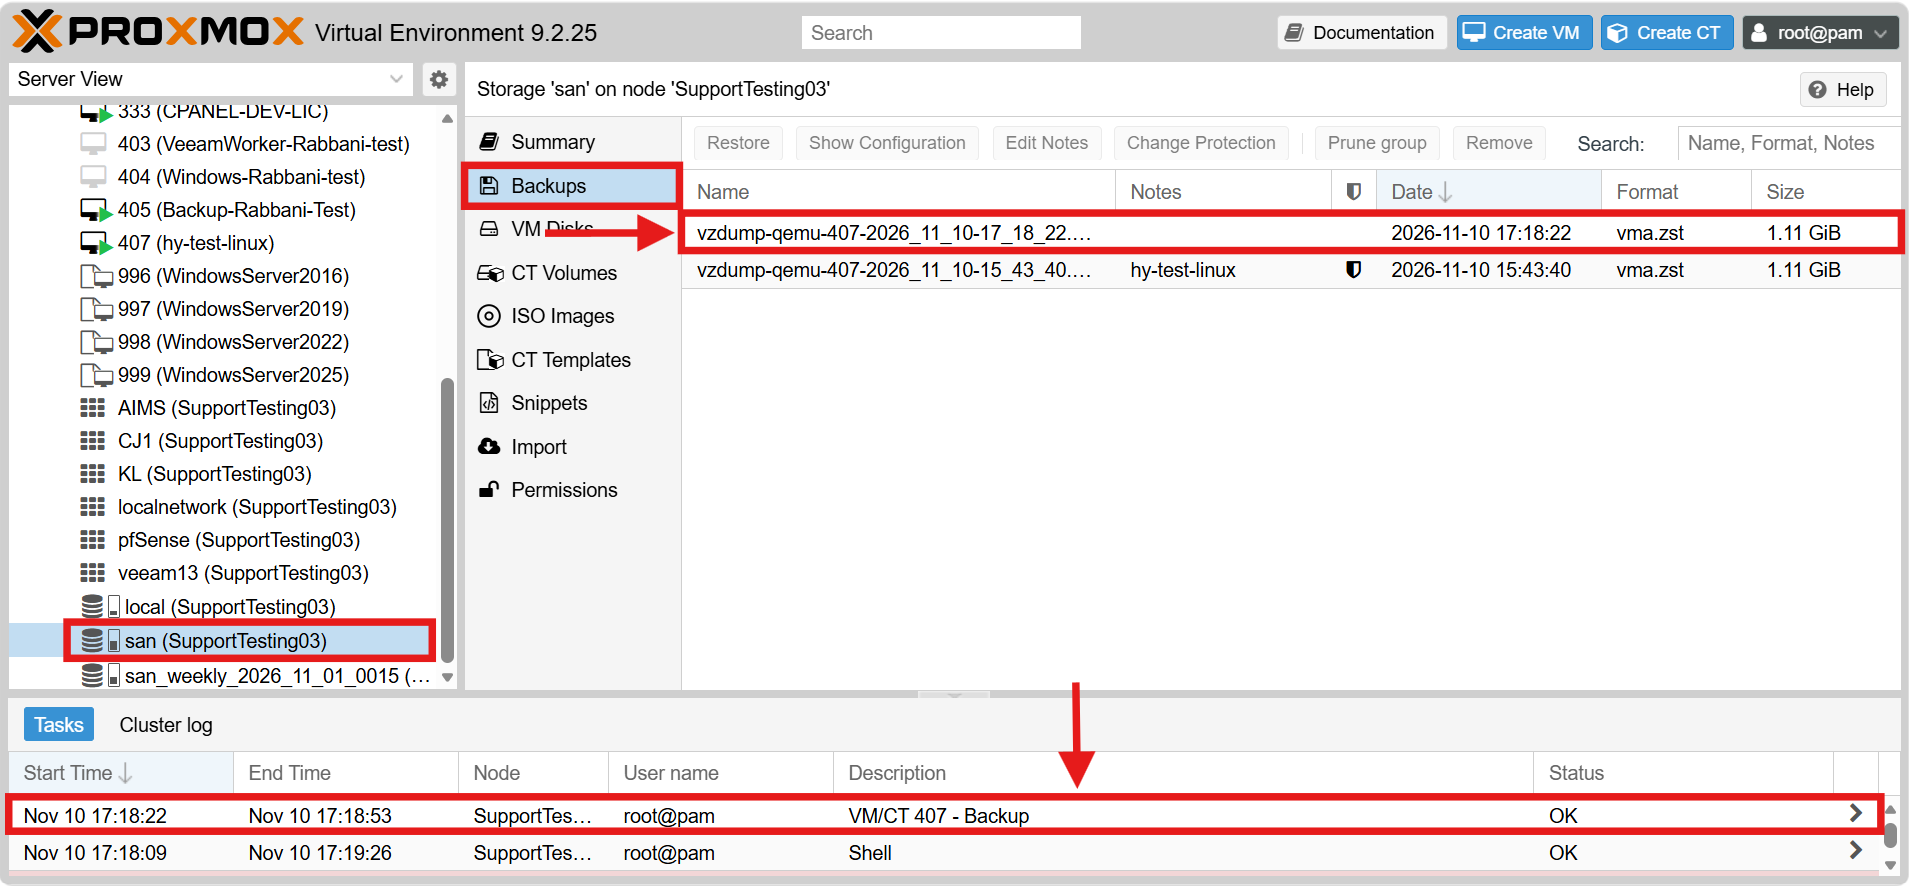
- Wait for the process to finish, then confirm that the backup file has been created in the target storage directory.
Restore a VM from a Backup
This section covers how to recover a VM from an existing backup file, either to the original VM or as a new VM.
Method 1: Restore & Overwrite an Existing VM
Use this method if the original VM still exists and you want to roll it back to a previous state.
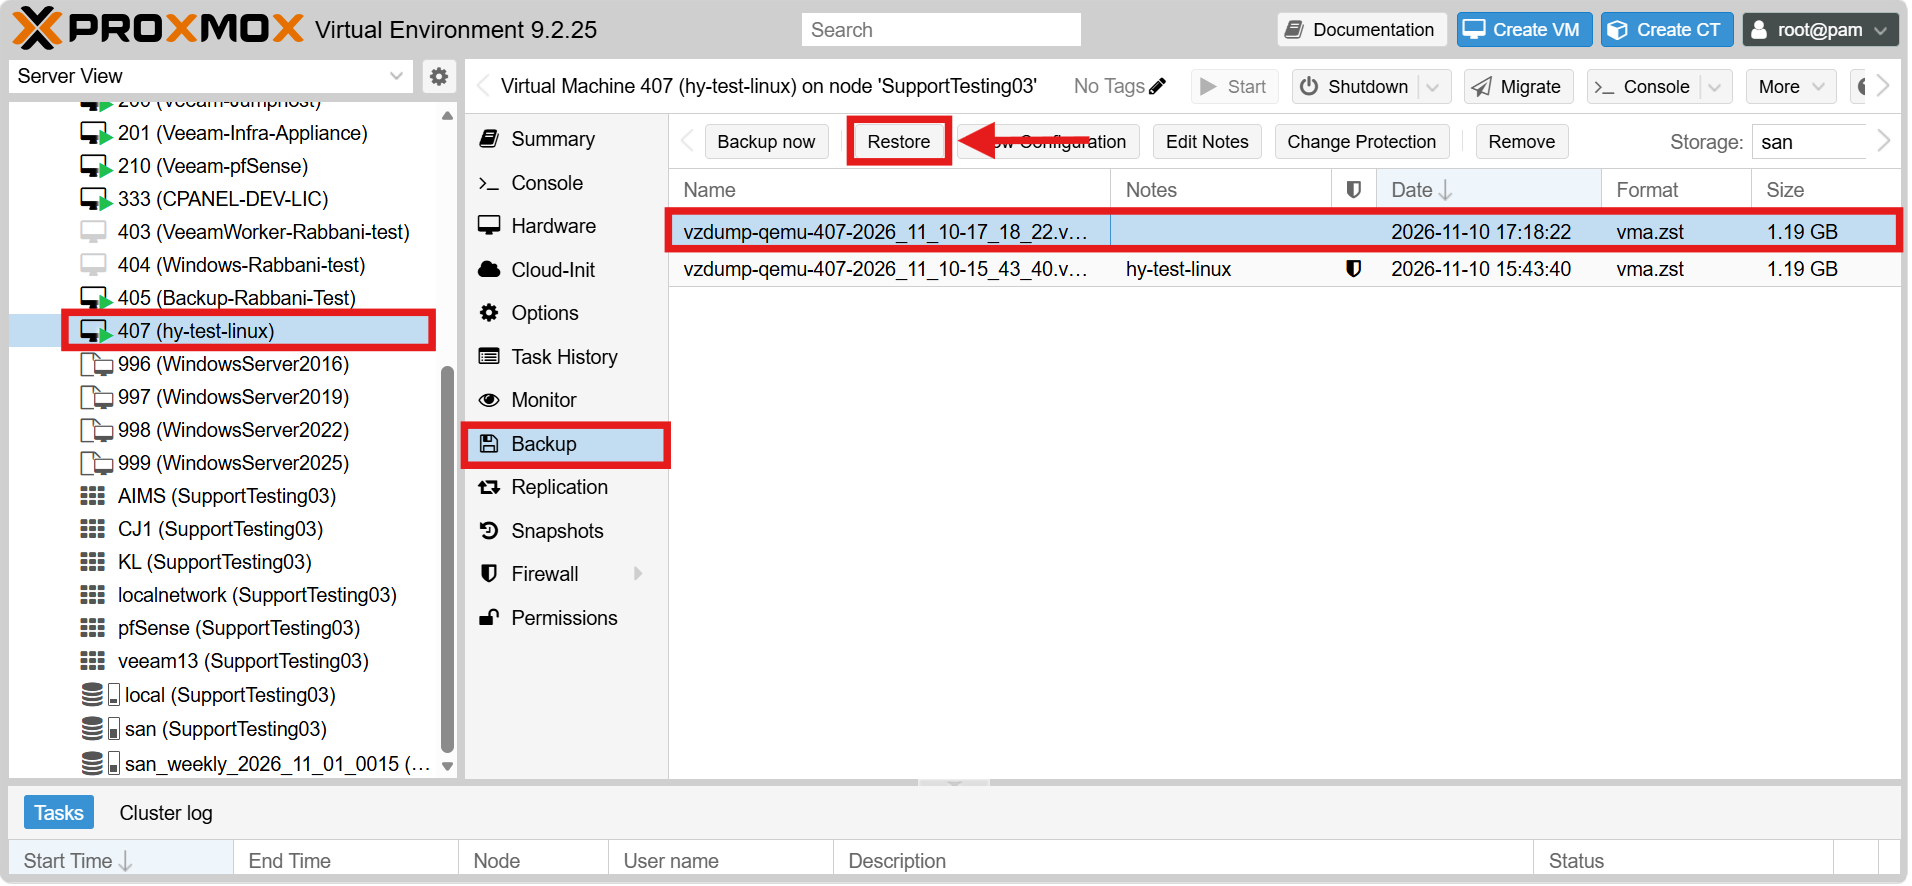
- Select the target Virtual Machine from the left navigation tree.
- Go to the Backup sub-tab under the VM’s menu.
- Select the desired backup file from the list and click Restore.
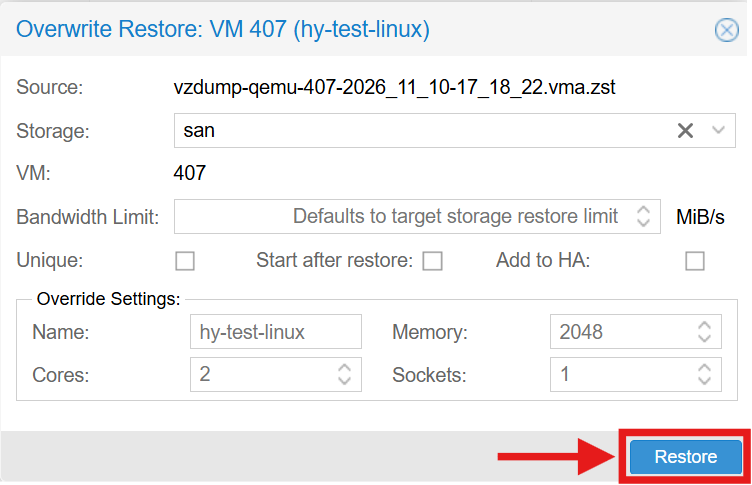
- Confirm the storage settings and click Restore to overwrite the current VM.
Method 2: Restore as a New VM
Use this method if the original VM was deleted, or if you want to restore the backup alongside the original VM for testing.
- Log in to the Proxmox VE web interface.
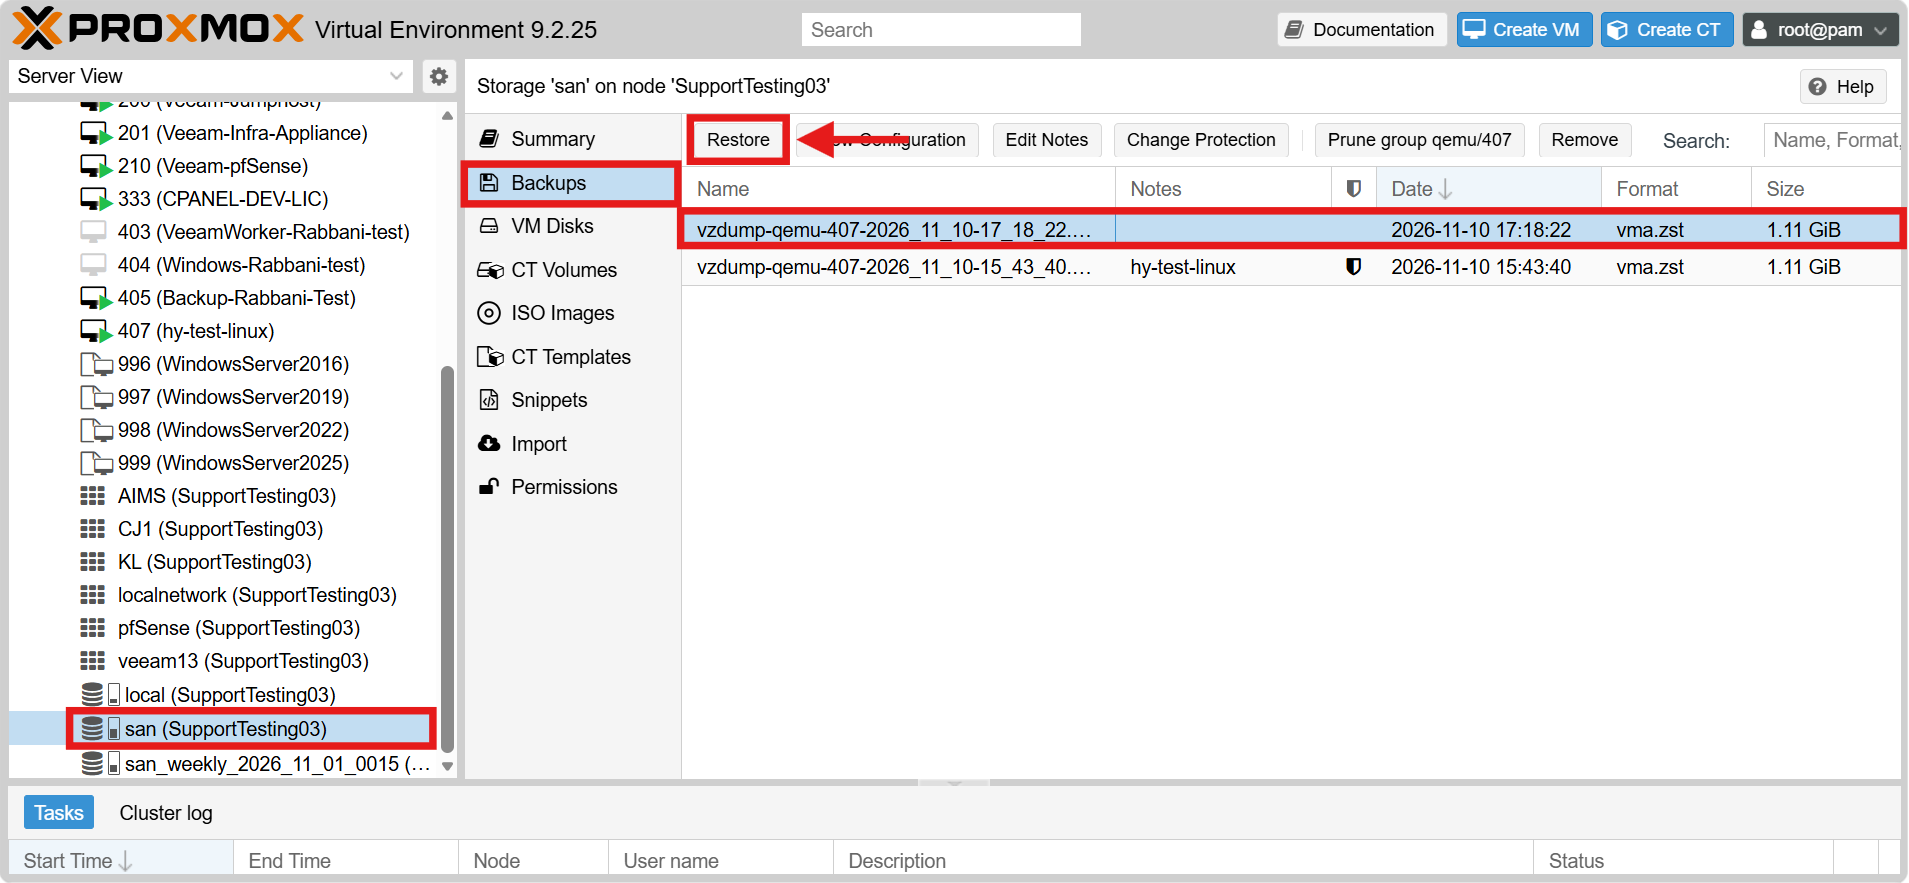
- Select the storage that contains the backup files from the left navigation tree.
- Go to the Backups sub-tab.
- Select the backup file of the desired VM and click Restore.
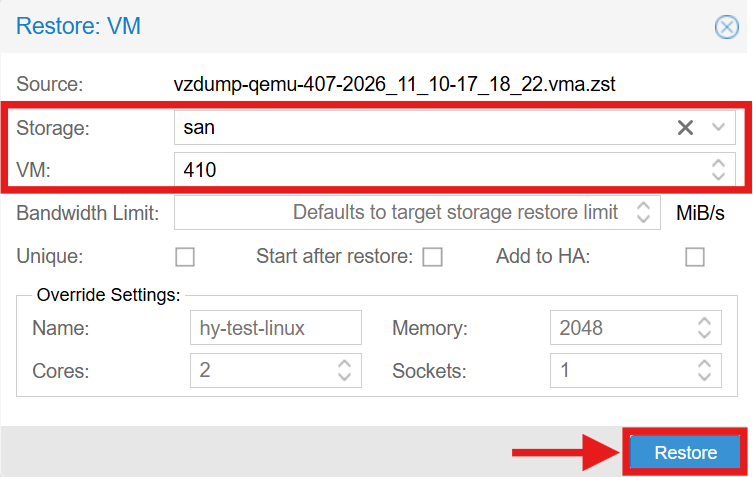
- Choose the Storage for the restored VM disks and enter a new, unused VM ID (e.g., 410). Entering an existing ID here will result in a “VM ID is already in use” error.
- Click Restore and wait for the task to complete.
Conclusion
By following this guidance, you can create manual backups, schedule automatic backup jobs, run backups from the command line, and restore VMs from backups in Proxmox VE. Maintaining regular backups ensures that your virtual machines and their data can be recovered quickly and reliably whenever system failure or data loss occurs.
For any assistance or inquiries, please contact our support team at support@ipserverone.com.