
Search Our Database
How to Enable HTTP Compression in Windows
Introduction
Server administrators can significantly improve website performance and reduce bandwidth consumption by enabling HTTP compression on Windows servers. By activating static and dynamic compression methods like Gzip or Brotli, you can ensure that web pages load faster for end users. This process is essential when optimizing a high-traffic environment or seeking to lower hosting resource usage. If the dynamic compression option is greyed out, the required IIS module must be installed first. Following this guide, you will learn how to install the missing module and configure these compression settings directly within the Internet Information Services (IIS) Manager.
Prerequisite
- Access to Windows Server Manager with Administrator privileges.
- Access to Internet Information Services (IIS) Manager with Administrator privileges.
- Basic knowledge of navigating the Windows Server environment.
Step-by-step Guide
If the “Enable dynamic content compression” checkbox is greyed out, you must first install the required module via Server Manager. Afterward, you can choose to configure HTTP compression globally for the entire server or individually for specific sites.
Step 1: Install Dynamic Content Compression Module
Perform this step if the dynamic compression setting is greyed out in IIS Manager.
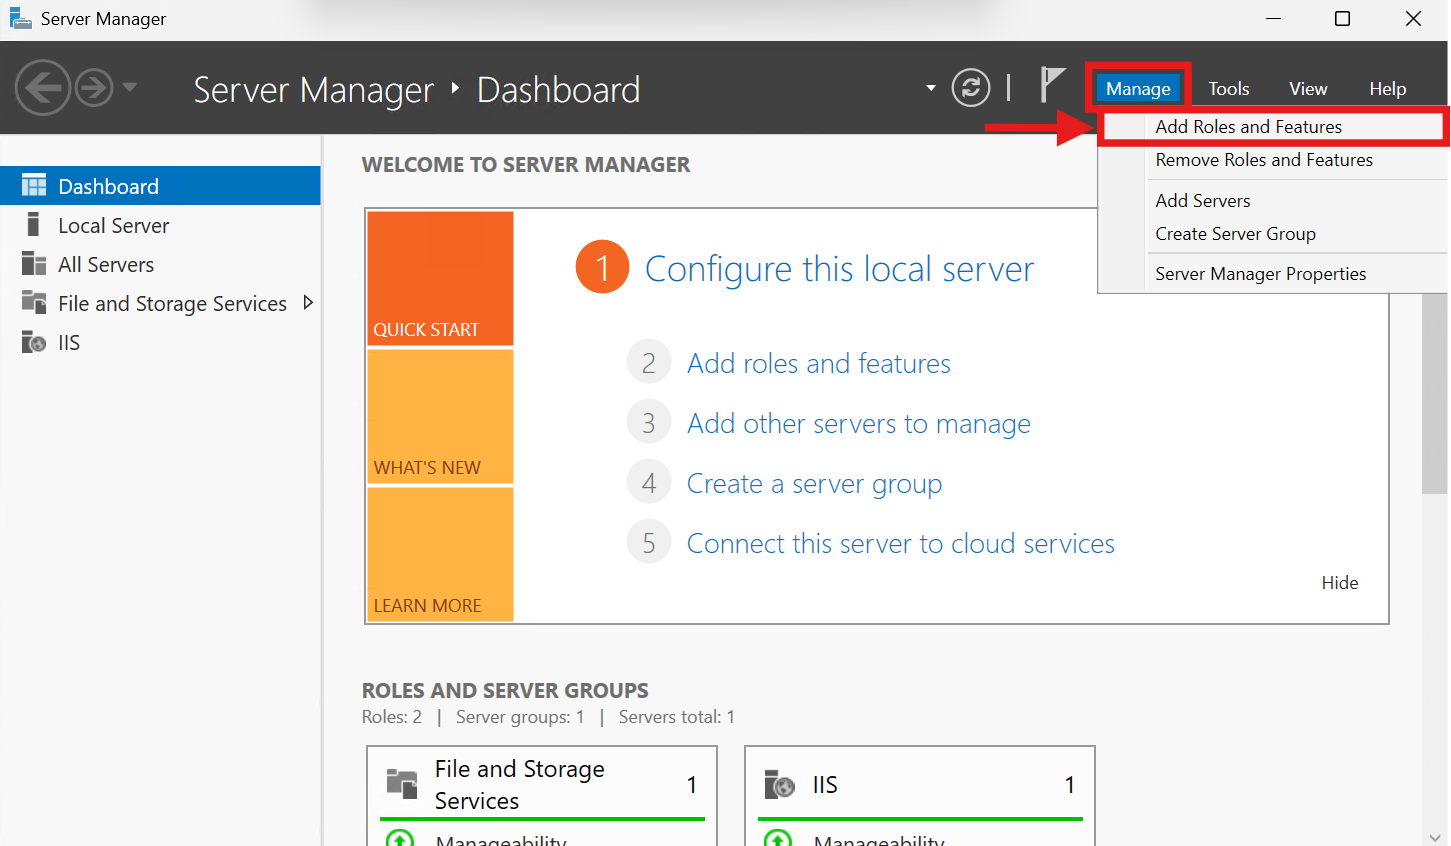
- Open Server Manager in Windows.

- From the Dashboard, click on Manage > Add roles and features.
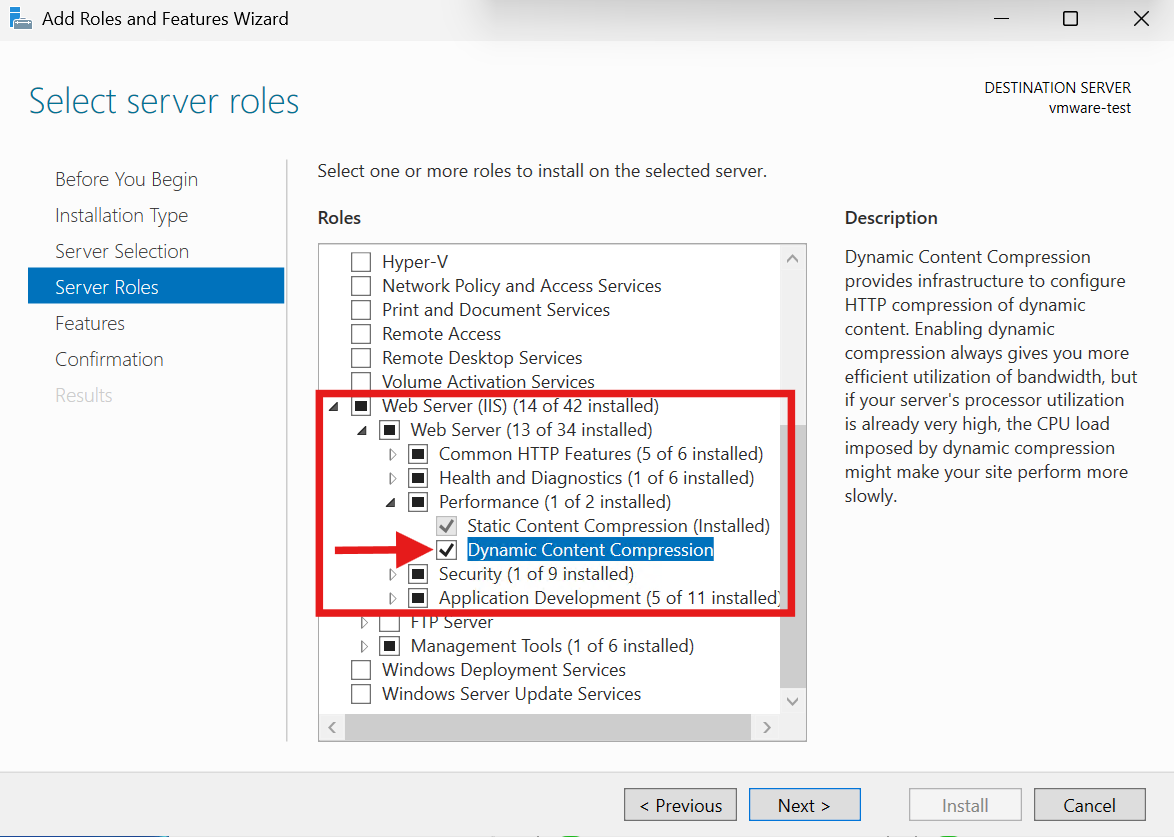
- Click Next > until you reach the Server Roles section.
- Expand Web Server (IIS) > Web Server > Performance.
- Check the box for Dynamic Content Compression (ensure Static Content Compression is also checked).
- Click Next > through the remaining screens and click Install.
- Once the installation completes, close the wizard and restart IIS Manager to apply the changes.
Step 2: Enable Compression
This option applies compression settings globally to all websites hosted on the server.
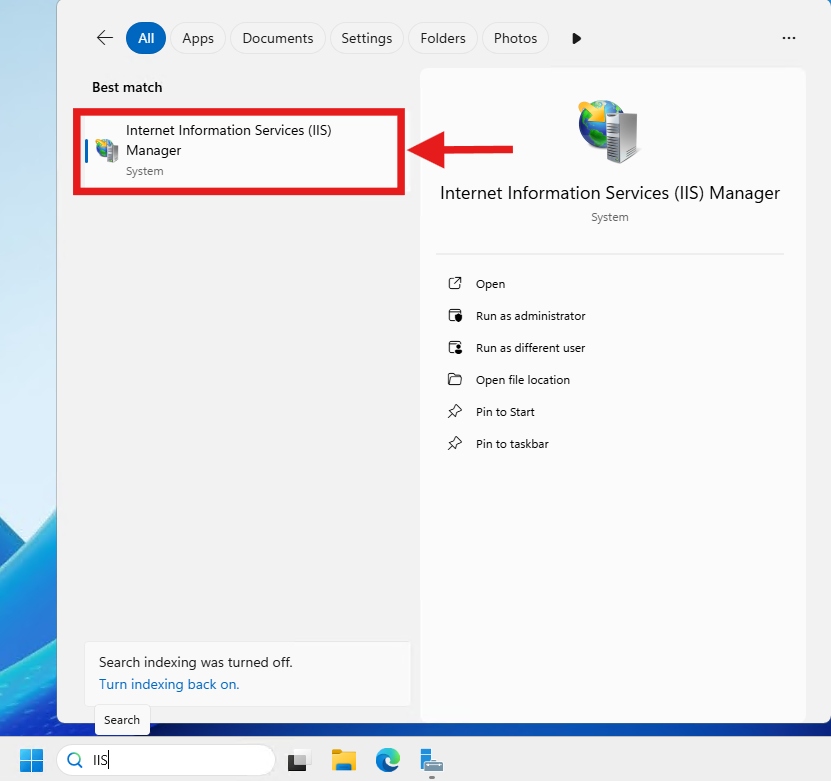
- Open Internet Information Services (IIS) Manager.
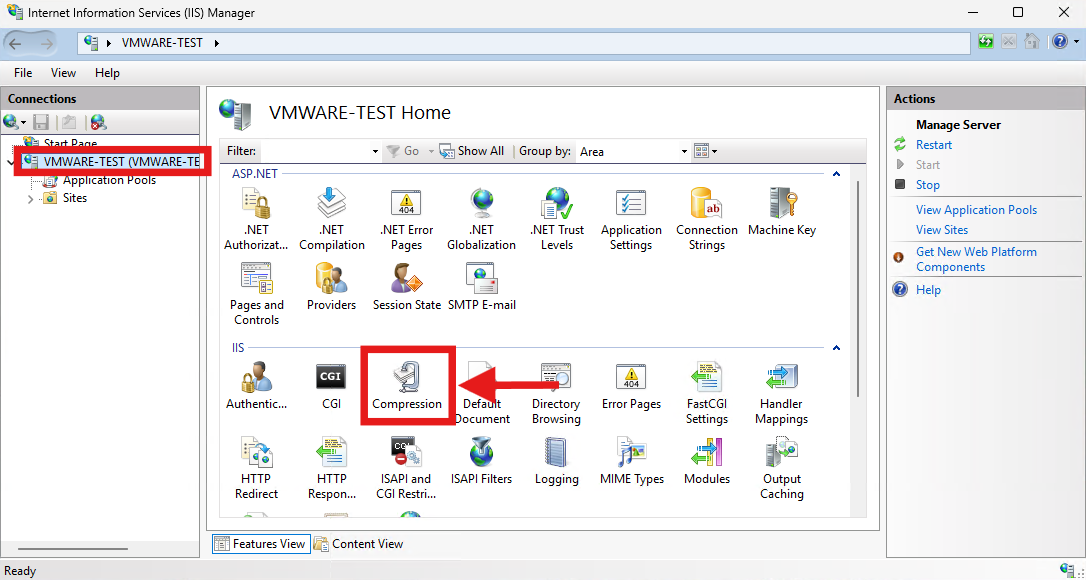
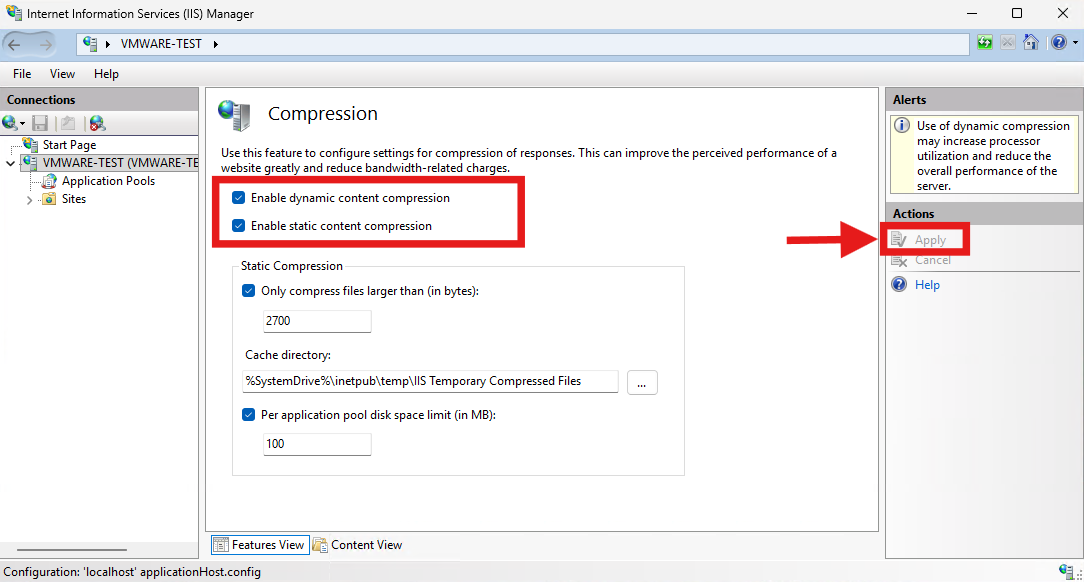
- In the Connections pane on the left, click on your Server Name.
- In the Home pane, double-click the Compression feature located under the IIS section.
- Check the boxes for Enable dynamic content compression and Enable static content compression.
- Dynamic content compression: Compresses dynamically generated responses (like ASP.NET or PHP output) on the fly, which can use more processor power but saves bandwidth.
- Static content compression: Compresses static files (like HTML, images, and CSS) and saves them in a cache directory, speeding up subsequent requests for those files.
- Under the Static Compression section, you can configure the following optional settings:
- Only compress files larger than (in bytes): Specifies a minimum file size (e.g., 2700 bytes) before compression is applied. Small files aren’t compressed because the processing overhead outweighs the bandwidth savings.
- Cache directory: Sets the local folder path (e.g., %SystemDrive%\inetpub\temp\IIS Temporary Compressed Files) where compressed versions of static files are stored.
- Per application pool disk space limit (in MB): Caps the maximum disk space (e.g., 100 MB) that can be used for caching compressed static files per application pool.
- In the Actions pane on the right, click Apply to save the changes.
This option allows you to apply compression settings to a specific website without affecting other hosted sites.
- Open Internet Information Services (IIS) Manager.
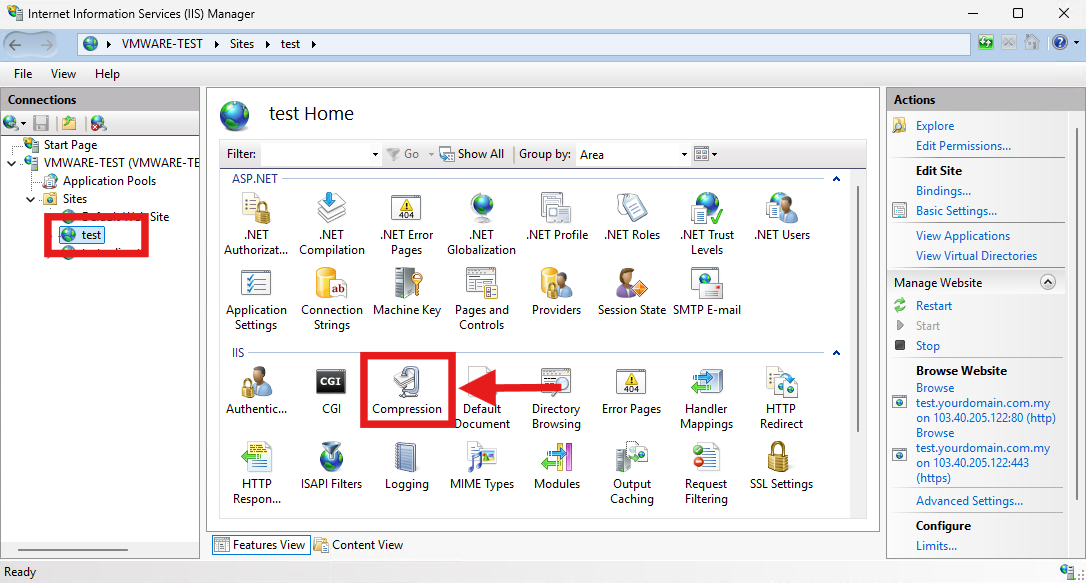
- In the Connections pane on the left, expand the Sites folder and select your specific website.
- In the Home pane, double-click the Compression feature located under the IIS section.
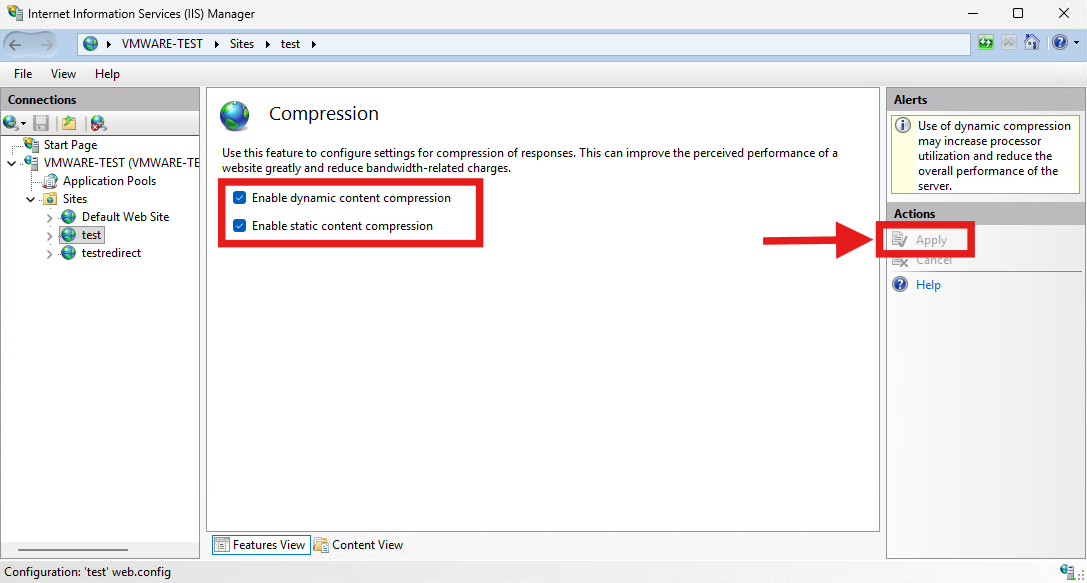
- Check the boxes for Enable dynamic content compression and Enable static content compression.
- In the Actions pane on the right, click Apply to save the changes.
Conclusion
By following this guidance, you can install the necessary IIS modules and effectively manage HTTP compression on your Windows server, reducing bandwidth usage and accelerating page load times for your visitors.
If you require further assistance, please contact us at support@ipserverone.com.