
Search Our Database
Directadmin | Configure DirectAdmin Server Hostname Behind Cloudflare on Port 2096
Overview
DirectAdmin standard uses port 2222 for its control panel login.
Cloudflare’s standard HTTP/HTTPS proxy does not support that port.
Cloudlflare supported HTTPS ports include 443, 2053, 2083, 2087, 2096 and 8443.
DirectAdmin specifically recommends 2096 when accessing its GUI if the DNS records proxy through Cloudflare.
This guide focused on configure DirectAdmin server hostname for proxied HTTPS access, on port 2096 while preserving visitor-IP handling and SSL/TLS validation.
The intended connection path is:
Every network layer must permit the connection for port 2096.
Remember, changing the DirectAdmin port alone does not automatically update a cloud security group or firewall rules.
Prerequisites
- Administrator/root SSH access to the DirectAdmin server or console session.
- Access to the Cloudflare DNS zone that manages the server hostname (for example, server.example.com).
- Permission to configure the cloud security group and the operating-system firewall (such as CSF).
- Plus an approved change window.
Important note: Changing the DirectAdmin port affects all panel users and may briefly interrupt panel access, while the service restart or during config rewrite.
Keep a recovery SSH session open, update saved panel URLs, and check whether the server hostname TLS certificate is also used by web, mail or FTP services before replacing it.
Step-by-step guide
Step 1: Check the existing DirectAdmin settings
Record the current configuration so you have the original settings available if access needs to be restored.
da config-get ssl
da config-get accept_cloudflare_proxy_requests
Expected result: The commands display the current panel port, SSL state and Cloudflare proxy setting.
Step 2: Allow TCP 2096 through the network security controls
Before switching ports, permit inbound TCP 2096 at the cloud security group and at the server firewall. Whitelist your own public IP as starting point.
Where the control panel should be reachable only through Cloudflare, make sure restrict source addresses to Cloudflare’s published IPv4 and IPv6 networks.
Step 3: Configure DirectAdmin to use port 2096
Change the panel listener and enable the option that lets DirectAdmin recognize the real visitor IP from Cloudflare’s CF-Connecting-IP header.
da config-set accept_cloudflare_proxy_requests 1
If SSL is not already enabled, enable it using the approved change procedure and confirm a suitable certificate is installed before exposing the hostname:
da config-get ssl
da config-get accept_cloudflare_proxy_requests
systemctl is-active directadmin
ss -ltnp | grep ‘:2096 ‘
Expected result: The port returns 2096, SSL returns 1, proxy awareness returns 1, and DirectAdmin is active and listening on port 2096. The configuration commands may reload or restart the panel service.
Step 4: Confirm the server hostname’s TLS certificate
In DirectAdmin, open Server Manager > Server TLS Certificate and confirm that the certificate covers the intended hostname.
Two common choices are:
- Publicly trusted certificate (for example, Let’s Encrypt): Appropriate when the hostname also needs to be trusted for direct access or other services.
- Cloudflare Origin CA certificate: Suitable for the Cloudflare-to-origin connection under Full (strict), but not trusted by ordinary browsers when they connect directly to the origin.
DirectAdmin may deploy its server hostname certificate to web, mail and FTP services, so review those uses before changing the certificate. The optional Cloudflare DNS API-token workflow below is relevant only if you choose ACME DNS validation.
Step 5: Enable Cloudflare Proxy for the hostname
In Cloudflare, open DNS > Records. Create or update the hostname’s A record to point to the correct public origin IP, then set its proxy status to Proxied (orange cloud).
Review any existing AAAA records or Origin Rules so they do not direct traffic to an unintended address.
In SSL/TLS, use Full (strict) after verifying that the origin certificate meets the mode’s requirements.
Expected result: You may do a ping test, the server public hostname resolves to Cloudflare edge IPs while the DNS record inside Cloudflare retains the correct origin address.
Step 6: Verify hostname access
Open https://server.example.com:2096/ in a browser, replacing the example hostname with your actual server hostname.
For an additional external check, run:
curl -I –connect-timeout 10 https://server.example.com:2096/evo/
Optional: Use a Cloudflare DNS API token for Let’s Encrypt
A Cloudflare DNS API token is not required merely to proxy DirectAdmin on port 2096.
Use one when DirectAdmin needs to perform DNS-based ACME validation through Cloudflare to issue or renew a publicly trusted server-hostname certificate.
- In Cloudflare, open My Profile > API Tokens > Create Token and choose the Edit zone DNS template. Limit Zone > DNS > Edit to the required Specific Zone.
- If you set an IP restriction, use the server’s actual outbound IP.
- Store the token securely for DirectAdmin’s server-hostname ACME integration. The documented default environment file is /usr/local/directadmin/conf/ca.dnsprovider.
- Configure the server-hostname ACME DNS provider and enable certificate management, then review or request the certificate under Server Manager > Server TLS Certificate.
da config-set acme_server_cert_provider letsencrypt
da config-set acme_server_cert_enabled 1
The token environment file uses the variable name CLOUDFLARE_DNS_API_TOKEN
Or, if you’re in Directadmin UI > Server Manager > Server TLS Certificate > ACME Setting > DNS Environment Variables
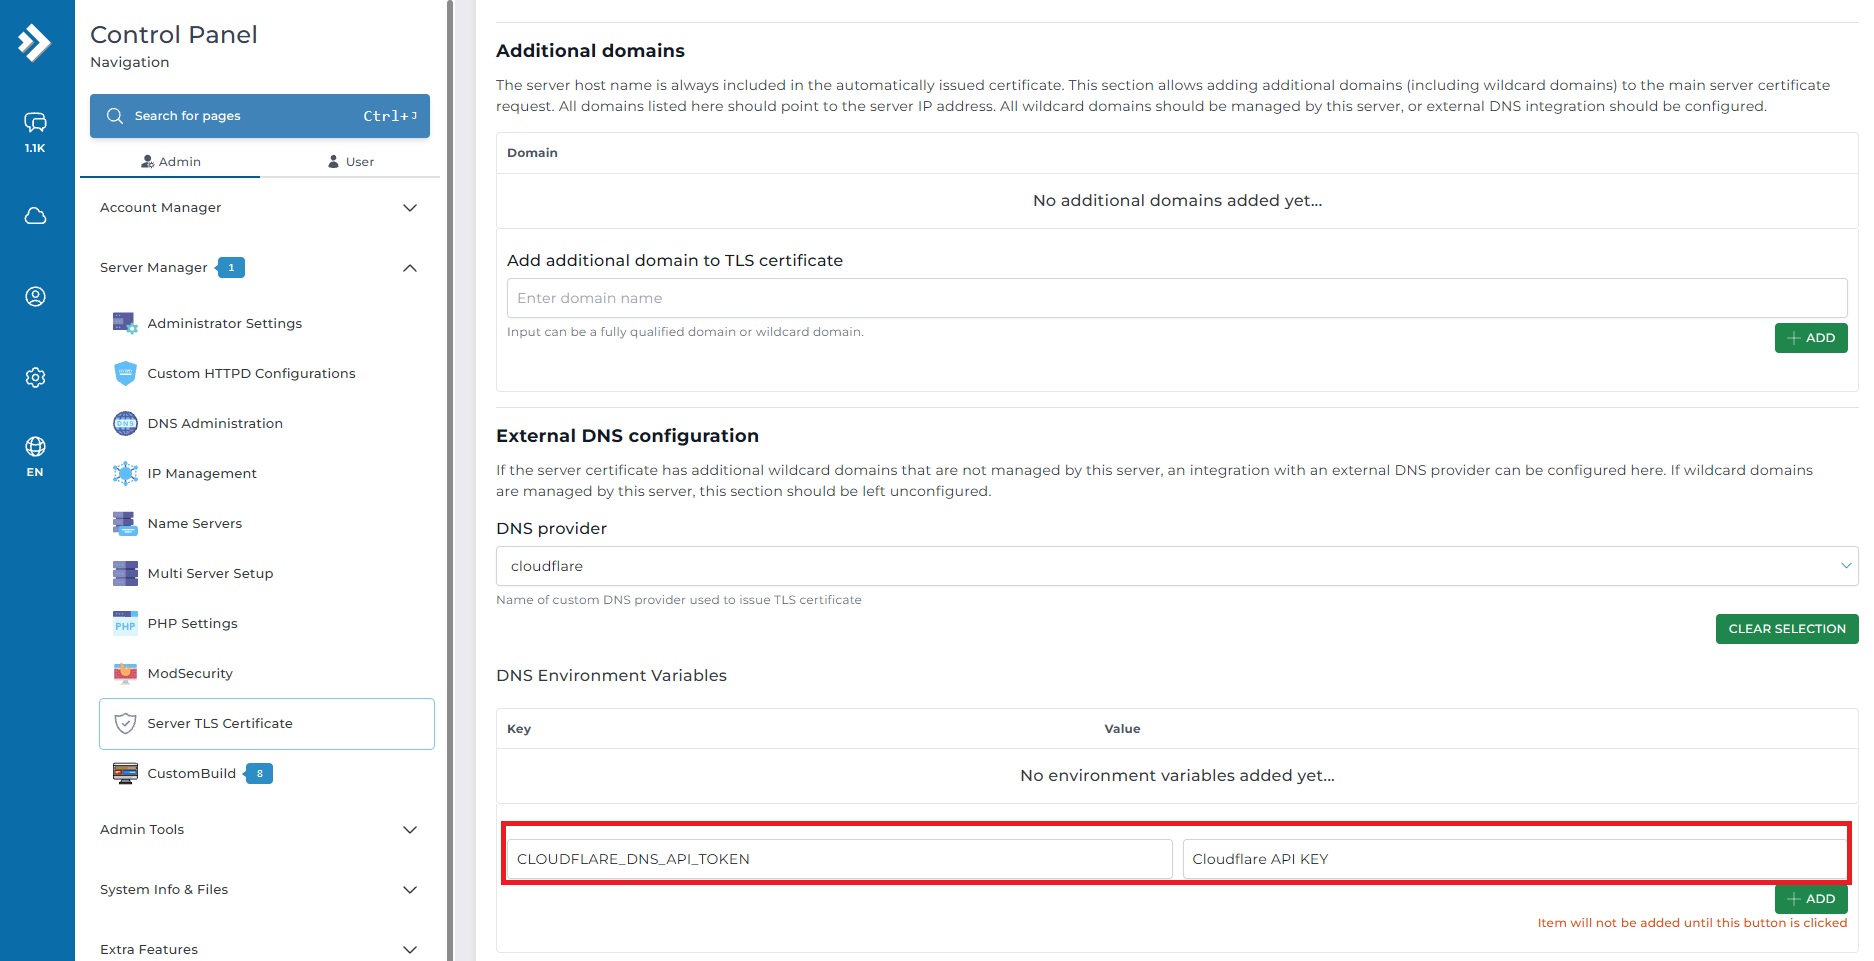
Always refer to official DirectAdmin’s guide Cloudflare DNS API-token instructions and server-hostname certificate guide
Verification
Confirm that the hostname https://server.example.com:2096/evo/ opens the DirectAdmin login page, TLS is valid in the browser and the server’s recovery access still works.
If you must revert the listenening port, use your existing SSH or console session to restore the recorded original port with da config-set port ORIGINAL_PORT (replace ORIGINAL_PORT with your target value). Confirm you can access with your target ports before closing the recovery session (SSH).
References
Through technology, we learn. Through sharing, we connect.
Explore more guides at https://kb.ipserverone.com/
For technical support / service enquiries, please reach out to support@ipserverone.com for assistance.