
Search Our Database
Delegate Access in Portal: Configuring Custom Roles for NovaCloud Resources
Introduction
Managing cloud infrastructure across growing organizations requires granular control and precise access governance. While assigning secondary user access lets team members assist with account management, granting unrestricted technical access across all cloud projects can introduce operational risks.
To address this, IP ServerOne introduces Custom Roles in the Customer Portal. This feature enhances Delegate Access by allowing primary account holders or administrators to define granular, project-specific, and resource-level permissions for authorized technical role users.
Custom Role Overview
While predefined secondary user roles provide general account-level access, Custom Roles introduce granular control over your NovaCloud resources.
With Custom Roles, administrators can control which Projects an authorized Technical Role user can access, which resources they can view or manage, and which actions they are allowed to perform.
- Which Projects an authorized technical role user can access.
- Which NovaCloud Resources (Instances, Volumes, Snapshots) they can view or interact with.
- Which Specific Actions they are permitted to execute.
Impact of Not Applying Custom Roles
As of 4-September-2026, NovaCloud manages project-level access based on project creation dates:
- Legacy Projects (Before 4 Sept 2026): Secondary users with the standard Technical Role default to Global Access, giving them full view and management rights across all existing projects and resources.
- New Projects (After 4 Sept 2026): Access is set to Strict No Access by default. Secondary technical role users cannot see or manage new projects unless an administrator explicitly creates and assigns a Custom Role linked to that project.
Why Custom Roles Matter:
- Mitigate Risk: Prevents unauthorized changes or accidental deletions on sensitive production workloads.
- Enforce Isolation: Restricts users to designated projects, ensuring team members only access environments required for their role.
Benefits of Custom Roles
- Restrict secondary user capabilities to only the specific tools and actions required for their job function (e.g., allowing a developer to reboot an instance without giving them authority to delete it).
- Limit team members to designated environments (e.g., Staging vs. Production projects).
- Minimize potential human error, prevent unauthorized resource deletion, and safeguard production workloads.
- Easily adapt, update, or revoke access permissions as team roles evolve.
Key Features & Available Permissions
Administrators can tailor permissions across multiple resource types within NovaCloud:
Instances:
- View Project details
- Create, Delete, and Rename instances
- Start, Stop, Reboot, Shelve, and Unshelve instances
- Resize instance resources
Volumes:
- Create and Delete volumes
- Attach and Detach volumes to/from instances
- Create volumes from images
- Rename and Resize volumes
Snapshots:
- Create snapshots
- Create volumes from snapshots
- Delete snapshots
How to Set Up and Assign Custom Roles?
Prerequisite
- Before assigning a Custom Role, ensure that the targeted user has already been added as an Authorized Secondary User under your primary account and assigned the Technical Role.
Step 1: Access Delegate Access Settings
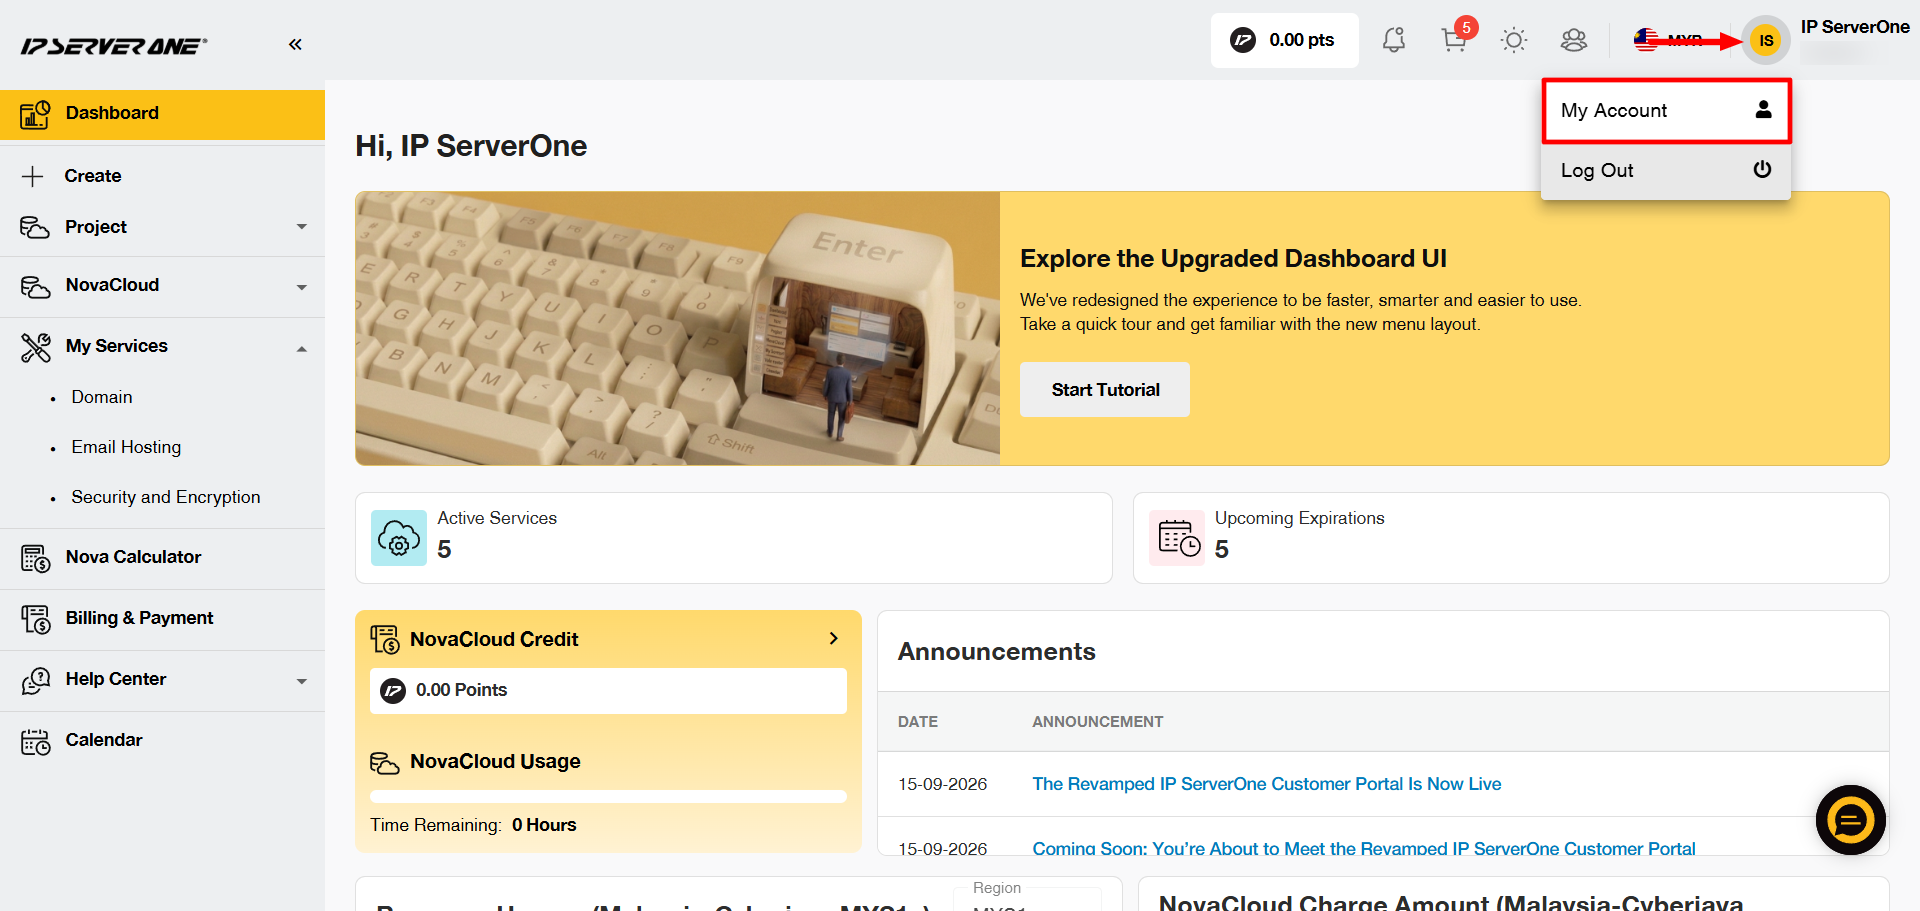
Log in to your Customer Portal at https://portal.ipserverone.com. Click your username in the top-right corner, then select My Account from the dropdown menu.
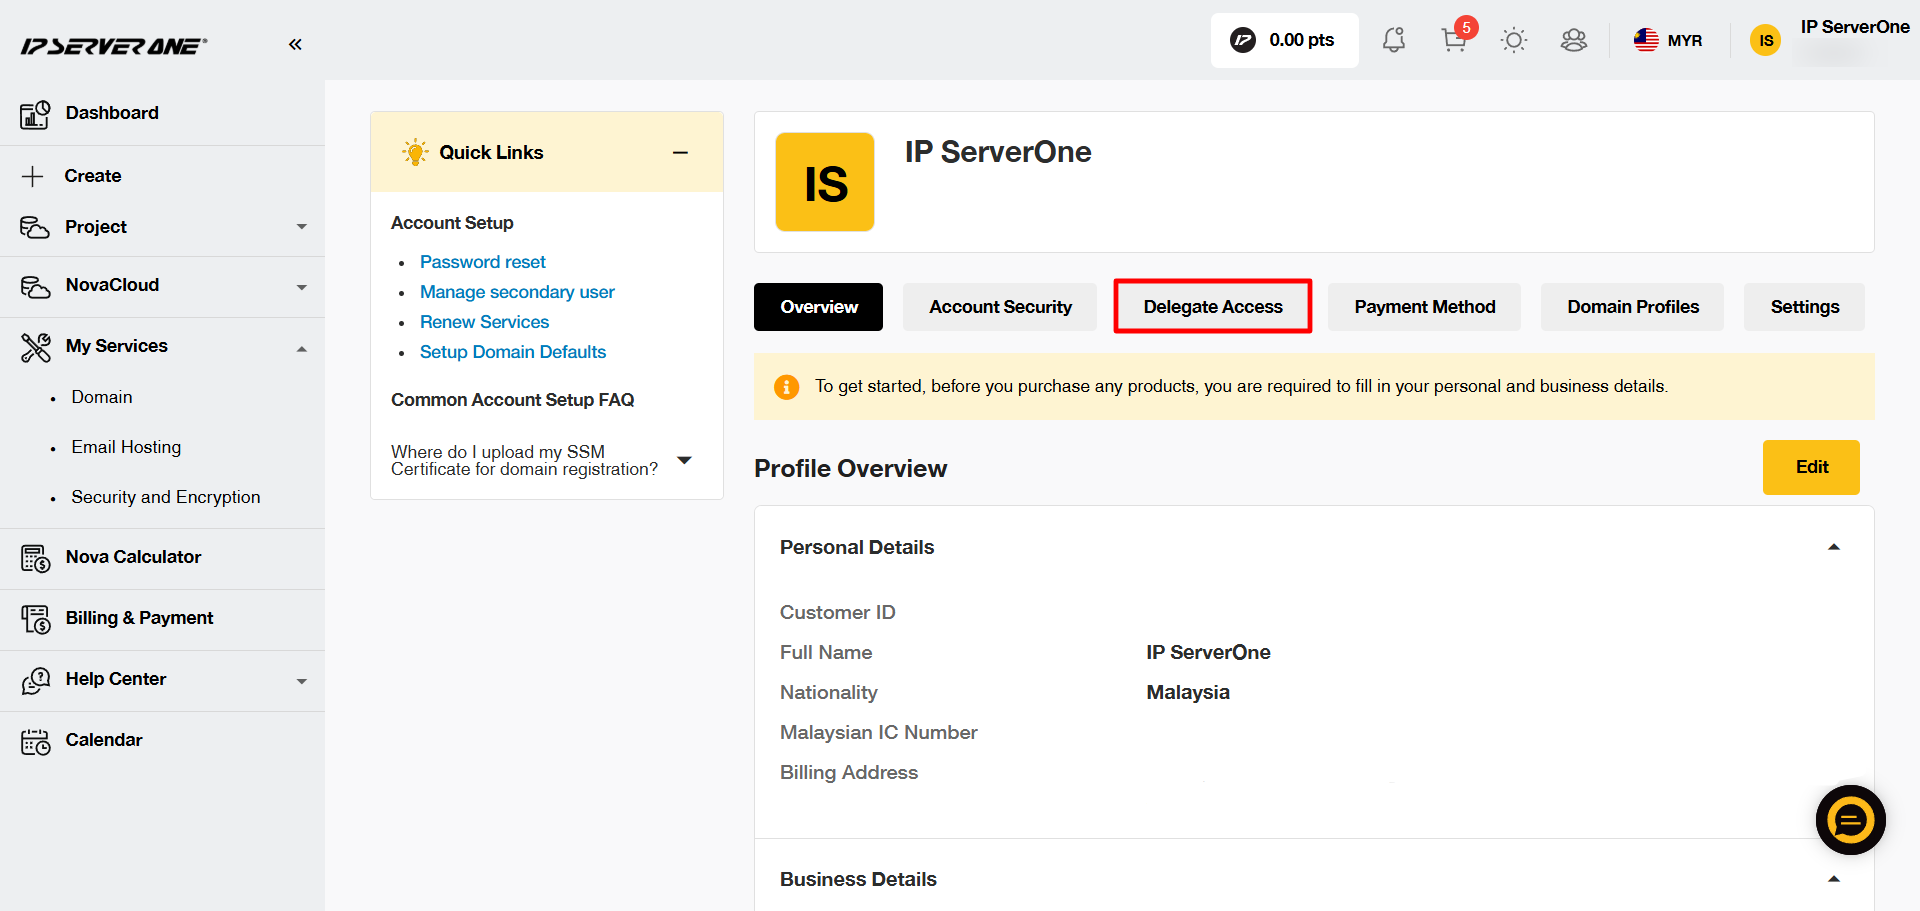
On the next page, click Delegate Access.
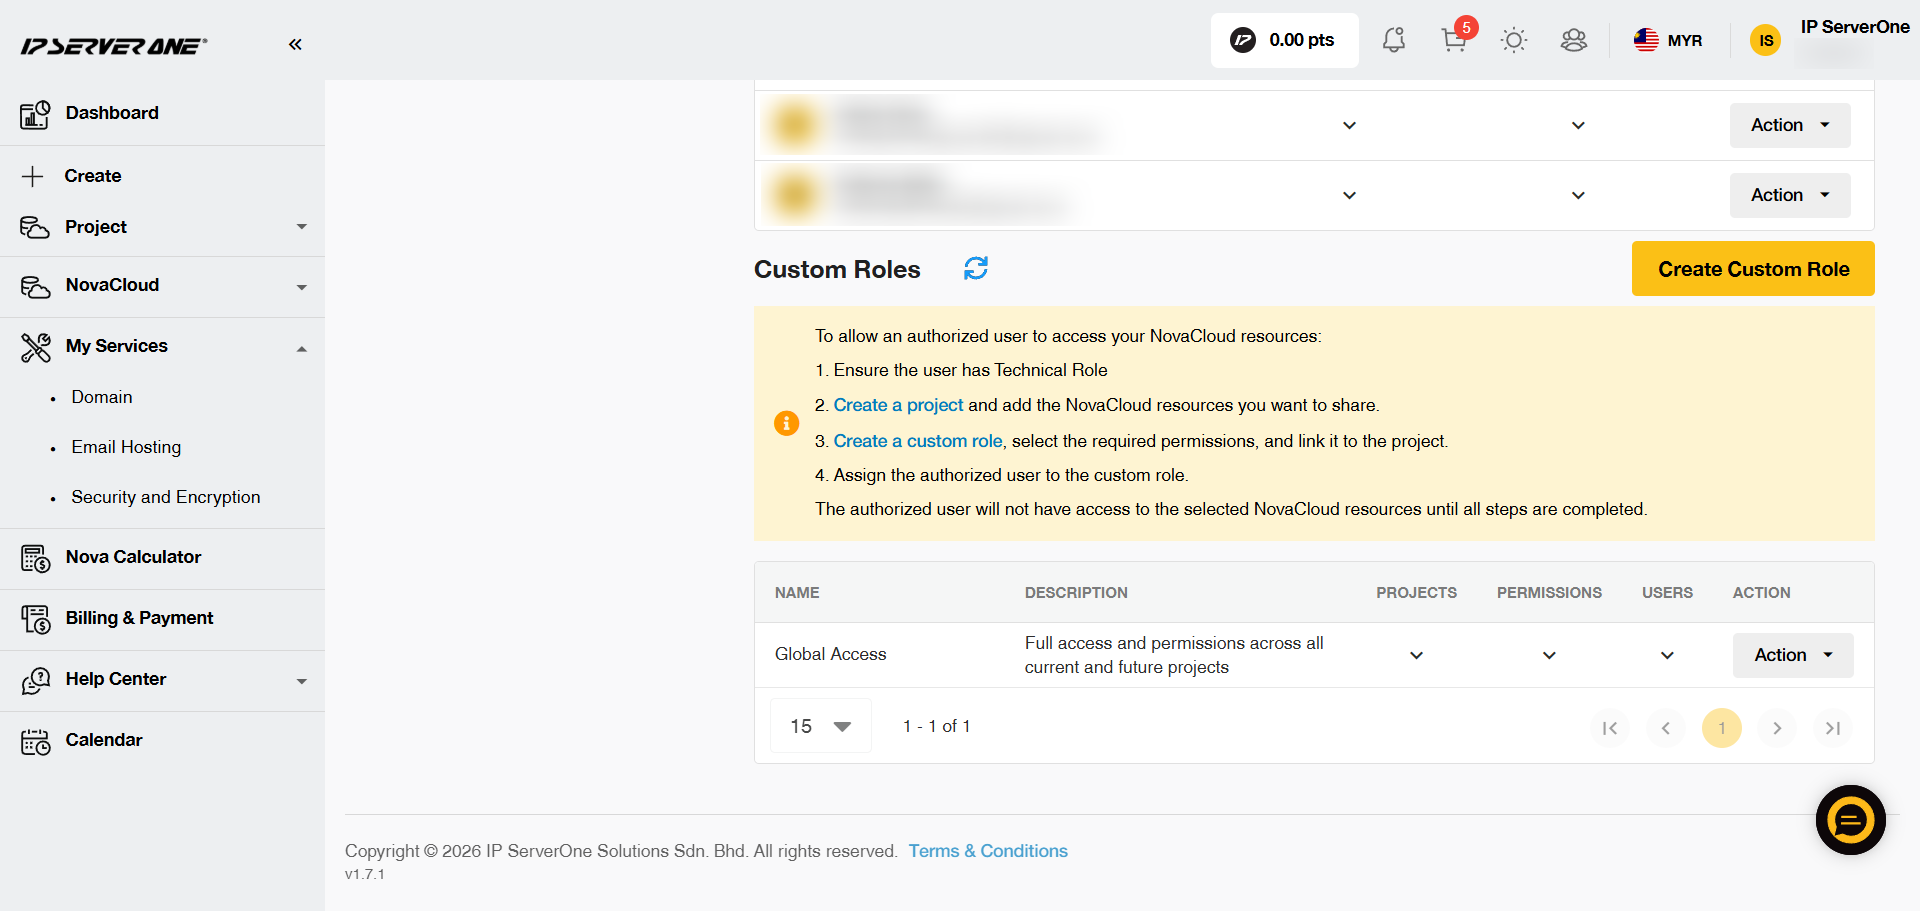
Then, scroll down to the Custom Roles section.
Step 2: Create a New Custom Role
Click Create Custom Role.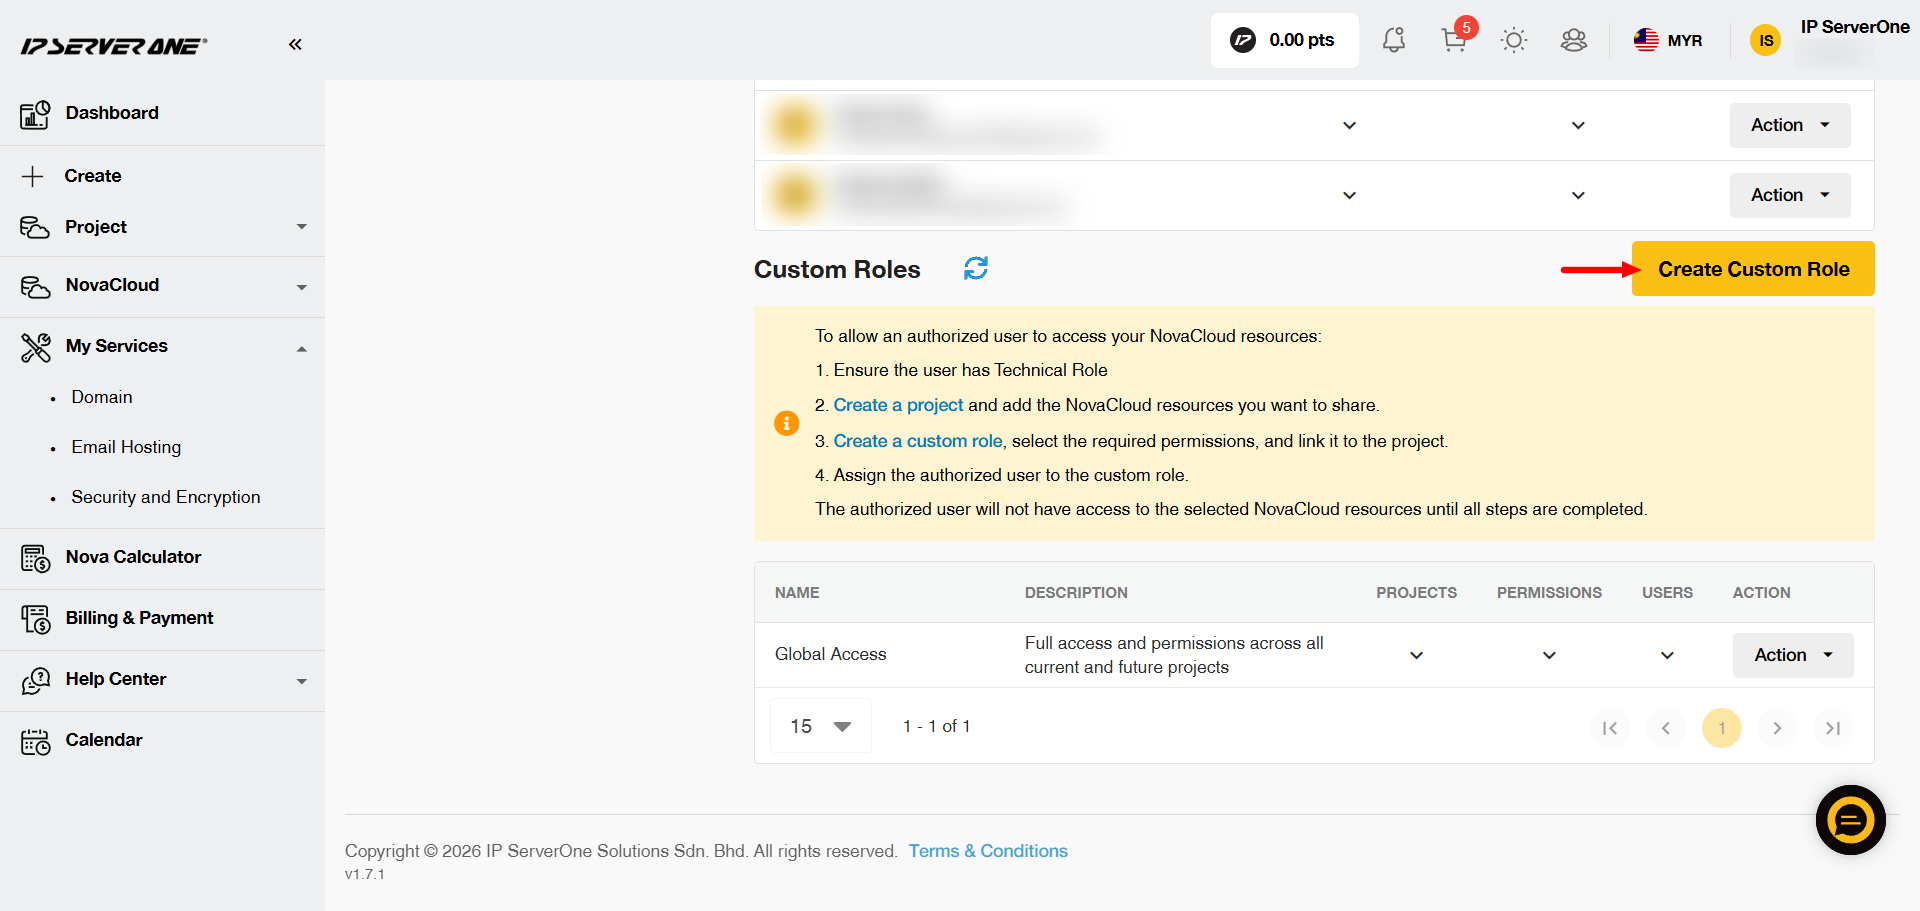
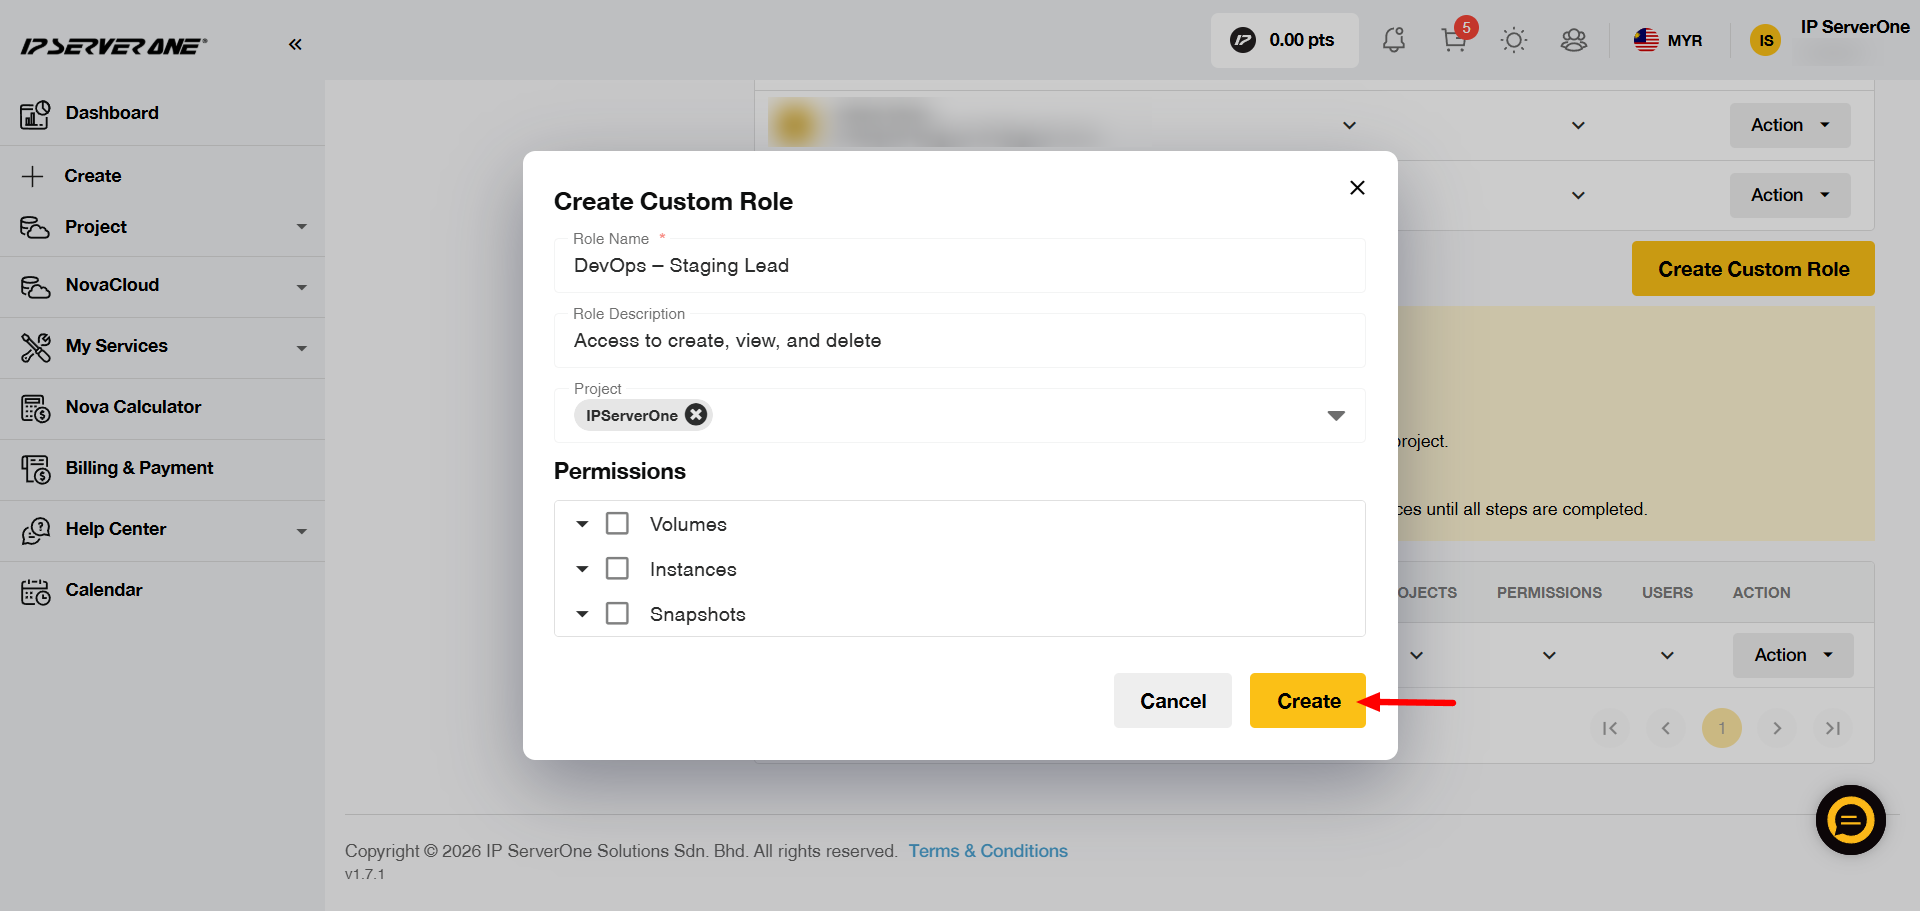
In the Create Custom Role window, fill in the required details:
- Role Name – Enter a clear name for the role, for example, DevOps – Staging Lead.
- Role Description – Enter a short description of the role and its purpose.
- Project – Select the project that you want to assign to the role.
- Permissions – Select the permissions you want to assign. Tick the main category to select all permissions under it, or expand the category and select only the specific permissions you need.
Once all the details and permissions are selected, click Create to save the custom role.
Step 3: Assign the Custom Role to an Authorized User
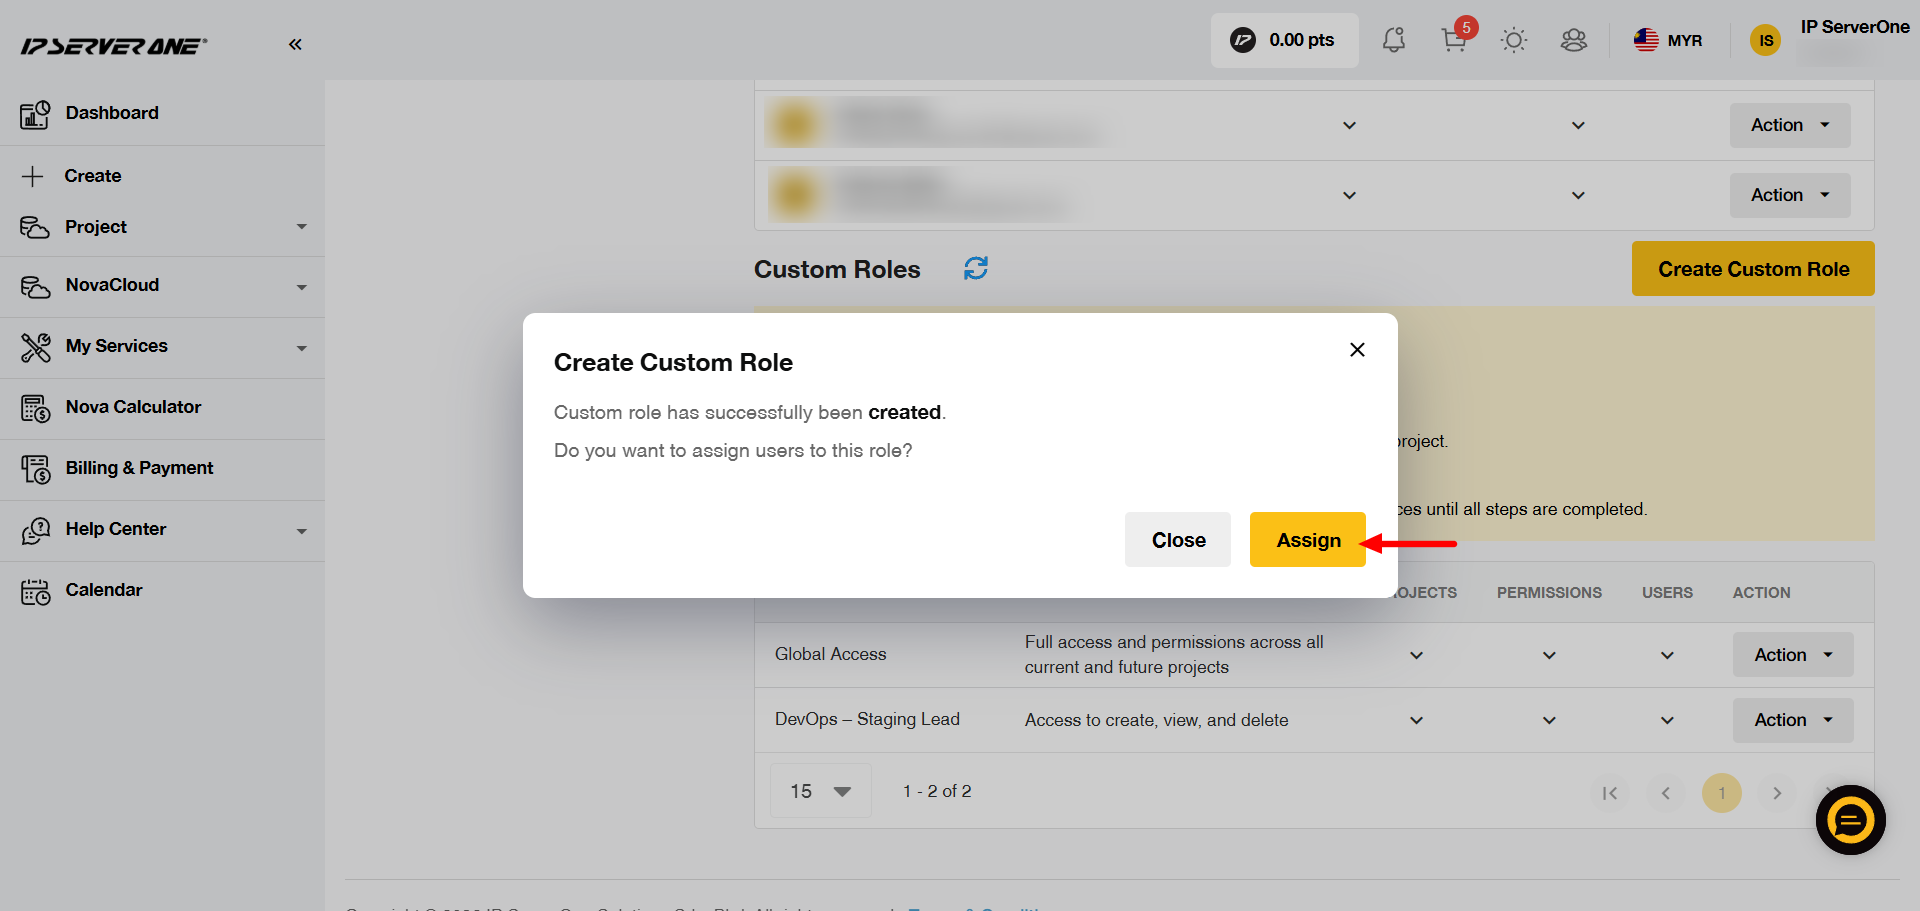
After the role is created, a confirmation pop-up will appear. If you want to assign the role to a user immediately, click Assign. If you prefer to assign users later, click Close.
Select the user(s) you want to assign to the role. You can select more than one user. Once done, click Assign Users to continue.
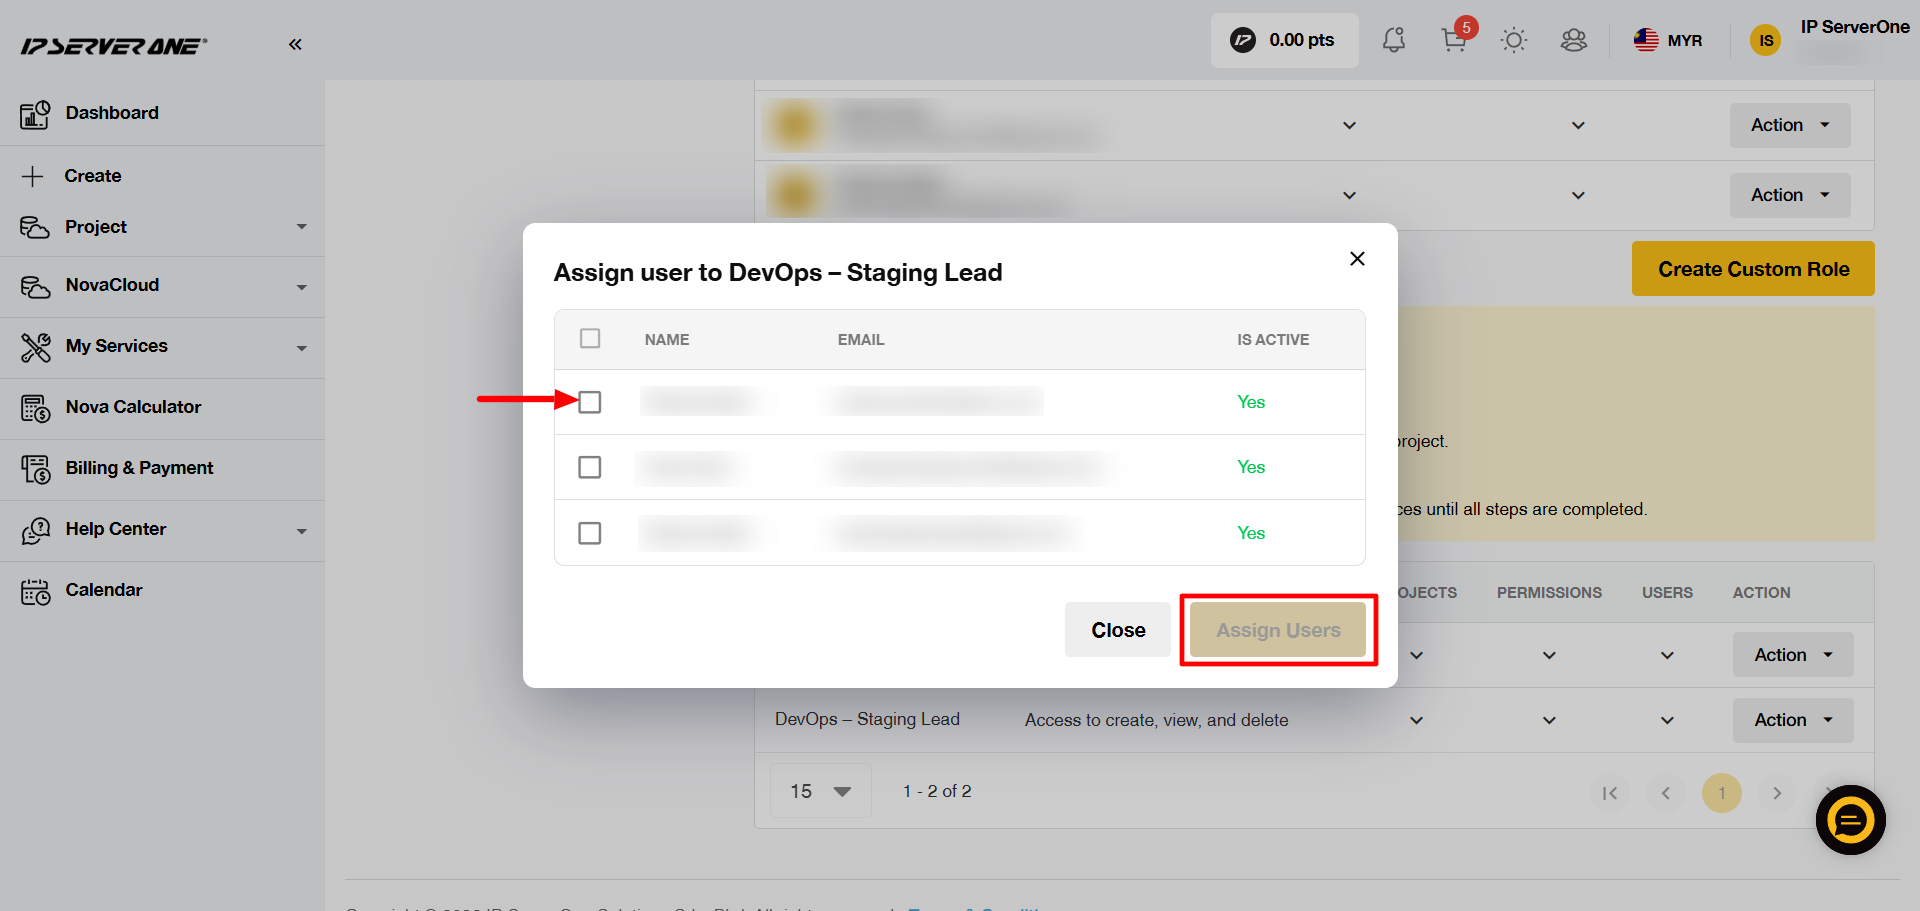
A confirmation message will appear once the selected user(s) have been successfully assigned to the designated project.
Note: Administrators retain full administrative control and visibility across all projects and resources at all times.
Managing Existing Custom Roles
Under the Custom Roles section on the Delegate Access page, each role will be listed in a table.
You can manage the role using the available options:
- Projects – Click the arrow to view or manage the projects assigned to the role.
- Permissions – Click the arrow to view or update the permissions assigned to the role.
- Users – Click the arrow to view, add, or remove users assigned to the role.
- Action – Click the Action button to edit the role name or description, or to delete the role.
Note: Deleting a custom role will remove the custom access permissions from all users assigned to that role.
Conclusion
By leveraging Custom Roles alongside Delegate Access, organizations can establish robust cloud security policies, enforce project separation, and maintain tight operational governance. Custom Roles ensure your technical teams have exactly the access they need—nothing more, nothing less.
If you require further assistance with setting up Custom Roles, please reach out to our Customer Support Team by submitting a support ticket in the portal or emailing us at cs@ipserverone.com.
Happy managing!