
Search Our Database
How to setup Calendar in Thunderbird
Introduction
Mozilla Thunderbird includes a built-in calendar that lets you manage appointments, meetings, and tasks directly alongside your email, without installing any add-on. This article explains how to set up a local calendar in Thunderbird on Windows 10/11, where all events are stored only on your computer and no online synchronization is required. It also covers how to set the calendar’s associated email address, which Thunderbird uses as your organizer identity, so that when you invite other people to your events, they receive a meeting invitation by email directly from Thunderbird. By the end of this guide, you will have a working local calendar and be able to send meeting invitations to others from it.
Prerequisite
Before you begin, make sure you have the following:
- Mozilla Thunderbird installed on a Windows 10 or Windows 11 computer. If you have not installed it yet, download the latest version from the official website (https://www.thunderbird.net/) and complete the installation first.
- At least one email account already set up in Thunderbird. This is required only for the meeting invitation part of this guide — Thunderbird saves an accepted invitation into the calendar whose email address matches the invitation recipient.
- No calendar server, online account, or synchronization setting is needed — a local calendar works entirely offline on your computer.
Step 1:Open the Calendar Tab
Thunderbird’s calendar lives in its own tab, which you can open from the Spaces Toolbar on the left side of the main window.
- Launch Mozilla Thunderbird on your computer.
- On the left side of the Thunderbird window, locate the Spaces Toolbar — the vertical column of icons for Mail, Address Book, Calendar, Tasks, and Chat.
- Click the Calendar icon in the Spaces Toolbar.
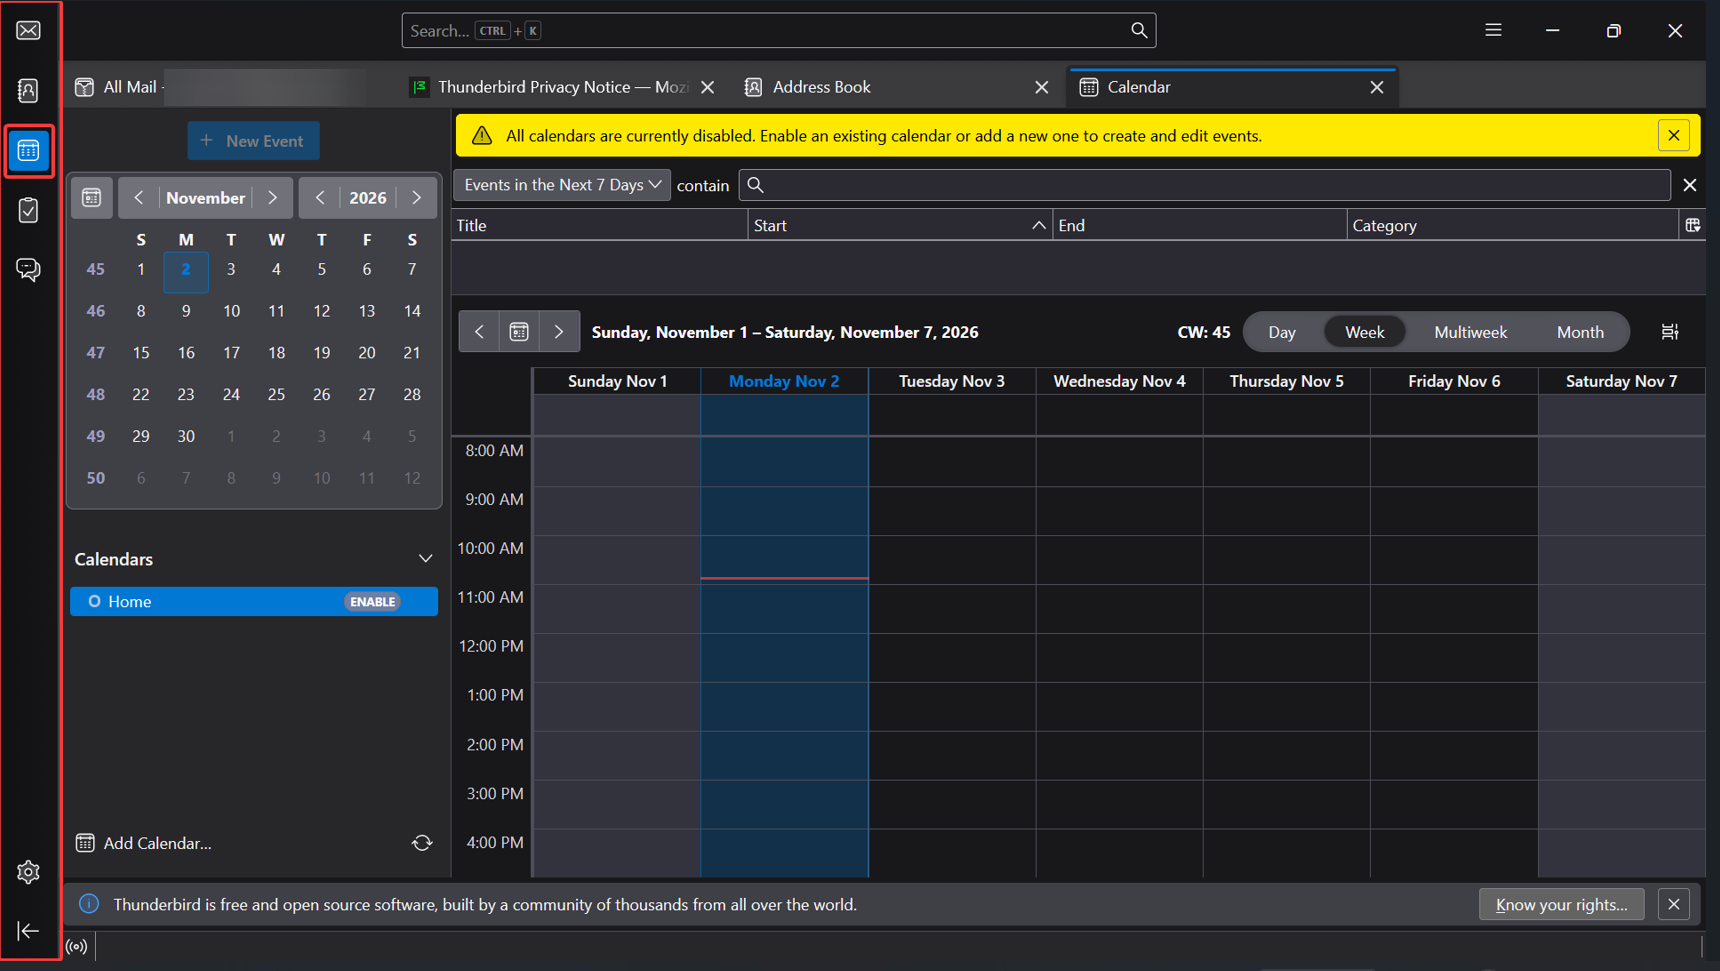
- The Calendar tab opens, showing the calendar view (by default in month view) with the calendar list panel on the left.
Step 2:Start Creating a New Calendar
With the Calendar tab open, you start the new calendar wizard from the calendar list panel.
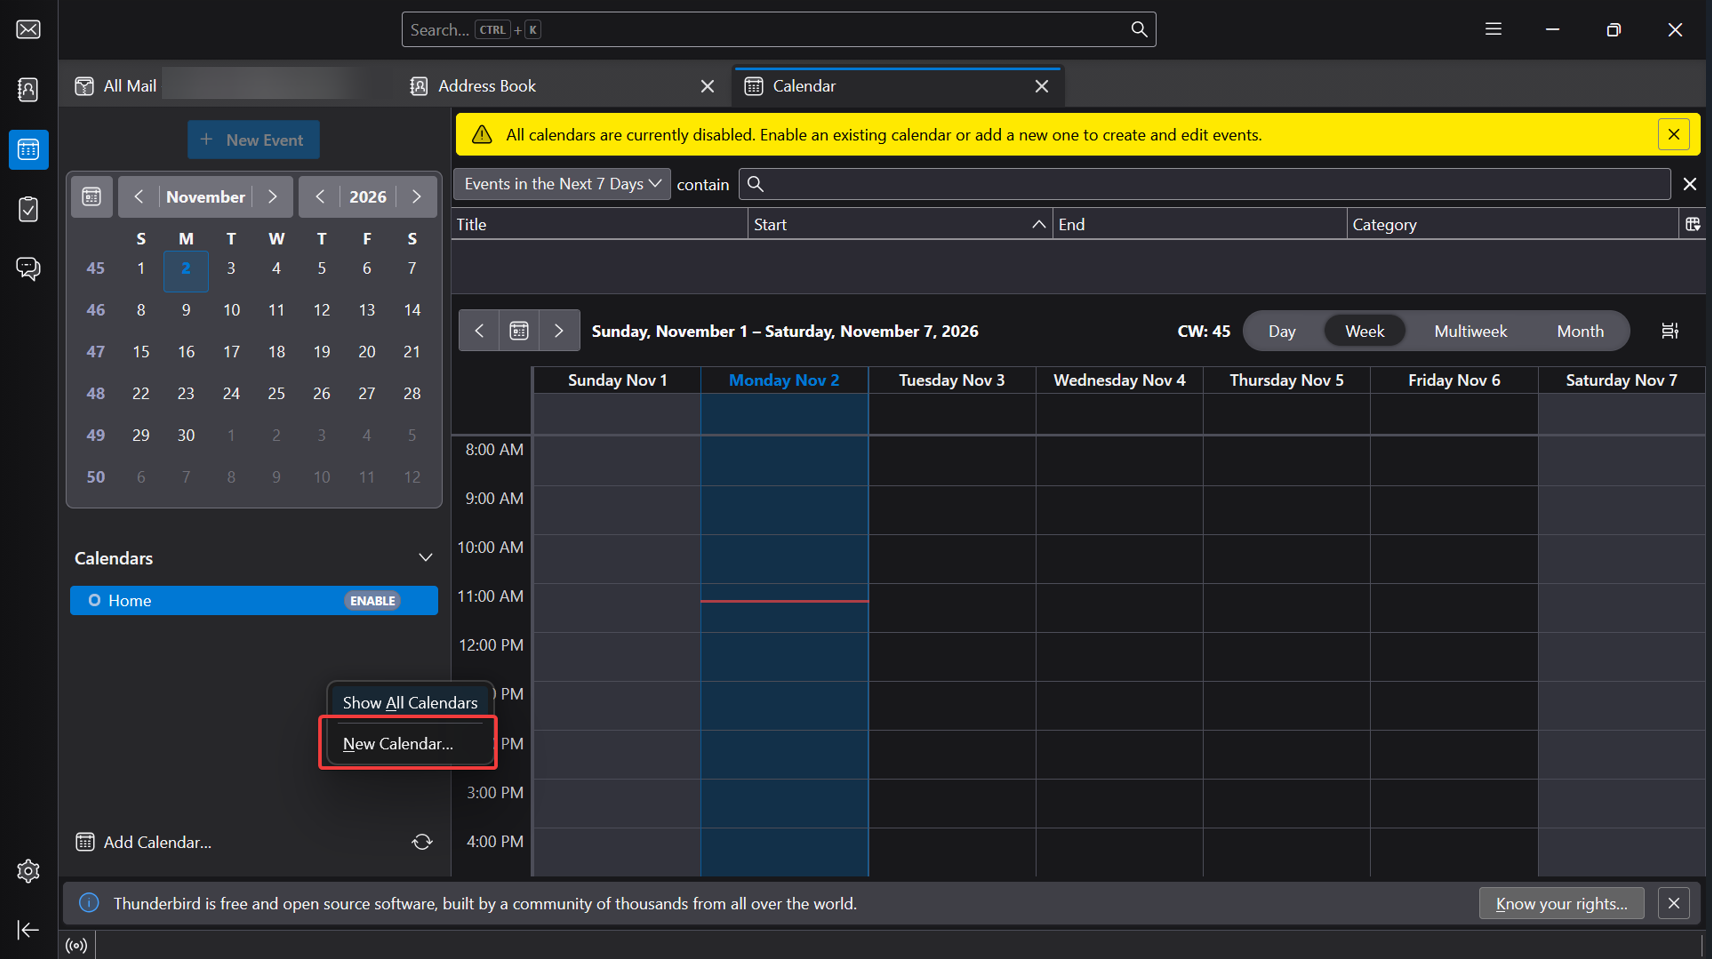
- In the Calendar tab, look at the left panel — this is the calendar list, showing all calendars Thunderbird knows about.
- Right-click anywhere inside the calendar list panel.
- Select New Calendar… from the context menu that appears.
Step 3:Choose On My Computer and Name the Calendar
The Create New Calendar wizard first asks where to store the calendar, then lets you name it and pick its color.
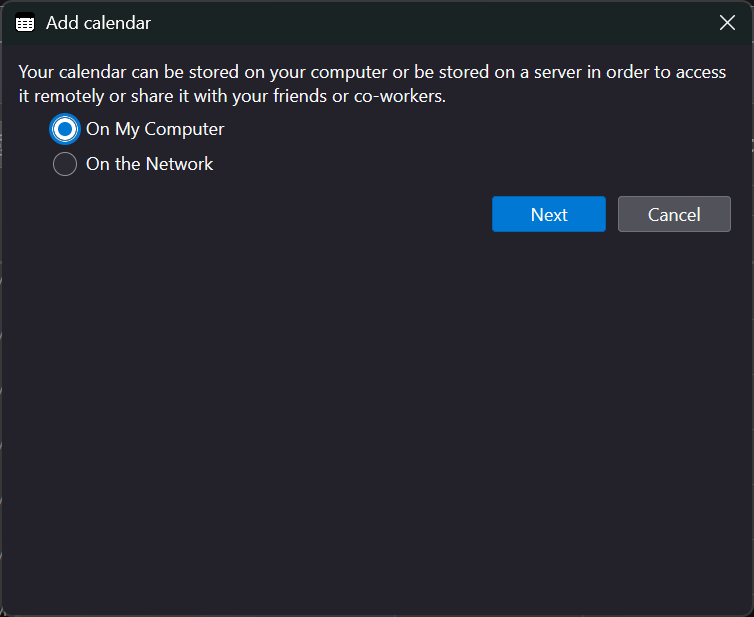
- The Create New Calendar wizard window opens, asking where you want to store your calendar.
- In the Create New Calendar wizard, select On my computer — this stores the calendar entirely on your own computer, with no online storage.
- Click Next.
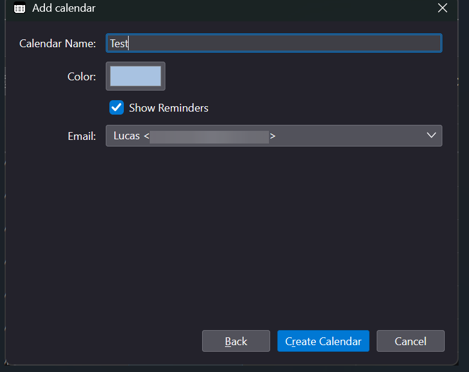
- In the Name field, type a name for your calendar, for example Test.
- Click the Color dropdown and select a color. This color identifies the calendar in the calendar list and colors its events in the calendar view.
- Click Create Calendar.
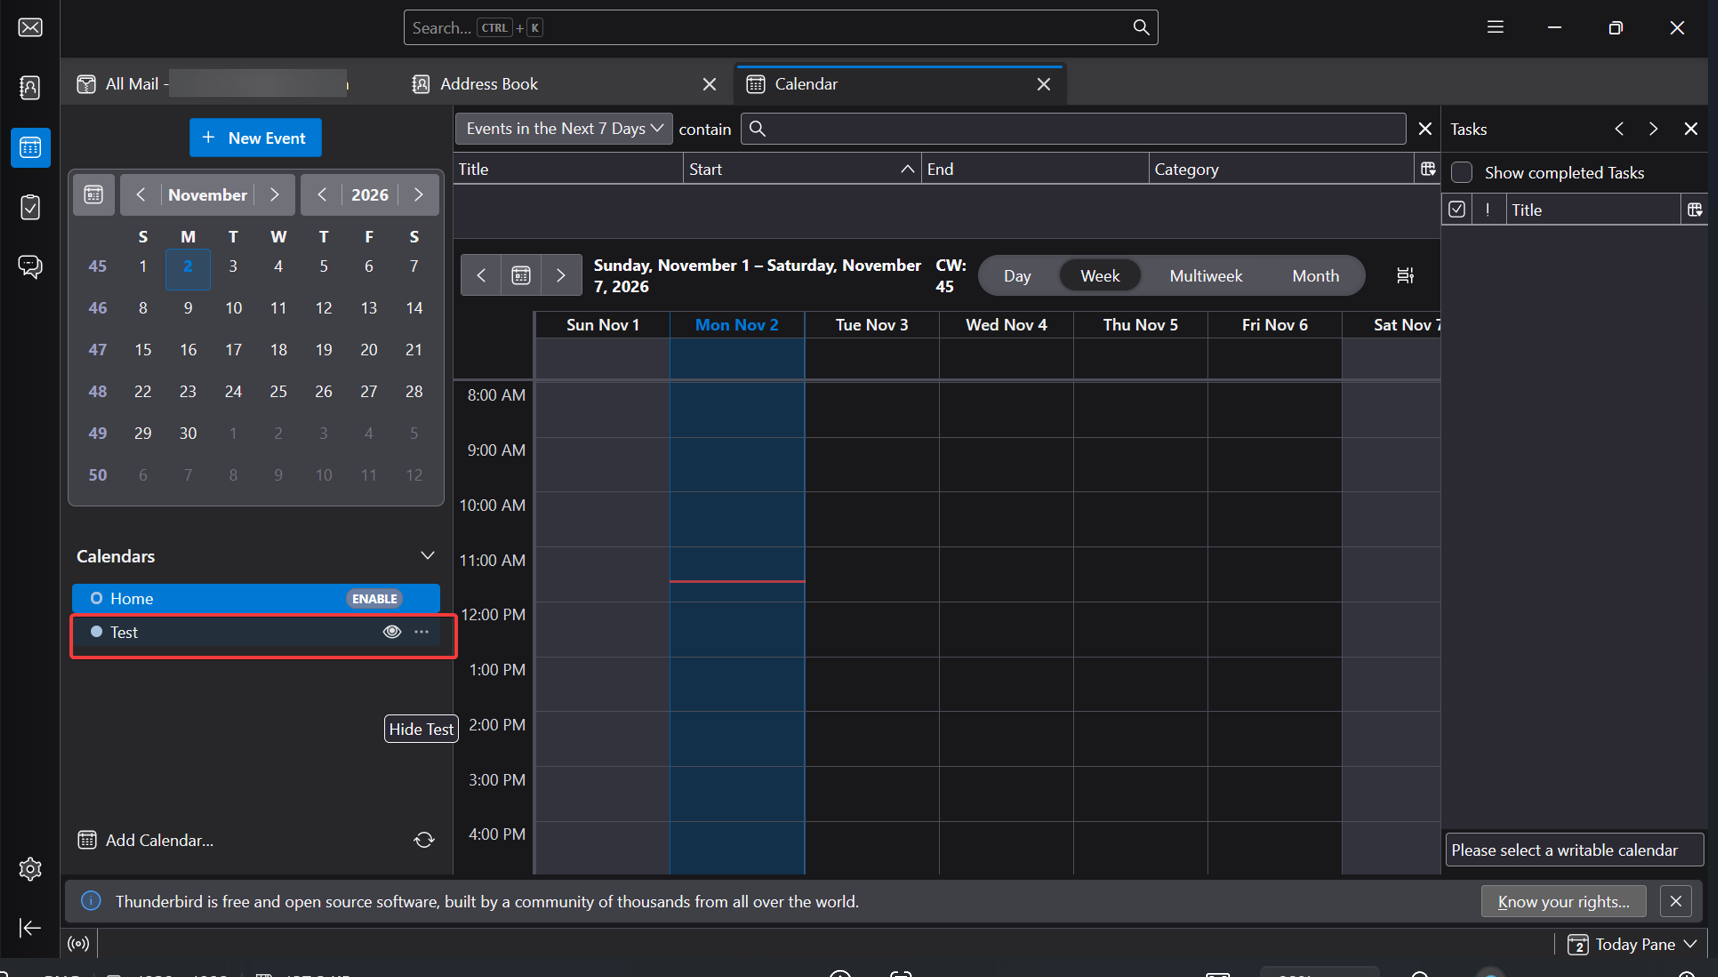
- The wizard closes, and your new calendar appears in the calendar list on the left side of the Calendar tab, showing the name and color you chose.
Step 4:Set the Calendar’s Email Address
This step links your calendar to your email account. The linked address becomes the organizer identity Thunderbird uses when you send meeting invitations in Step 6.
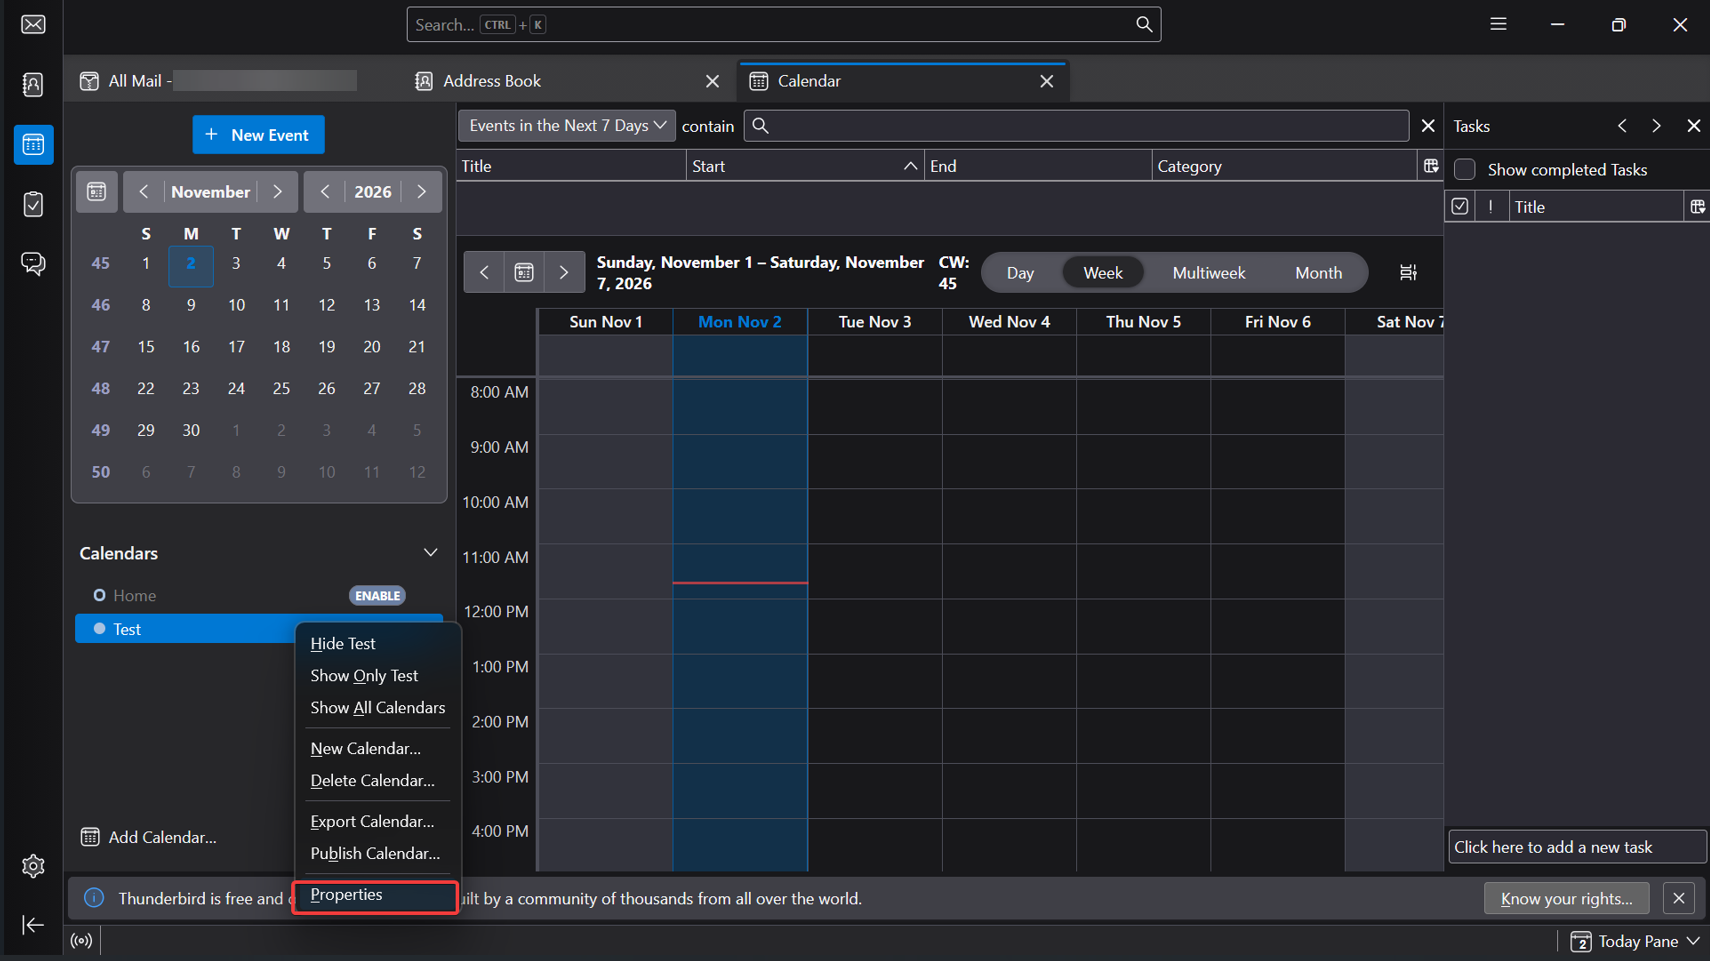
- In the calendar list on the left, right-click the calendar you created in Step 3.
- Select Properties from the context menu. The Calendar Properties window opens.
- Click the Email dropdown and select the email account whose address should appear as the organizer on your invitations.
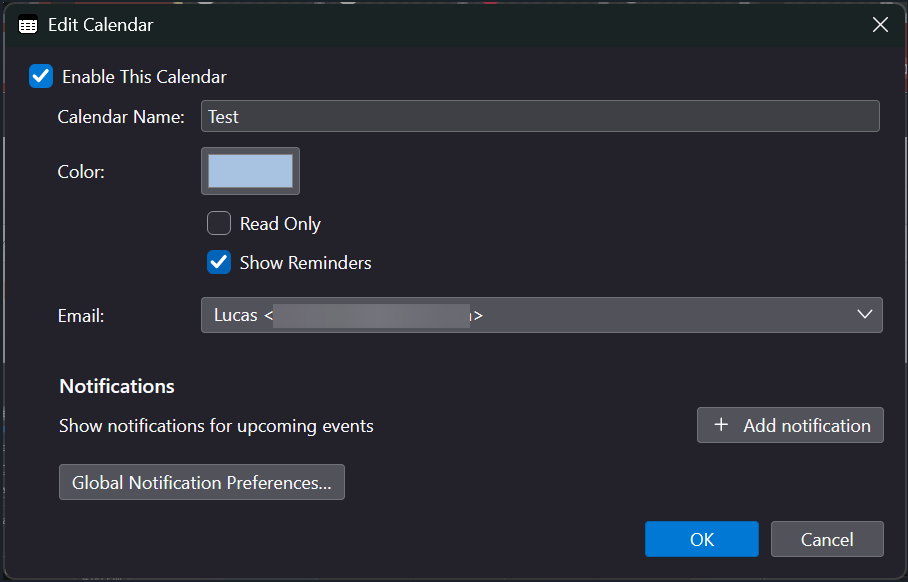
- Click OK.
Step 5: Create a Test Event
This step verifies that the calendar was created correctly and is ready to store events.
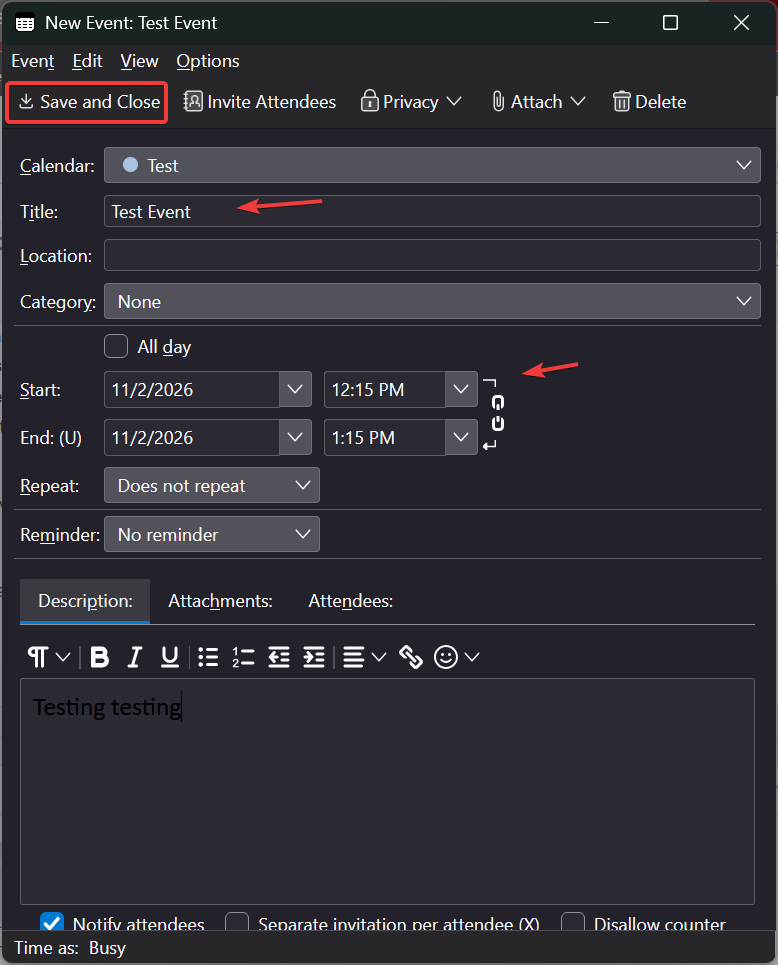
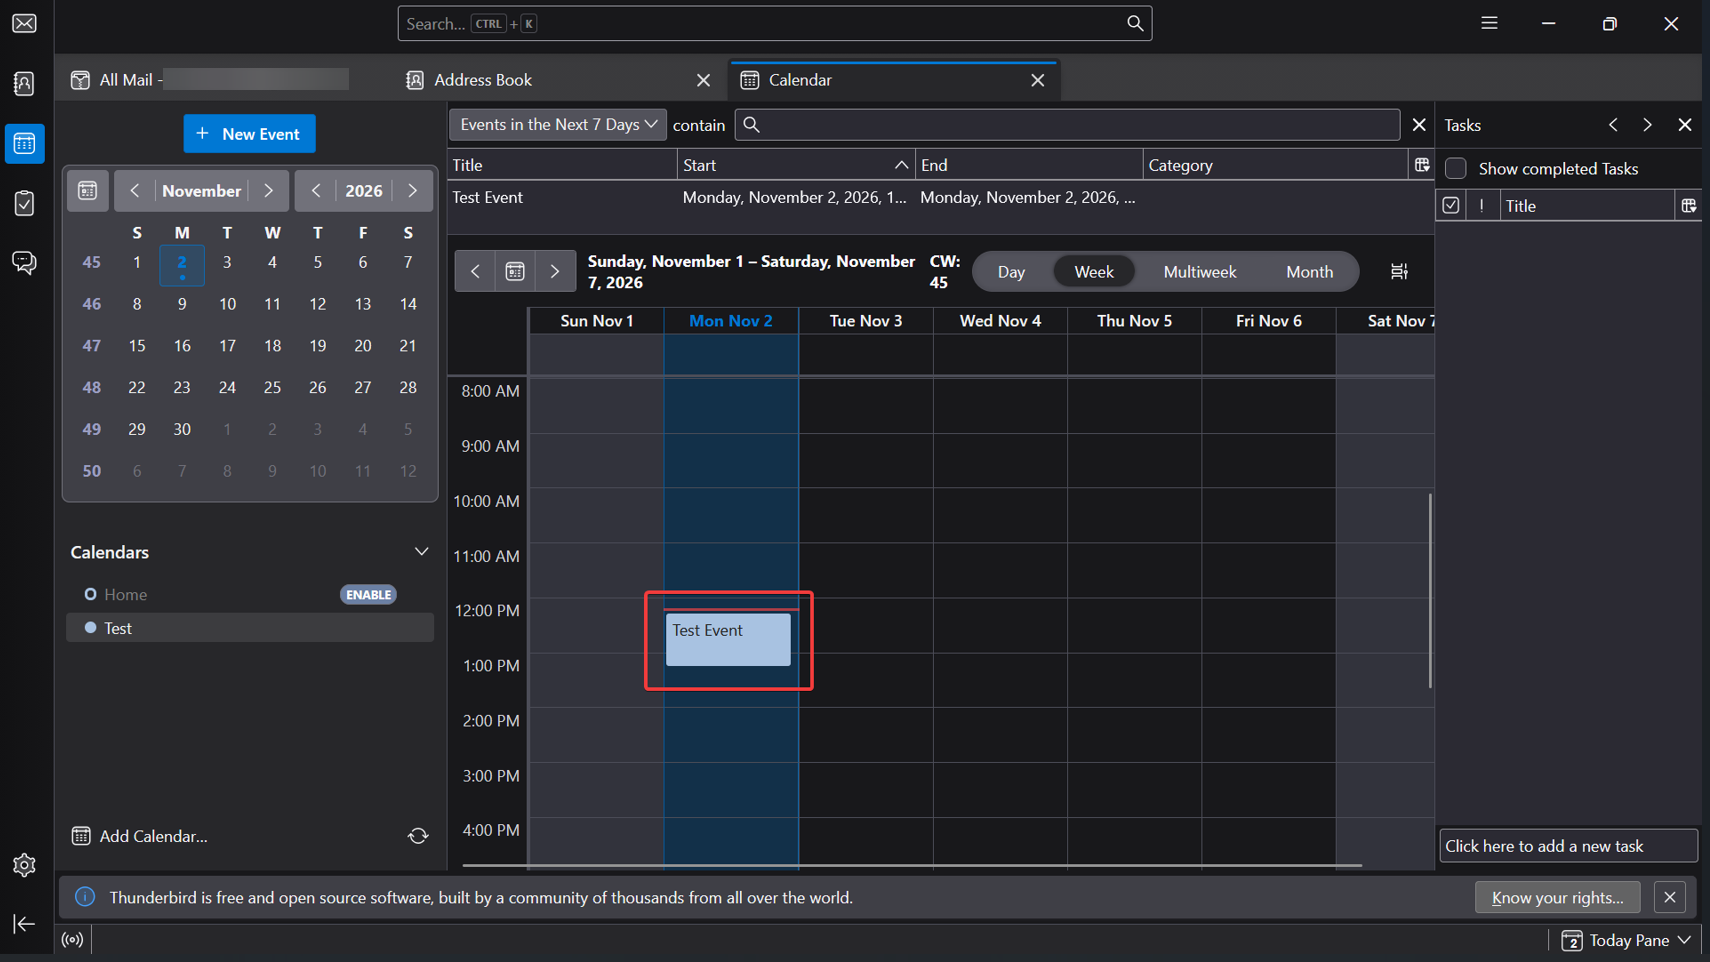
- In the Calendar tab, double-click on any empty day in the calendar grid. The New Event window opens.
- In the Title field, type a name for the test event, for example Test Event.
- Click the Calendar dropdown and make sure your new calendar (created in Step 3) is selected.
- Set the Start and End time for the event.
- Click Save and Close.
- The New Event window closes, and the test event appears in the calendar grid in your calendar’s color.
Step 6: Invite Others to an Event
This step shows how to invite other people to an event, so they receive a meeting invitation by email directly from Thunderbird.
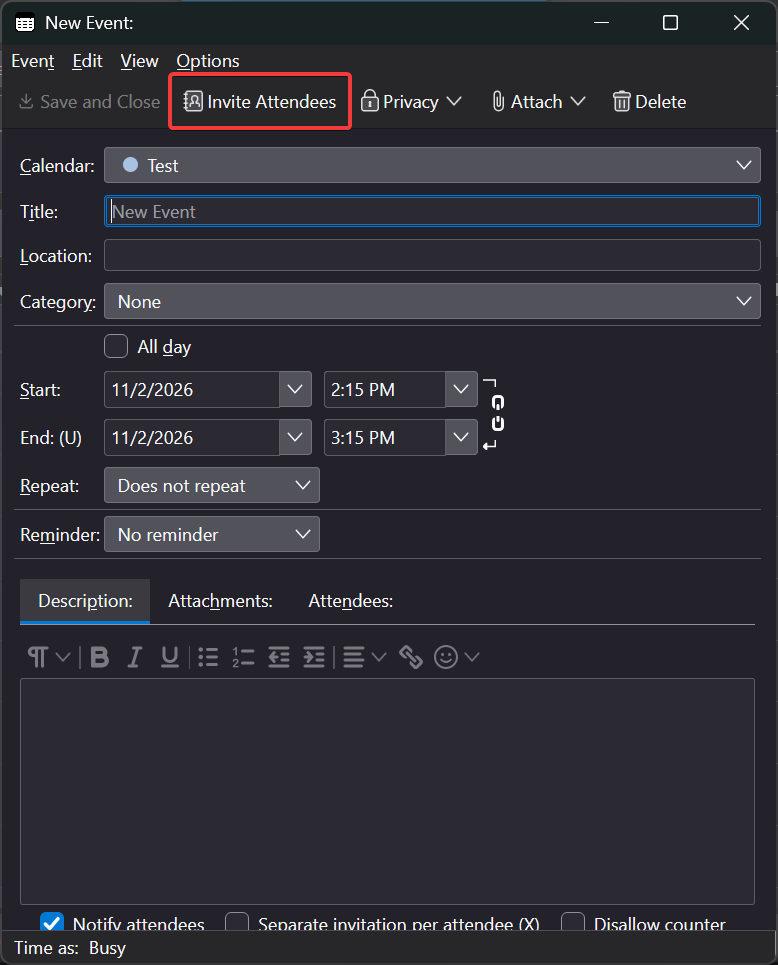
- In the Calendar tab, double-click on an empty day in the calendar grid. The New Event window opens.
- Click the Invite Attendees button on the toolbar of the New Event window. An attendee panel opens on the left side of the window, with your own email address already listed as the organizer (the address you linked in Step 4).
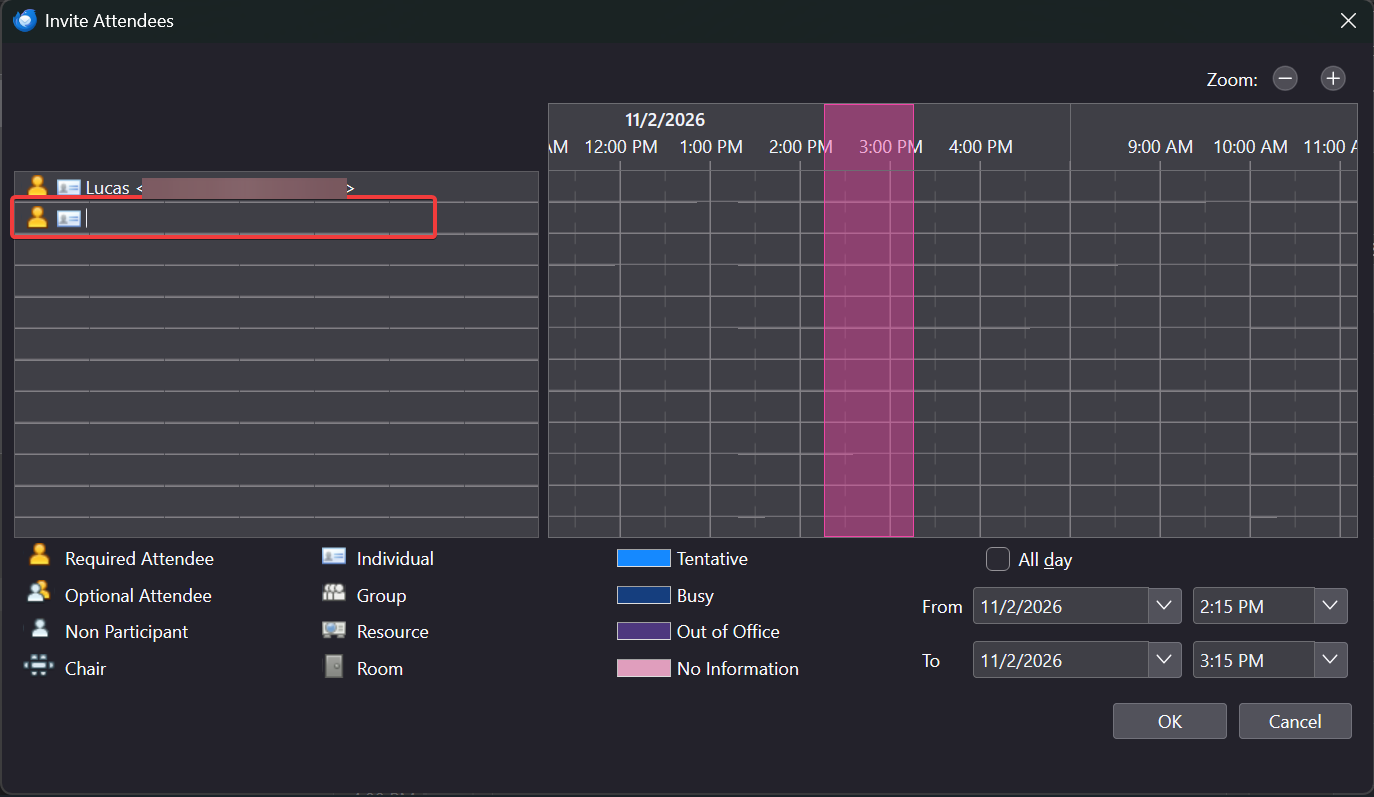
- In the attendee field, type the email address of the person you want to invite and press Enter. Repeat for additional attendees.
- Fill in the Title, Start, and End of the event. The people you want will be shown in Attendees.
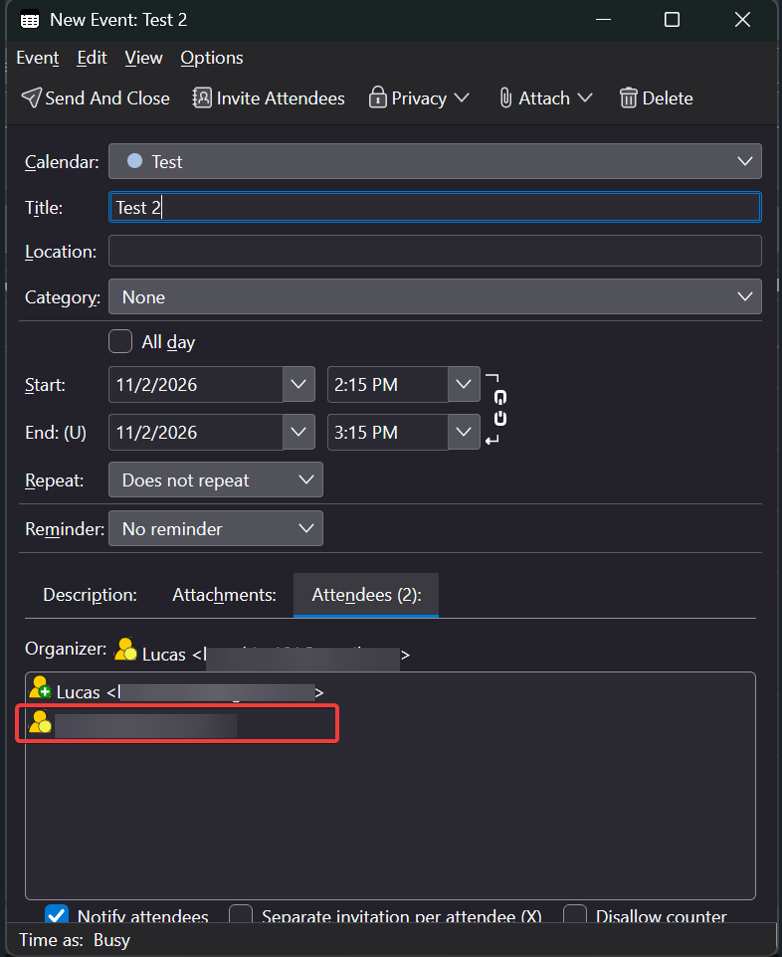
- Click Save and Close. Thunderbird asks whether to send an invitation email to the attendees.
- Click Send.
Thunderbird sends the invitation email from your email account to every attendee.
Conclusion
You have successfully set up a local calendar in Mozilla Thunderbird on Windows. Starting from the Calendar tab, you created a new calendar stored on my computer, gave it a name and color, and linked it to your email account so Thunderbird uses it as your organizer identity. You then verified the calendar by creating a test event, and used the Invite Attendees feature to send meeting invitations by email directly from Thunderbird — without any calendar server or online synchronization, since everything is stored locally on your computer.
From here, you can create events and invite attendees anytime.
For additional assistance or if you encounter any issues, please contact our support team at support@ipserverone.com.